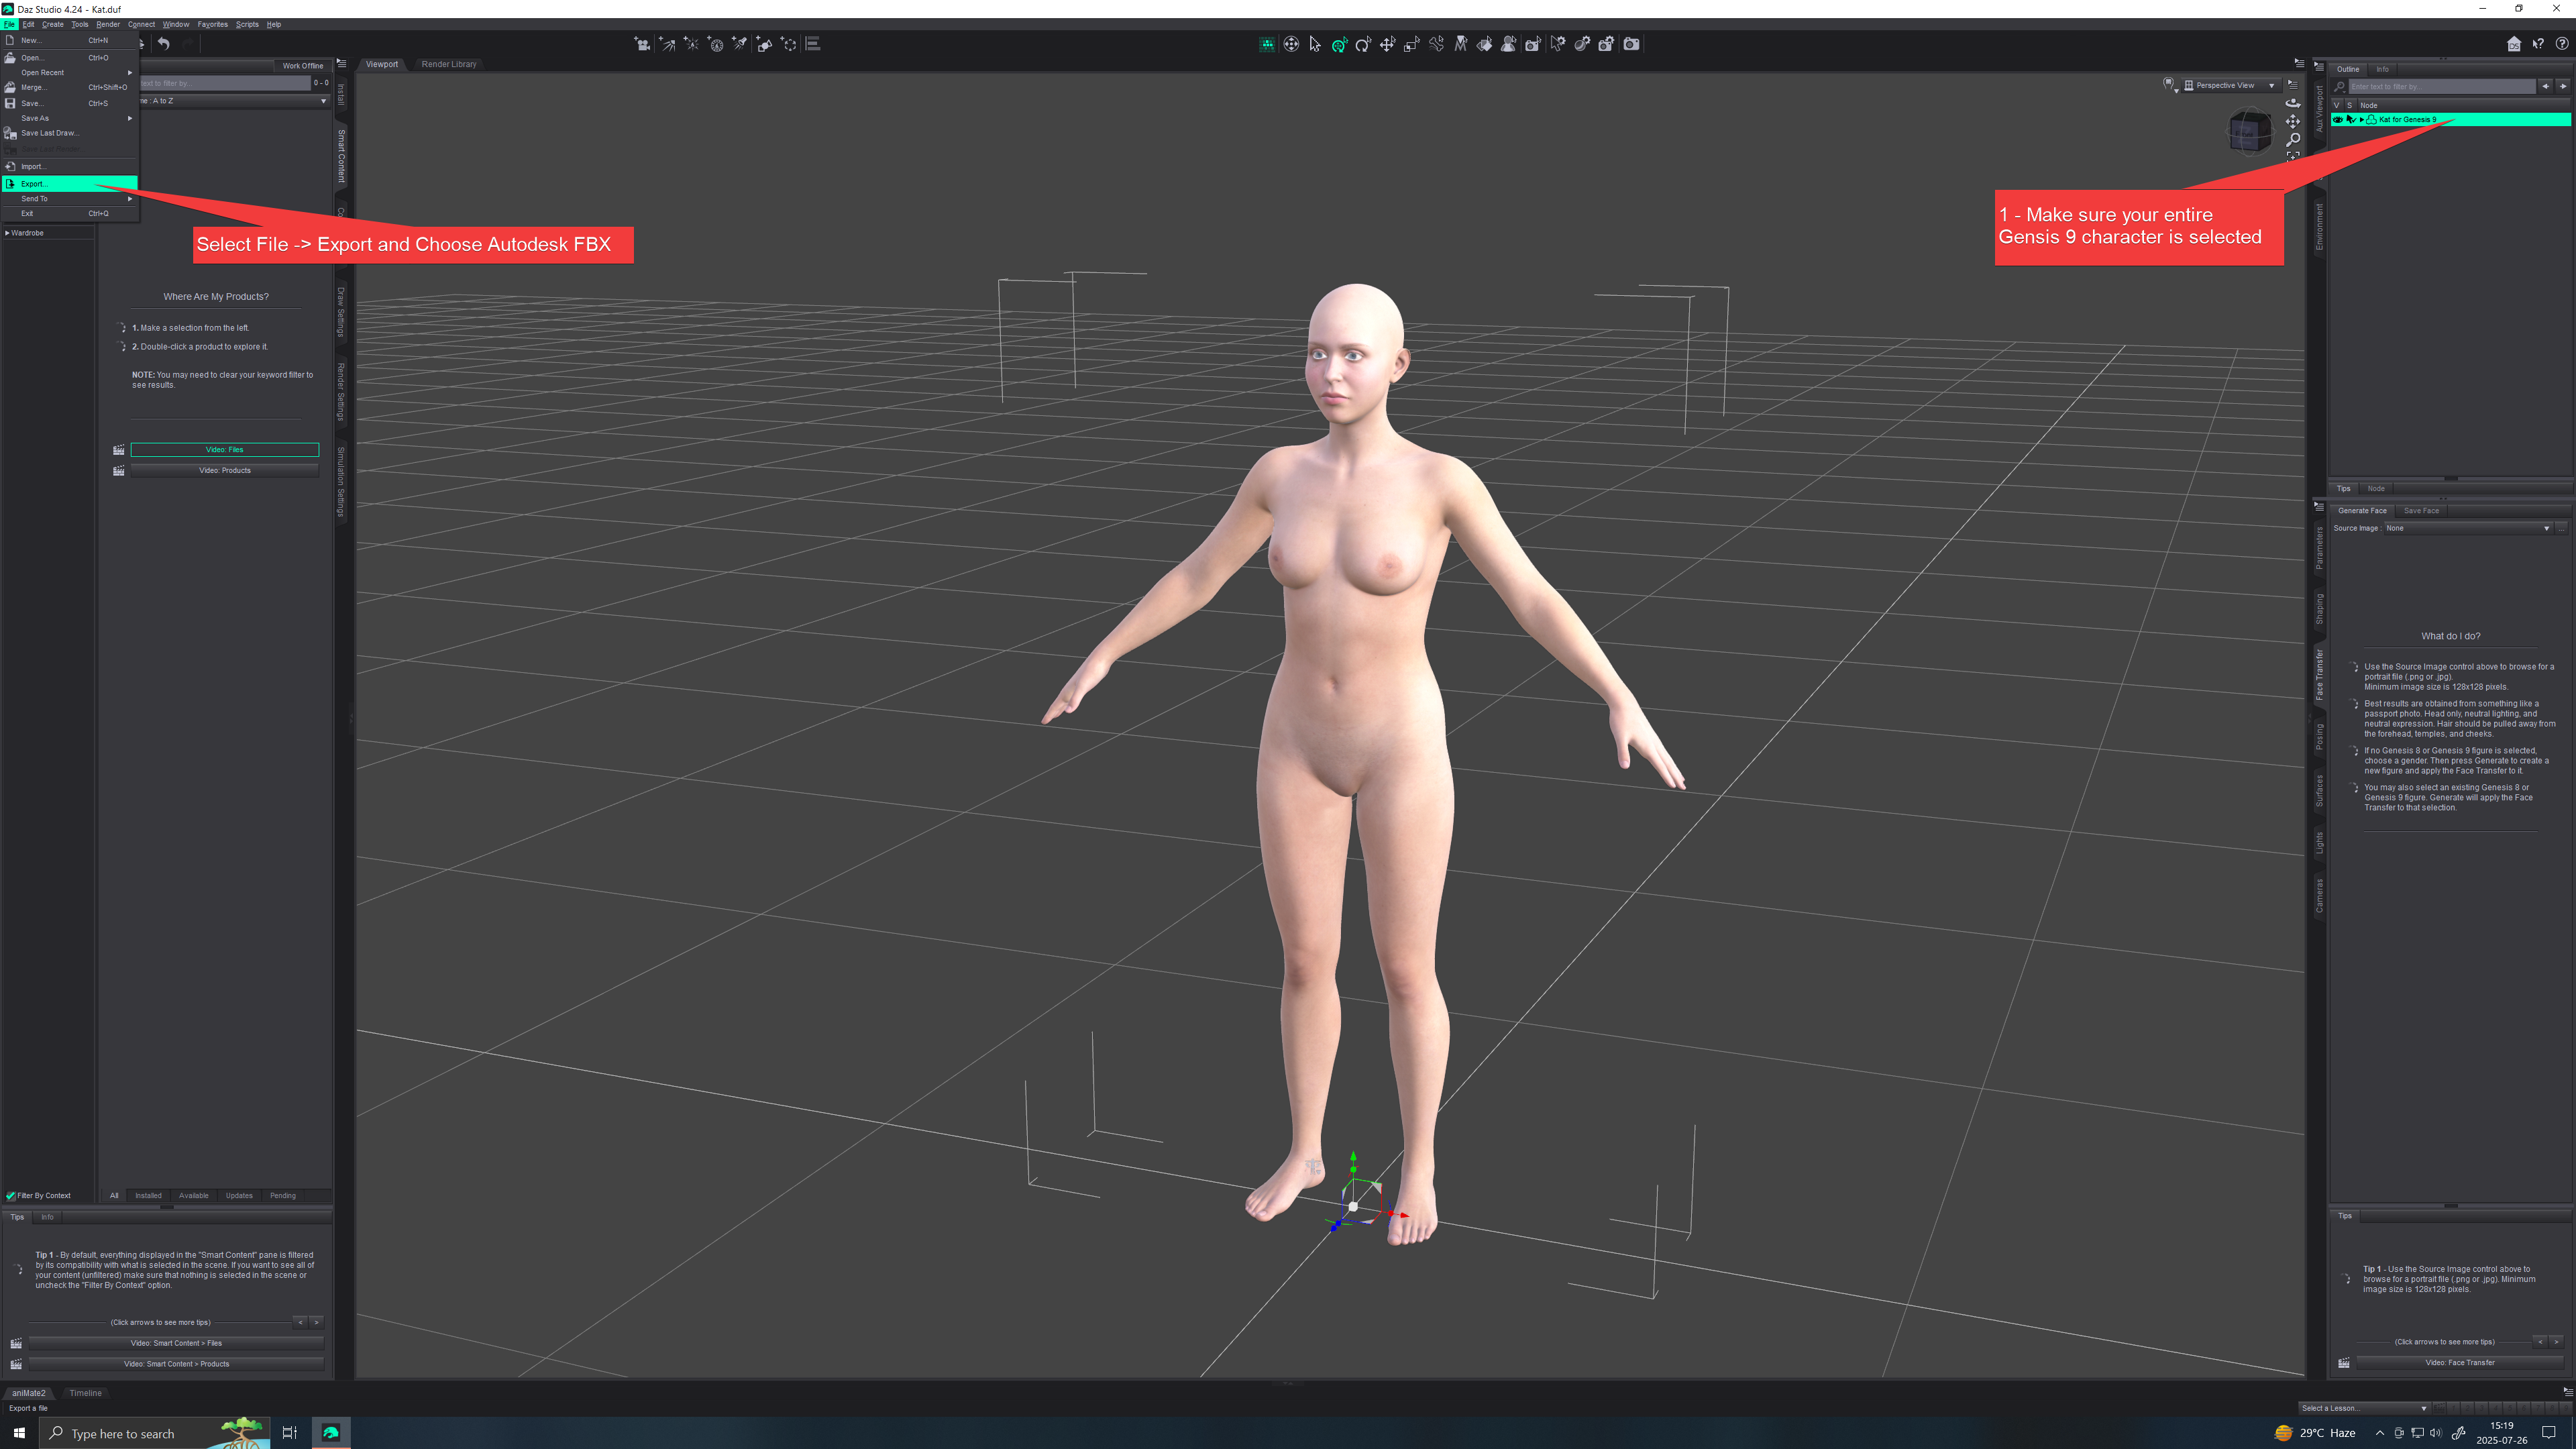
Open DAZ 3D, open your Genesis 9 character or create a new one. In this tutorial, I chose Kat with no props.
With your Genesis 9 character selected, click File → Export and Choose Autodesk FBX
☝🏼
- TBD - Karim: How about including Morphs?
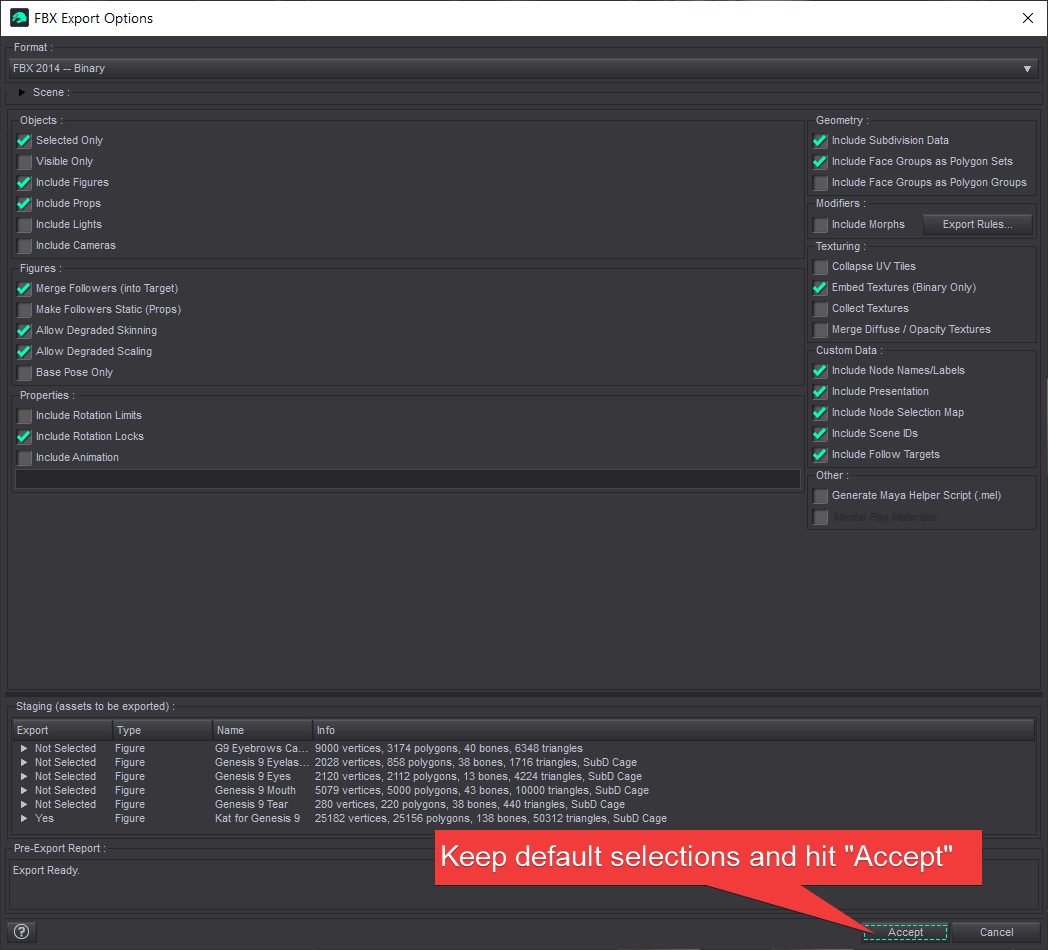
Keep the default Selections (as of version 4.24 of DAZ Studio) and Hit accept:
- We are done with DAZ 3D!
- In UE, either in 1st or a 3rd person project
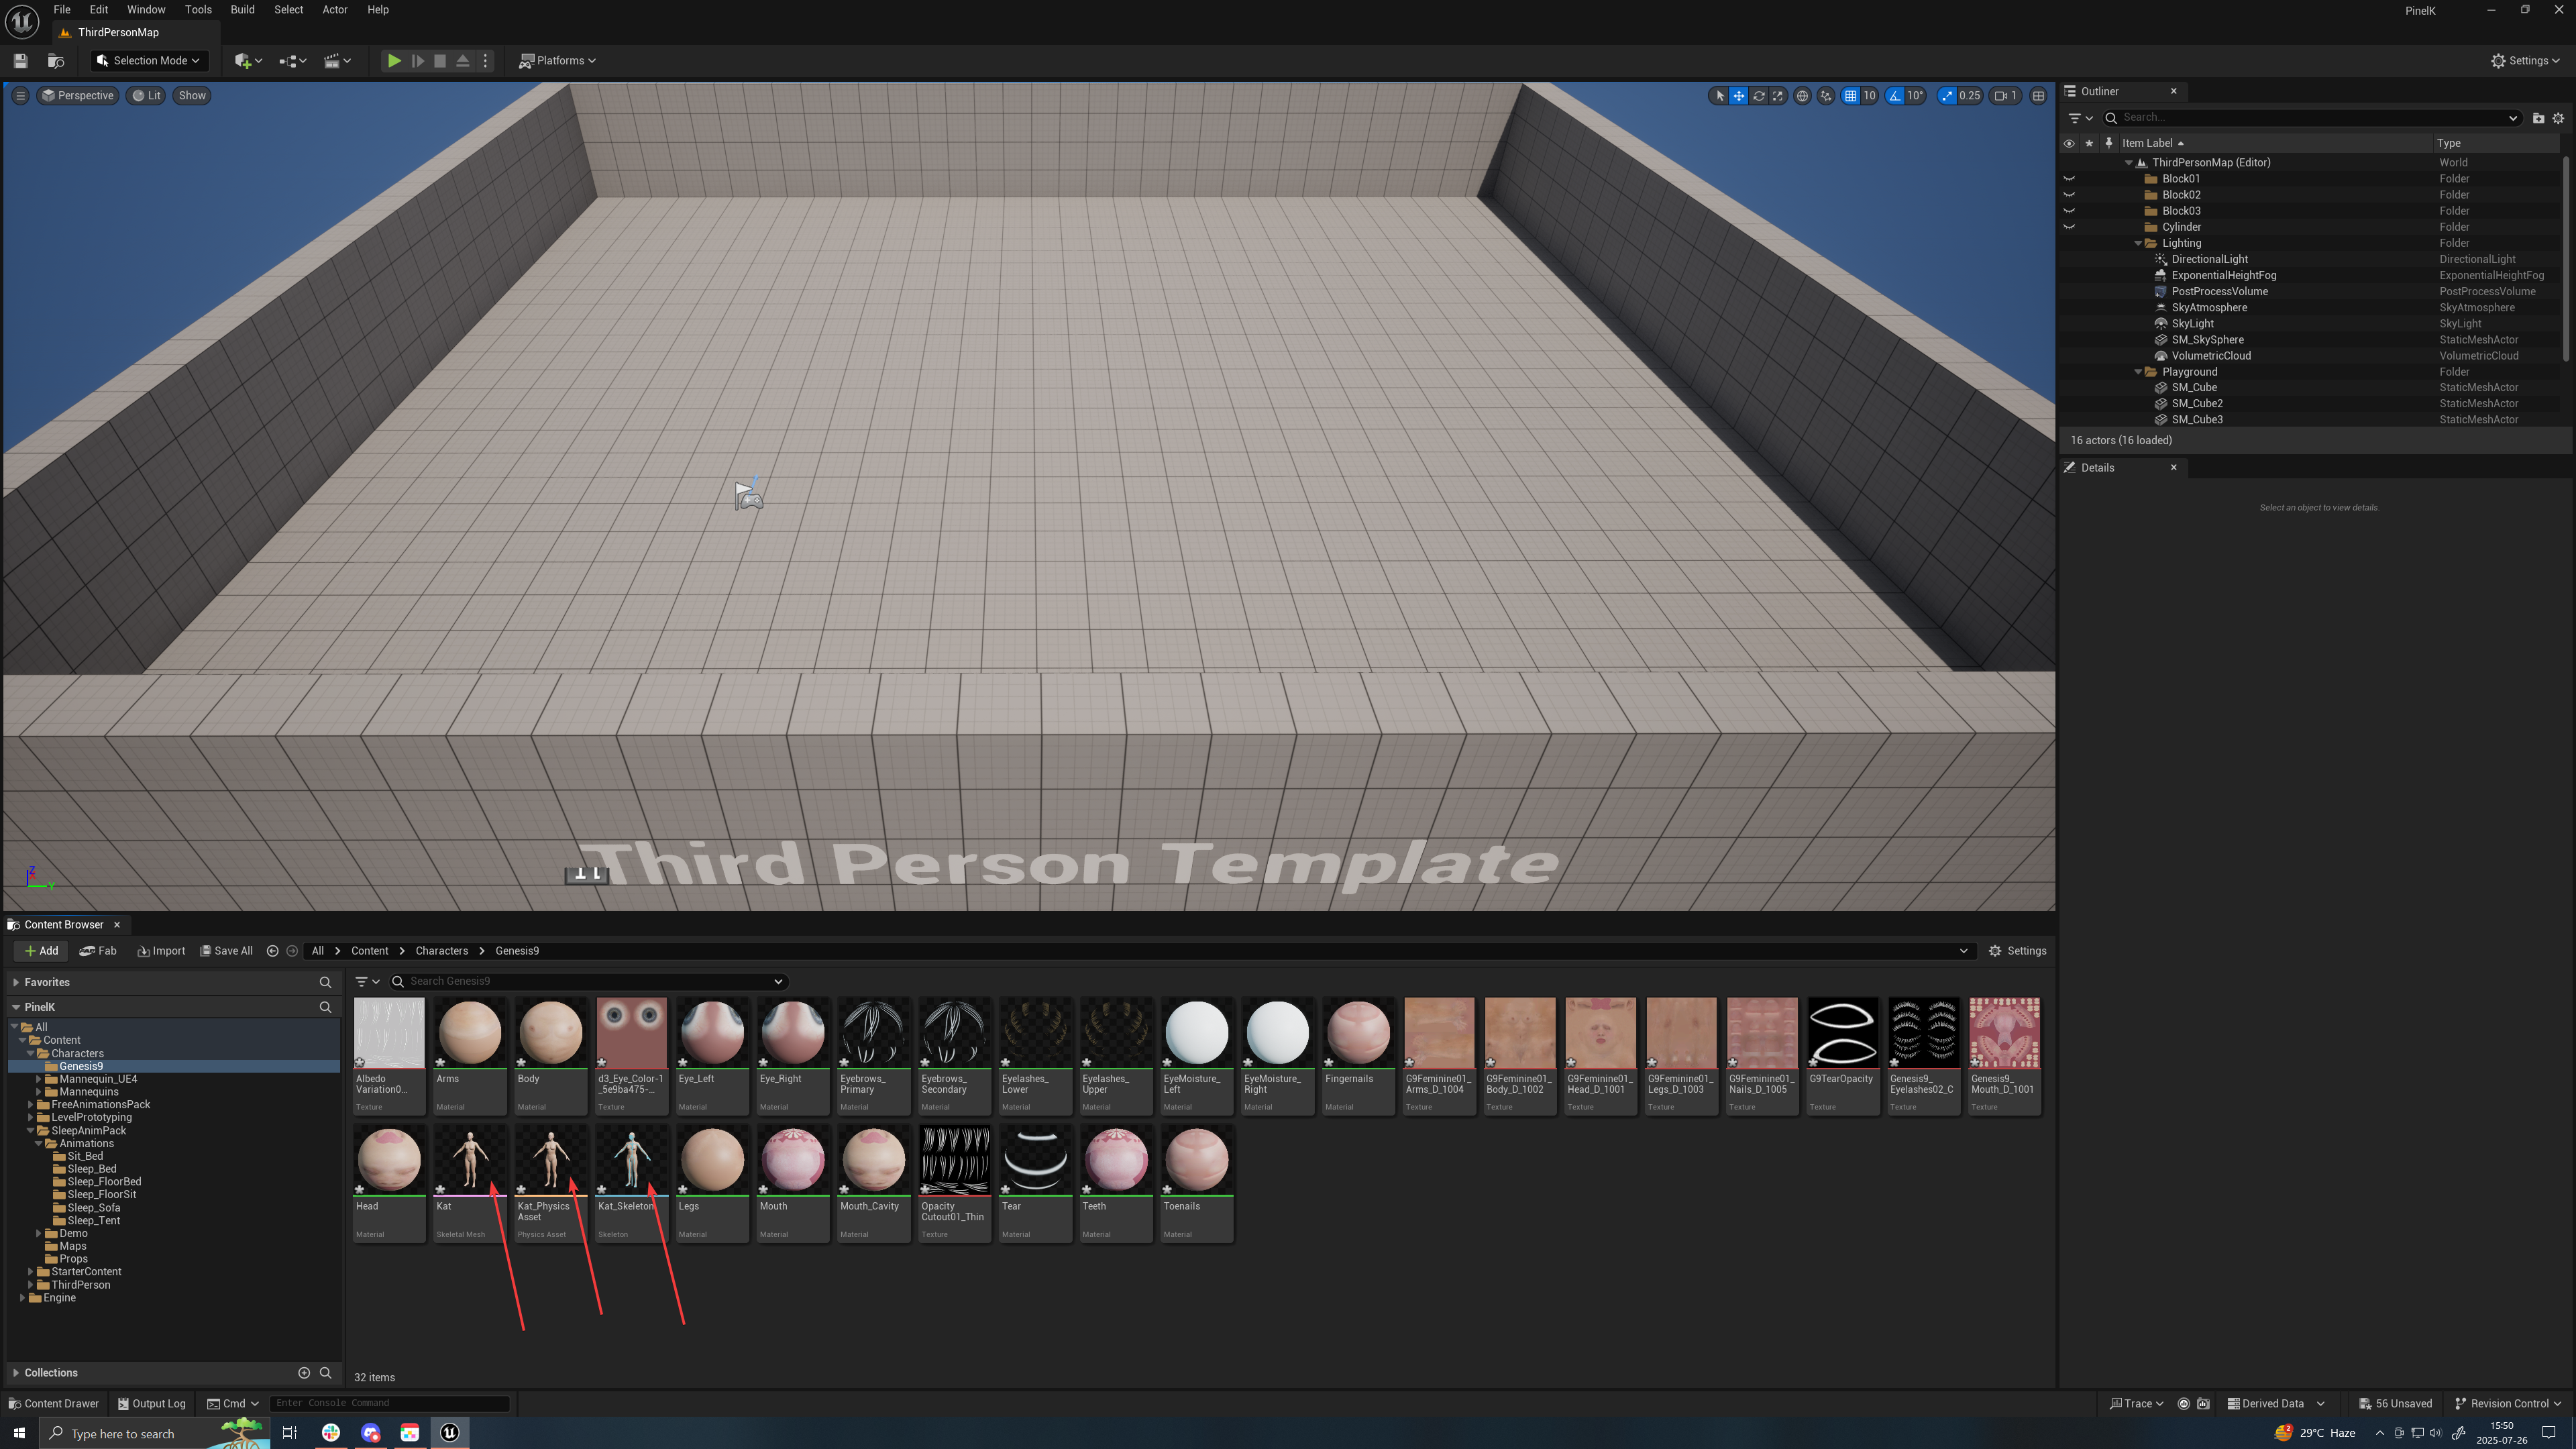
- Create a folder in the content browser called “Genesis9”. I like to create it under the “Character” folder.
- Drag and drop and FBX to import it
- Keep the default values and hit import. Make sure no skeleton is specified in the import dialog box.
- You should now have imported all the textures and materials and the Genesis 9 Skeleton, Physical Asset and Mesh:
- The character (see the red arrows) should be facing forward. Double click on the skeletal mesh, it should be facing forward.
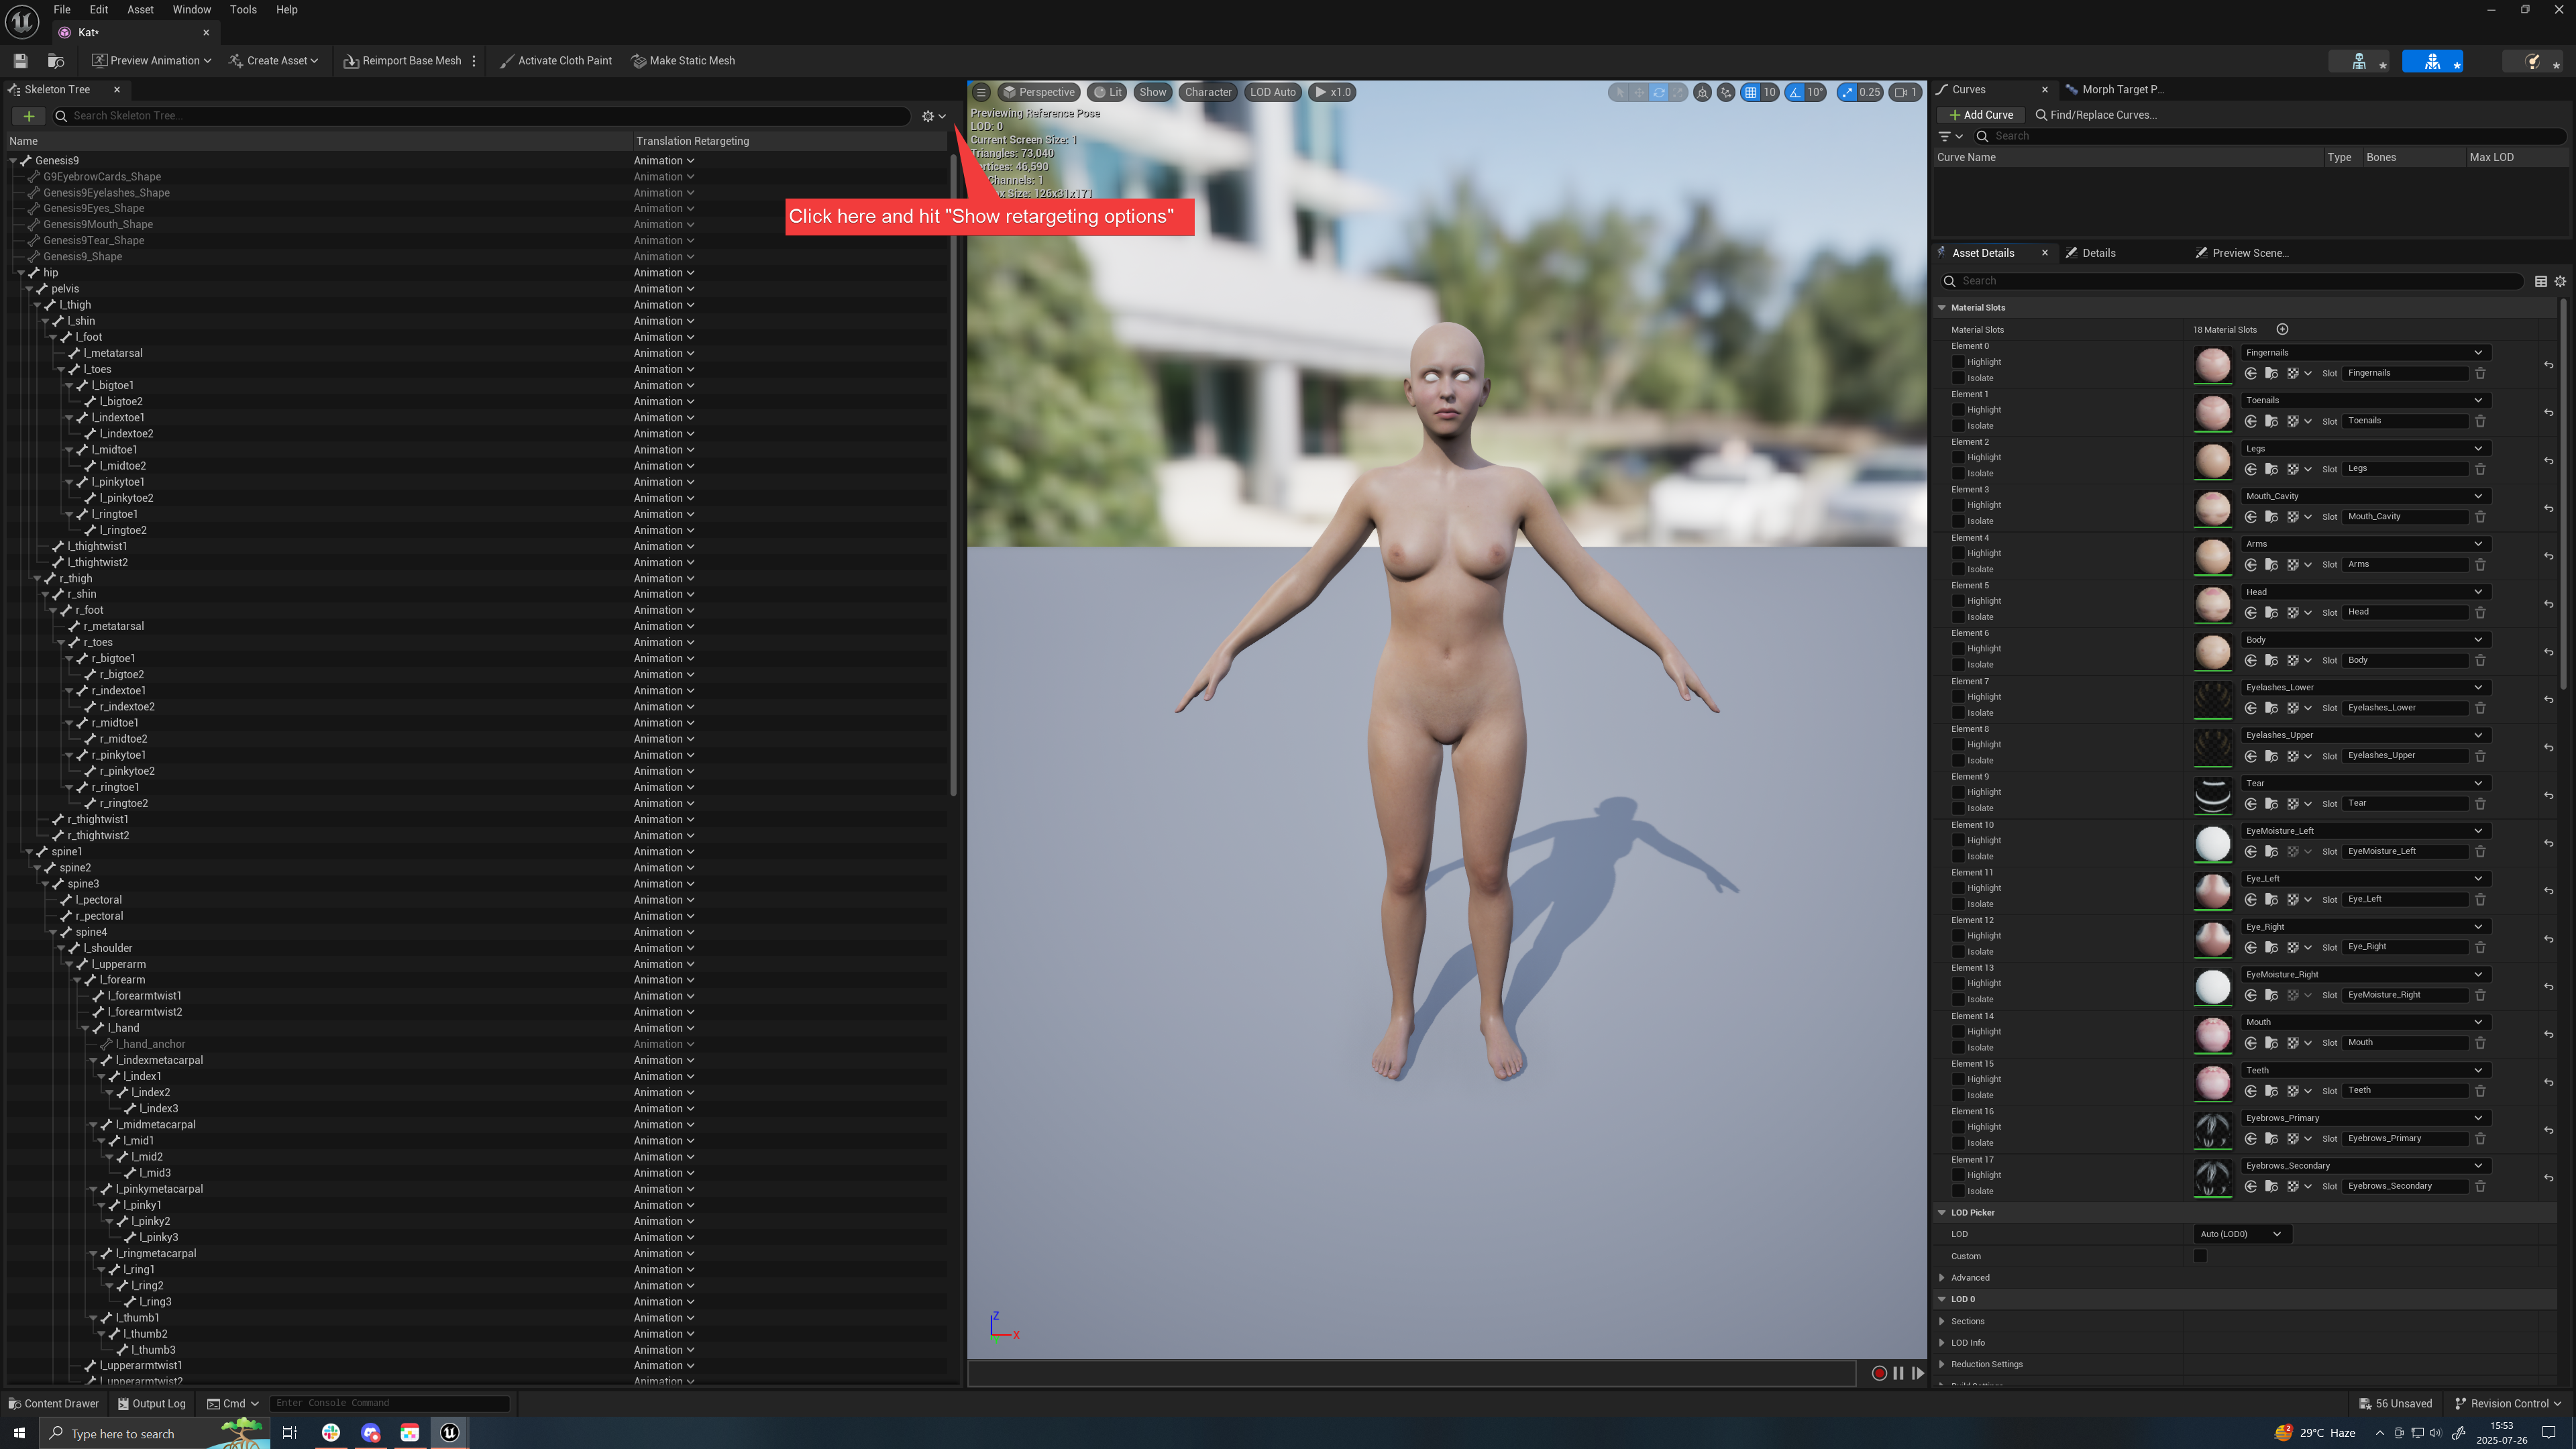
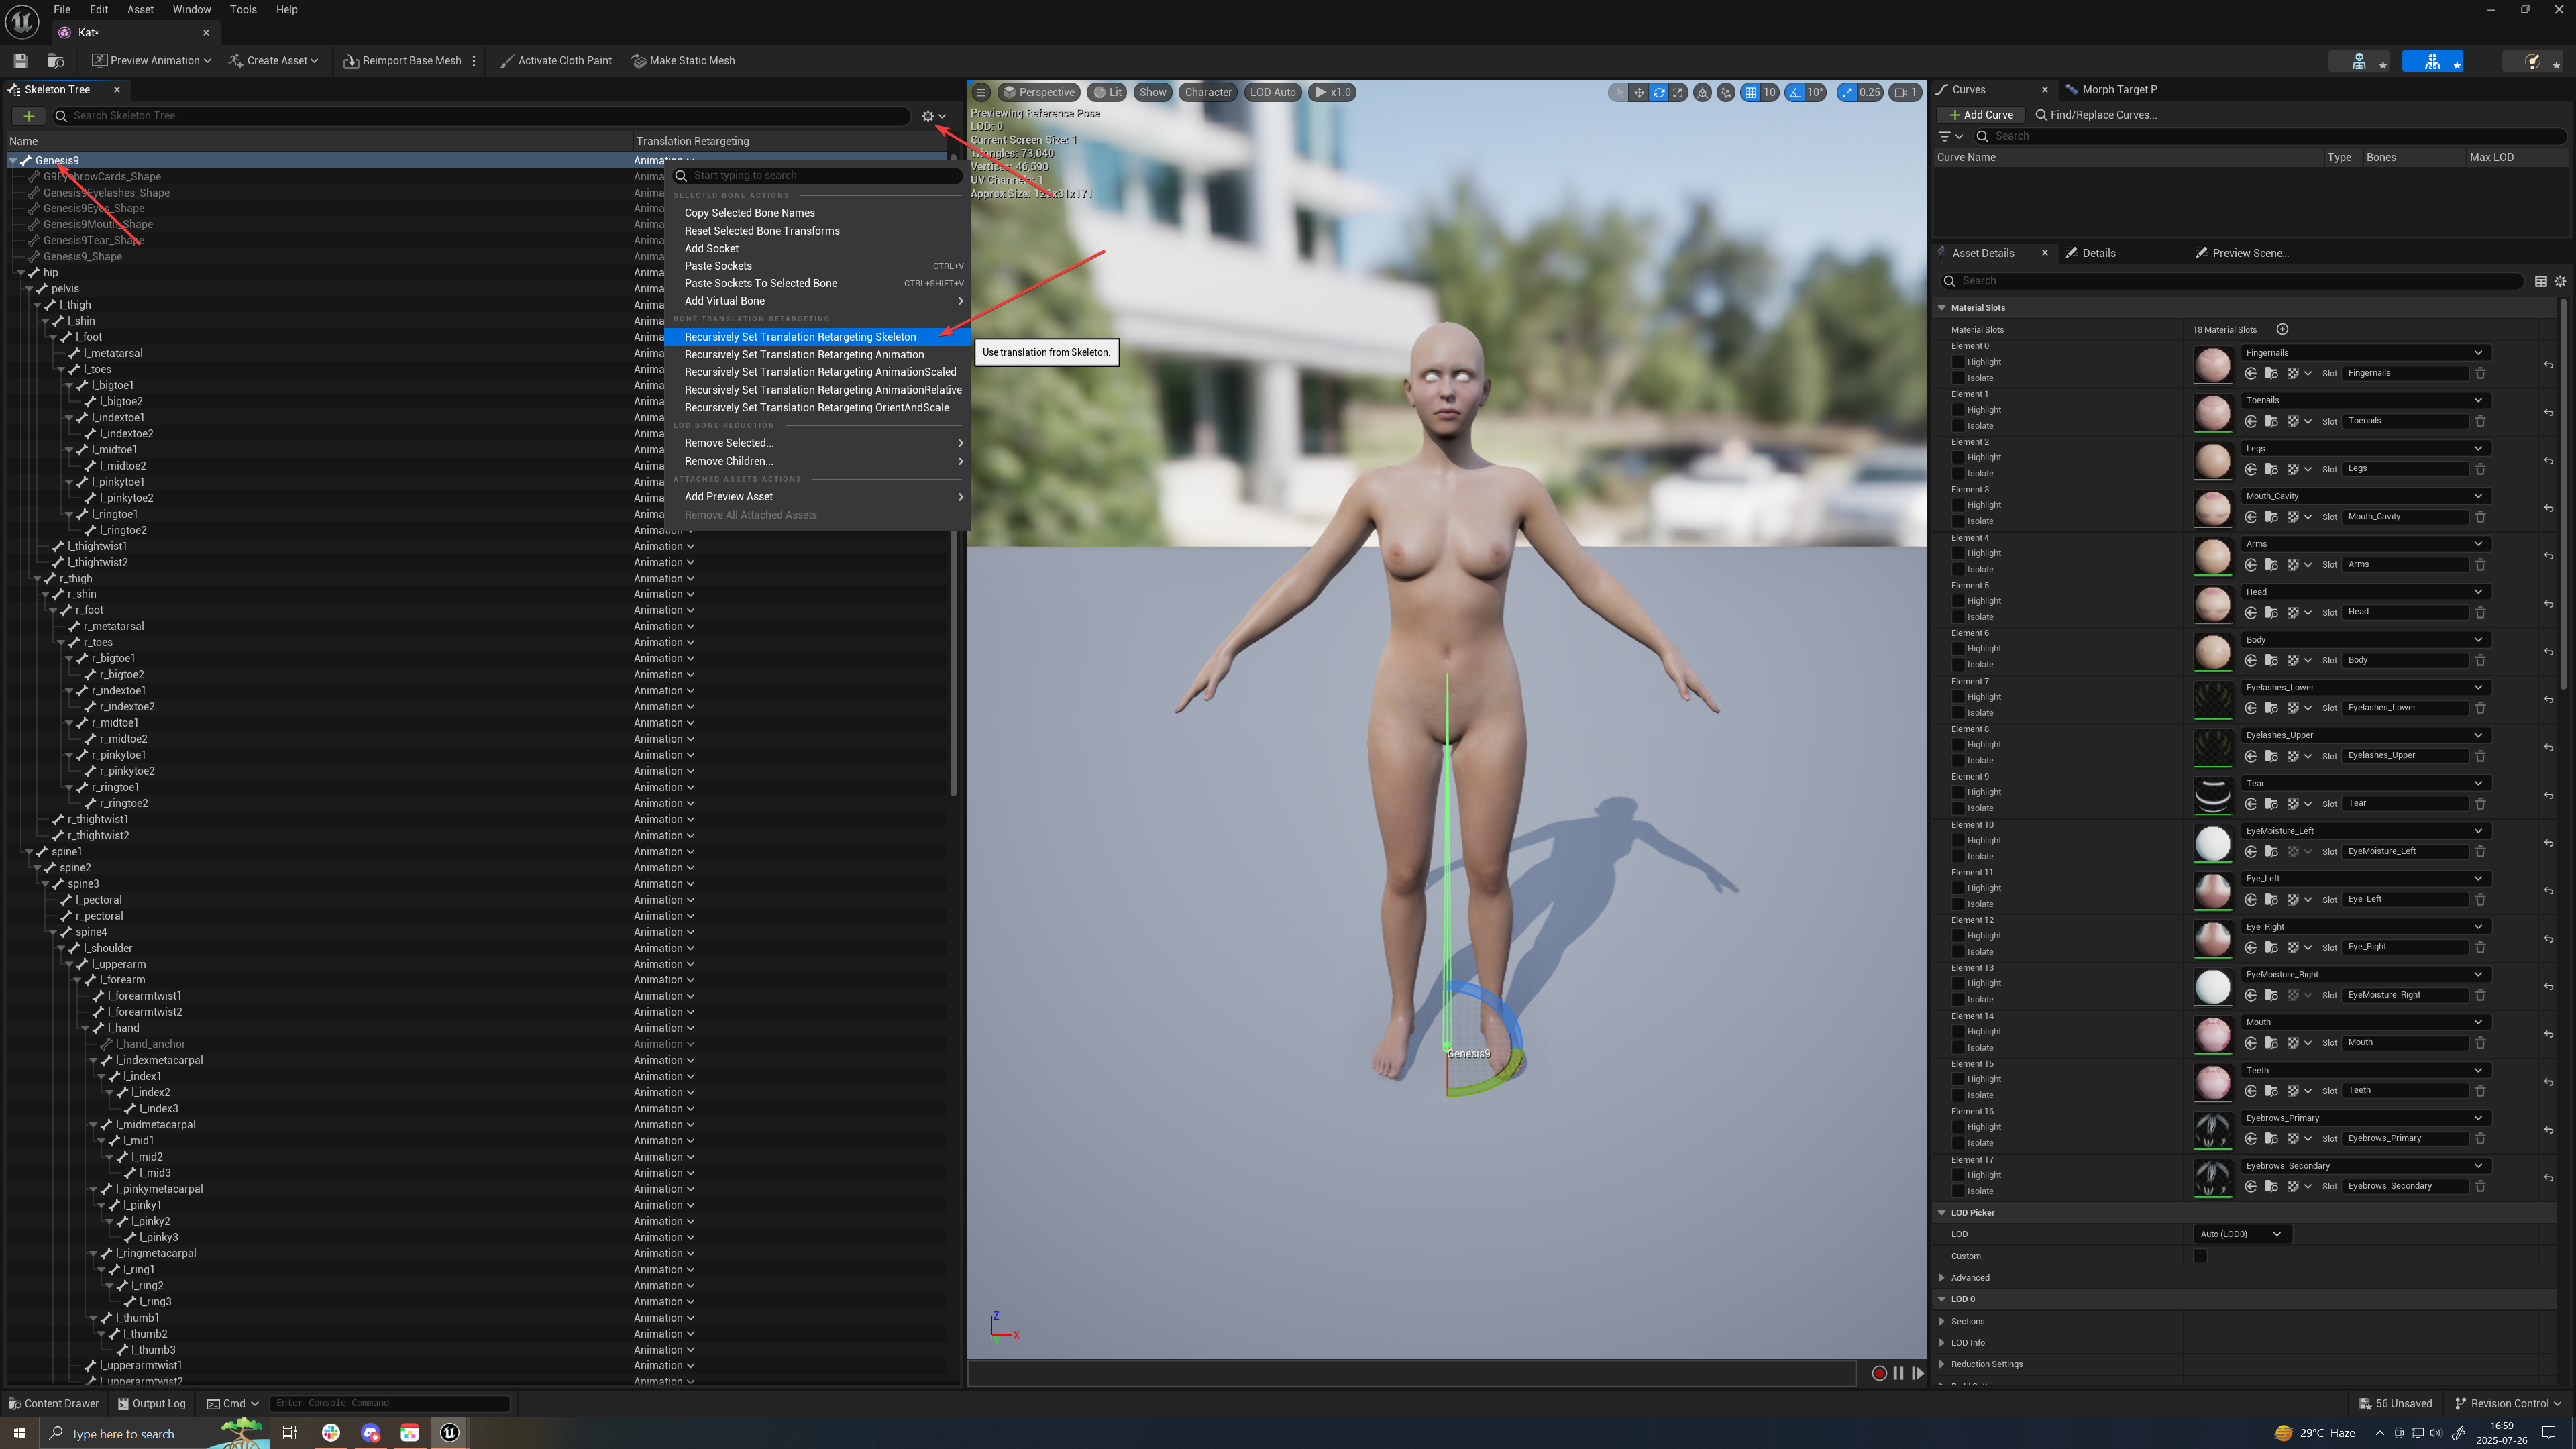
- On the left panel, click on the cog icon and choose “Show Retargeting Options”
- Now we need to set each bone’s retargeting option. Essentially, since our Genesis 9 character is not only smaller than a UE Mannequin, but also does not have the same bones, nor the same bones mapping, nor the same bone count, some root skeletons need to be set to “Animation Scaled”, but the great majority of them should be set to “Skeleton”.
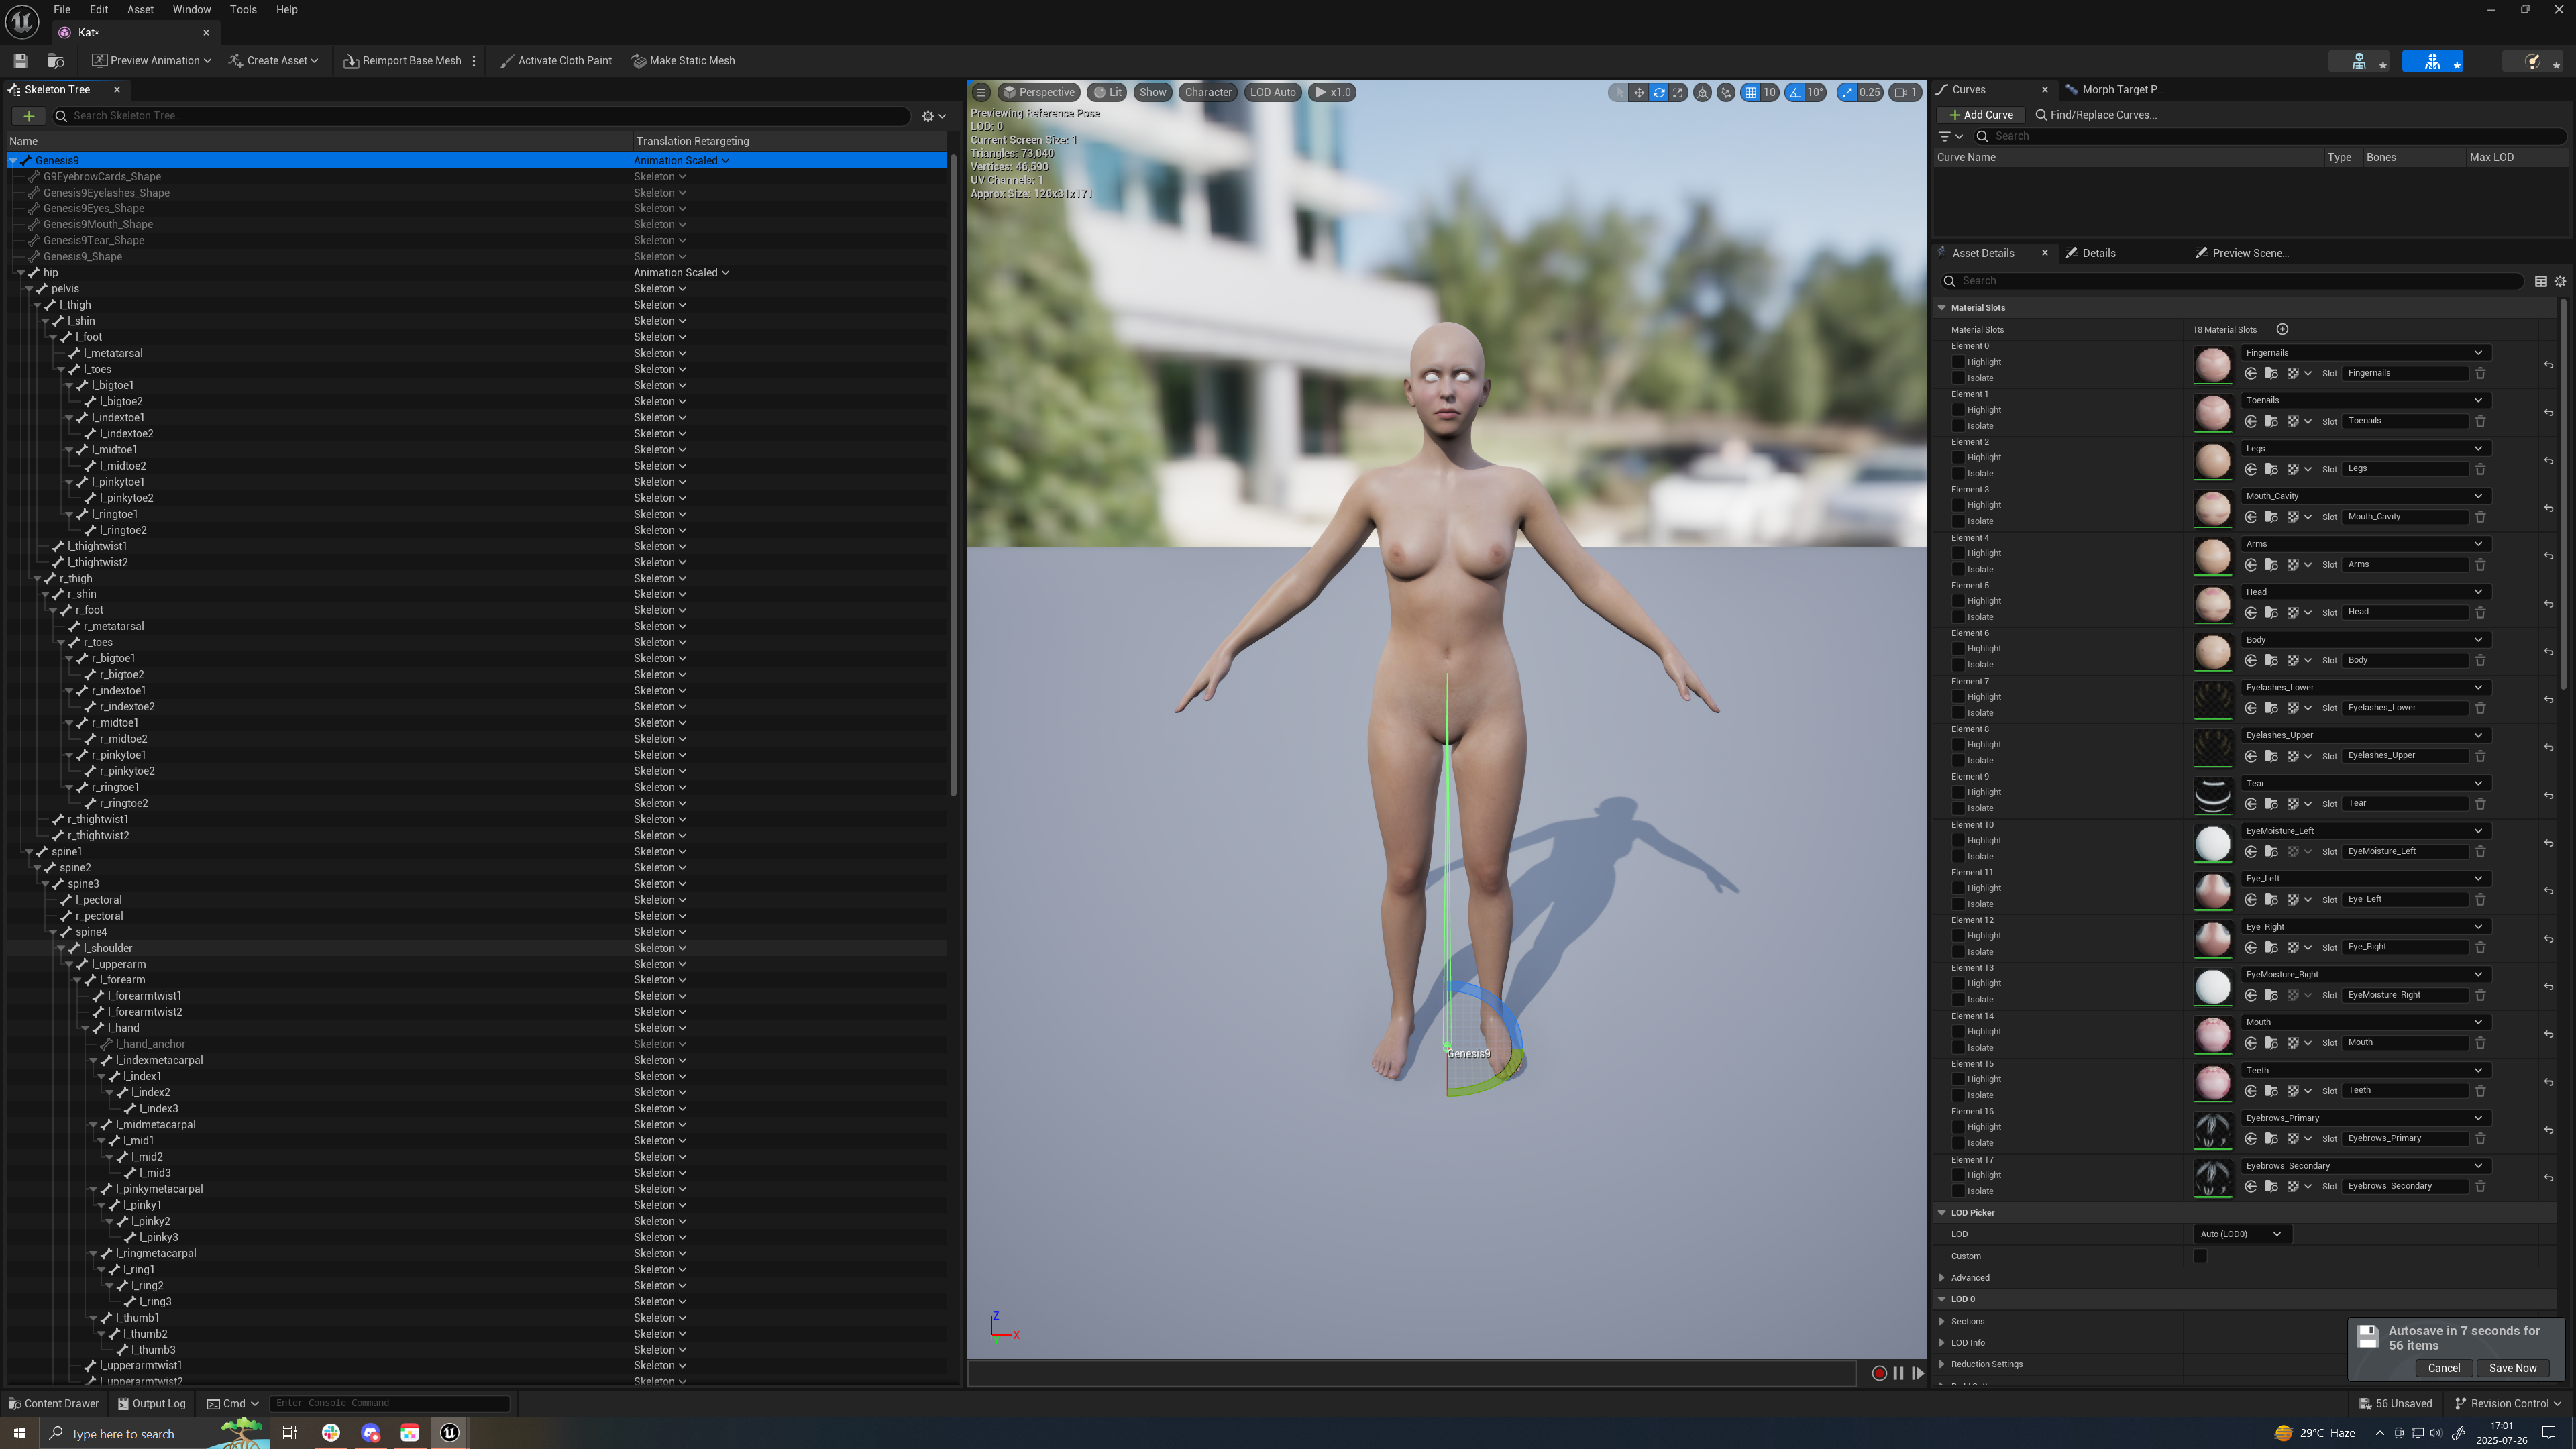
- So Select Genesis9 (the root) and choose “Recursively Set Translation Retargeting Skeleton”.
- However, for the root and the hip bone, choose Animation Scaled instead
- You can close this window.
- Why don’t you “File → Save all” as you’re at it…
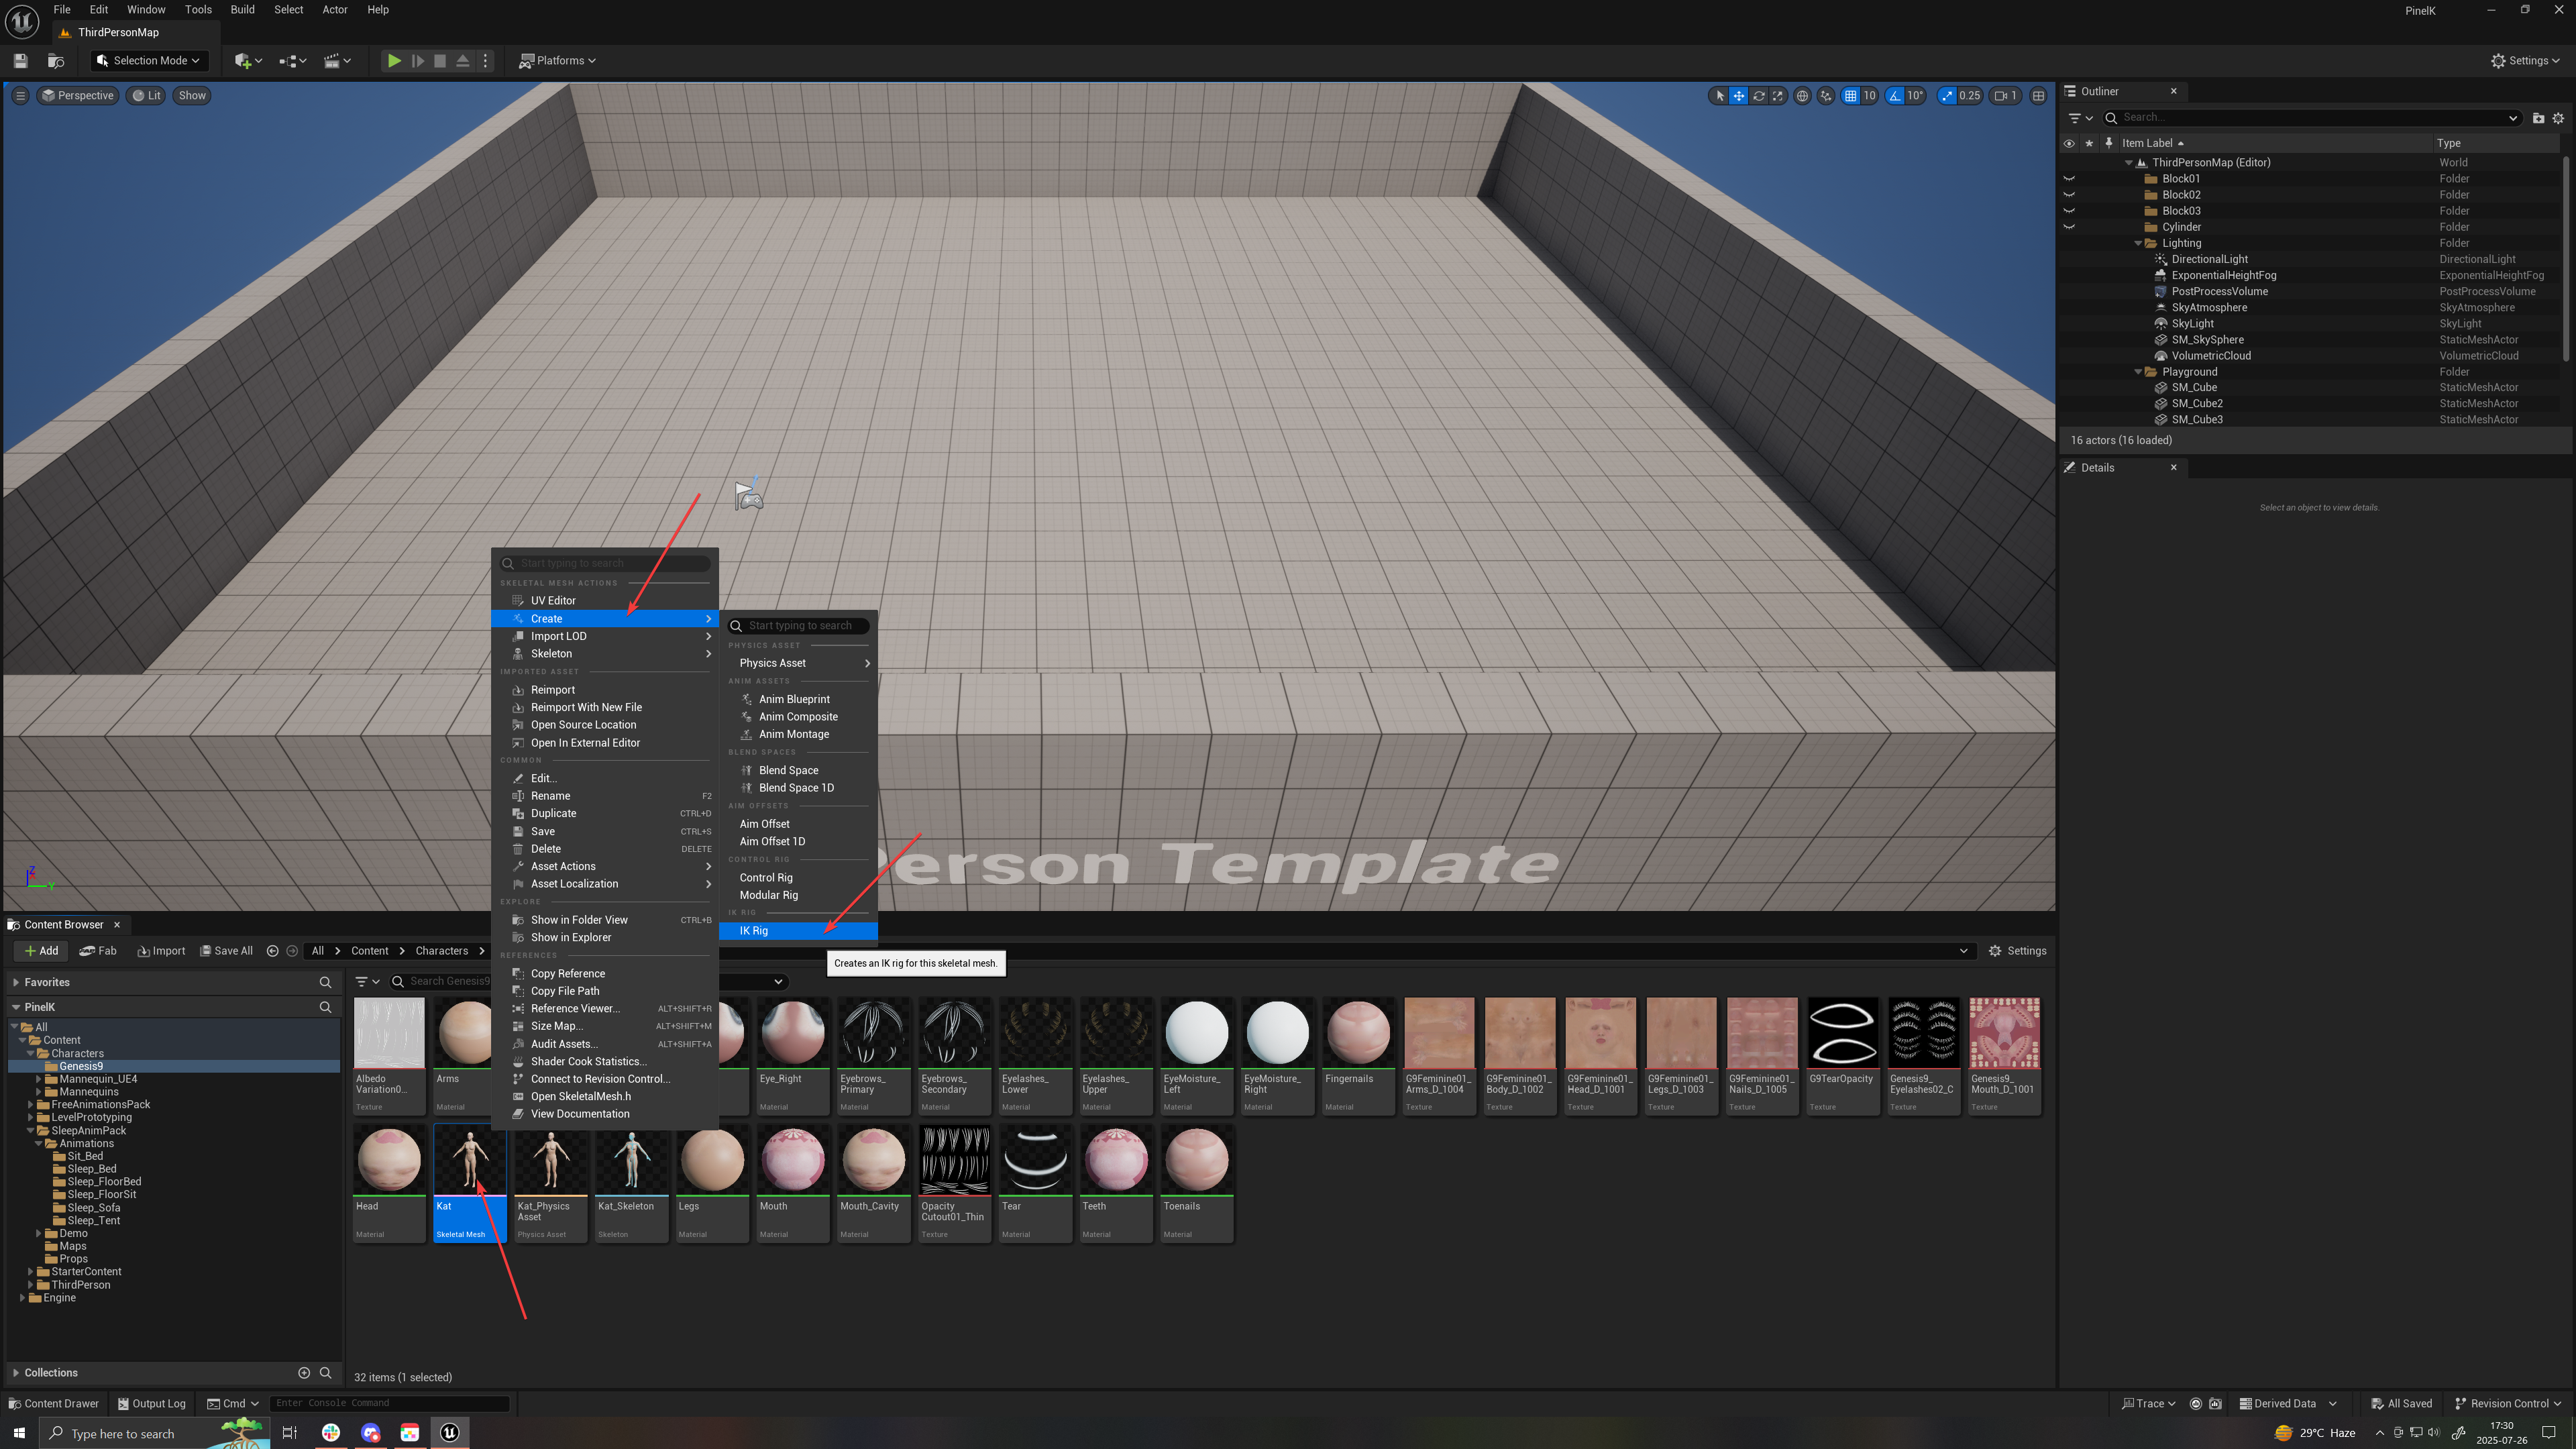
- Right click on your Genesis 9 Skeletal Mesh and choose “Create → IK Rig”
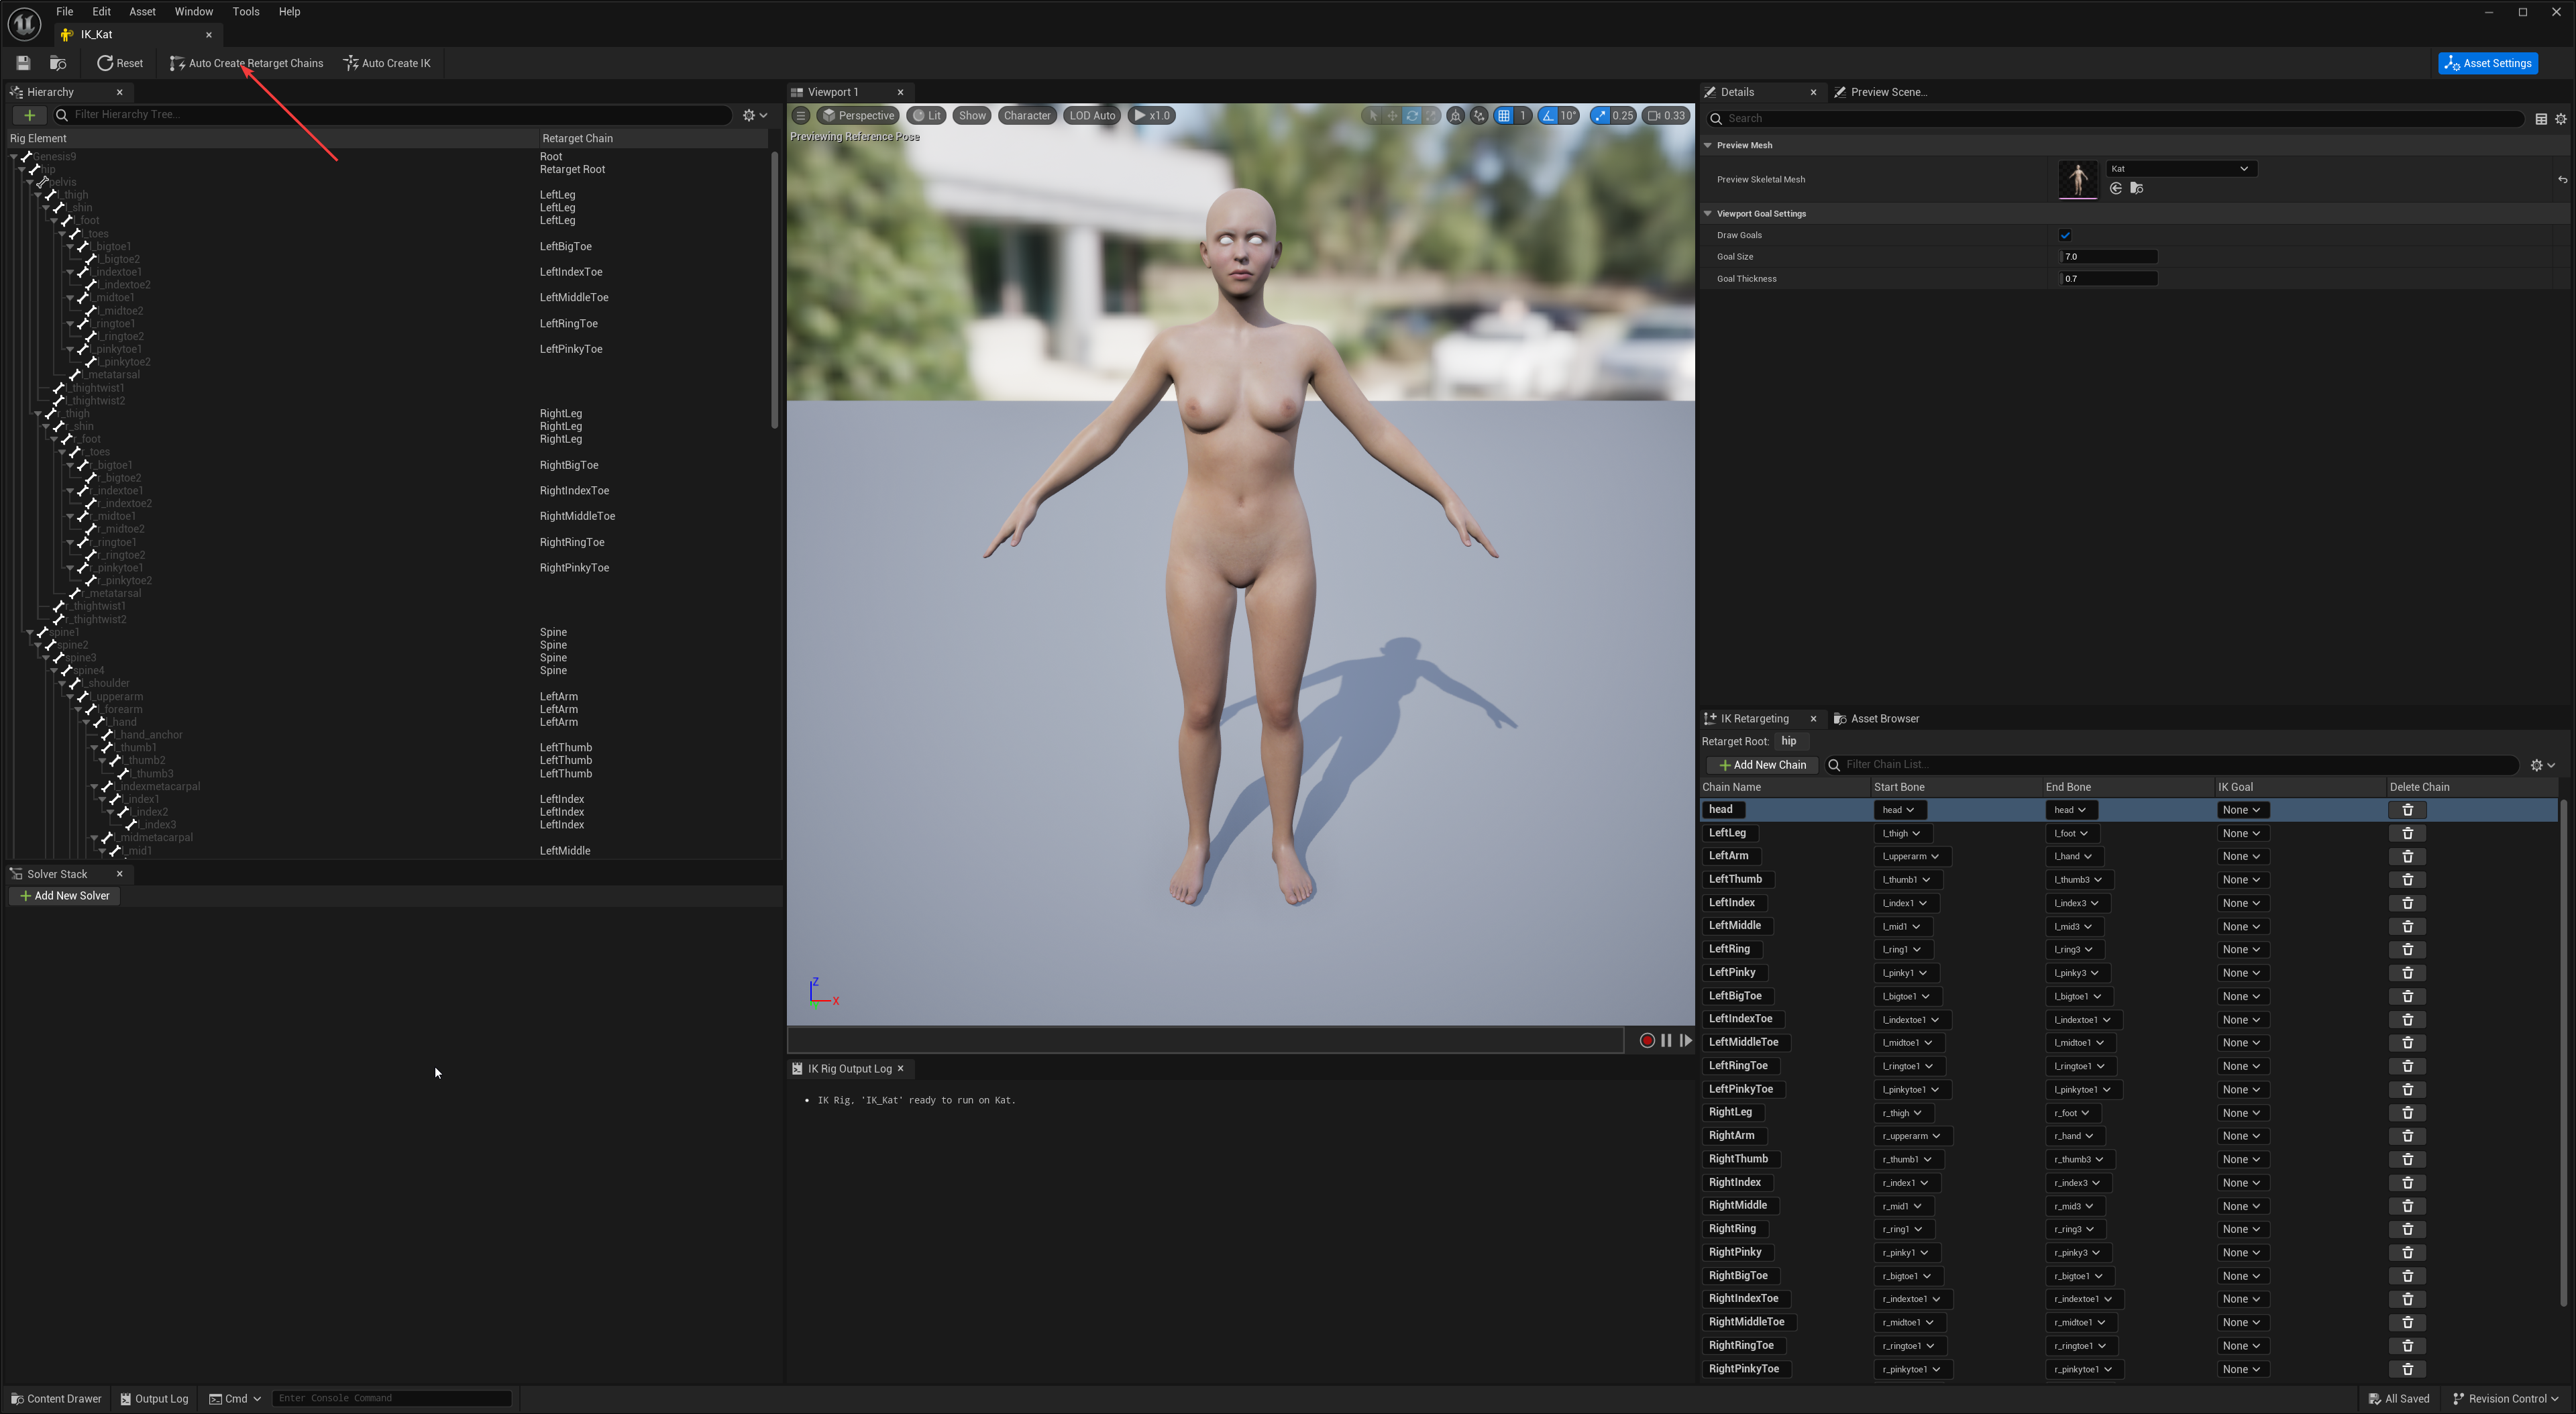
- Open your newly created IK Rig asset (it will have the name of your Skeletal Mesh, prefixed with “IK_”; in my case, it is called “IK_Kat”).
- Click on the button “Auto Create Retarget Chain”.
- Unreal will create a retarget chain based on Reallusion Character Creator 4, as it doesn’t know about Genesis 9 from DAZ 3D (it should mind you, maybe it does in UE 5.6, we’ll find out).
- It’s okay, we’ll get a 72% accurate retarget chain which we will fix later.
- Close this window for now.
- File → Save all.
- Now go to the Animation asset that was done for UE Mannequin characters in the Content library.
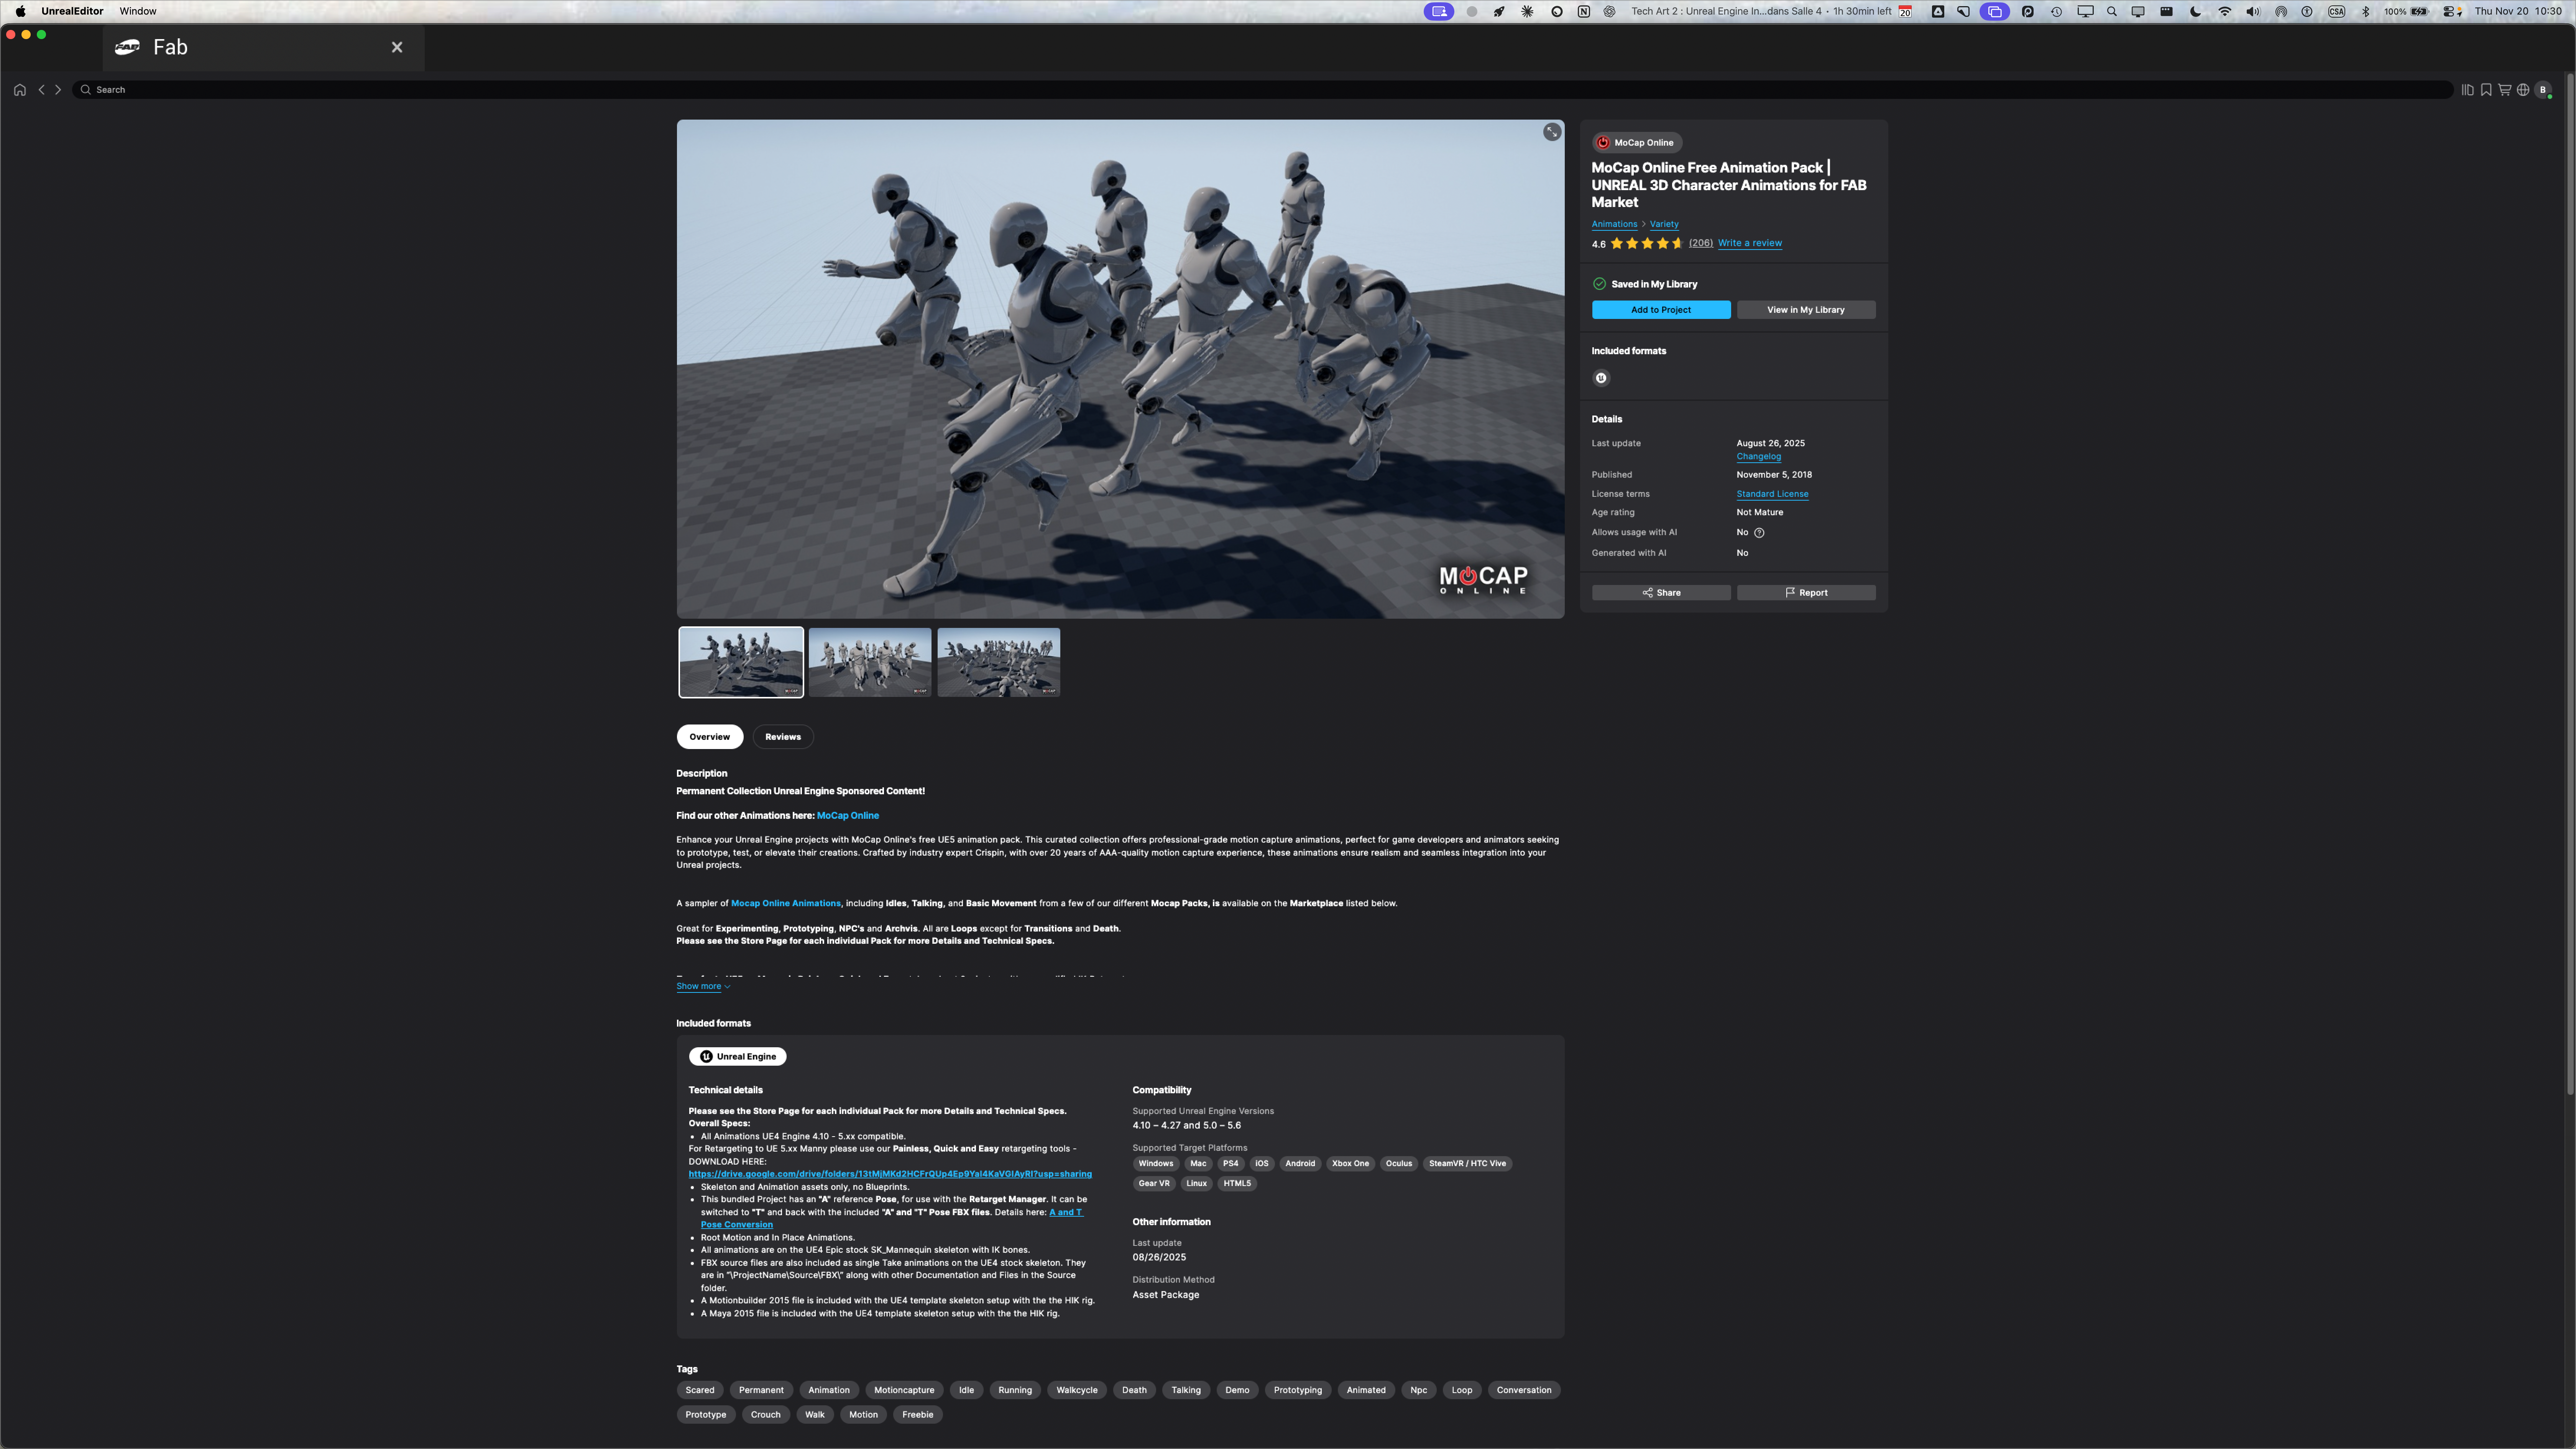
- If you don’t have any, go to FAB, search for the free MoCap Online Free Animation Pack and add it to your project
☝🏼
If you don’t have SKM_Quin or SKM_Manny, get them with +Add → Add features or content pack - > Third person
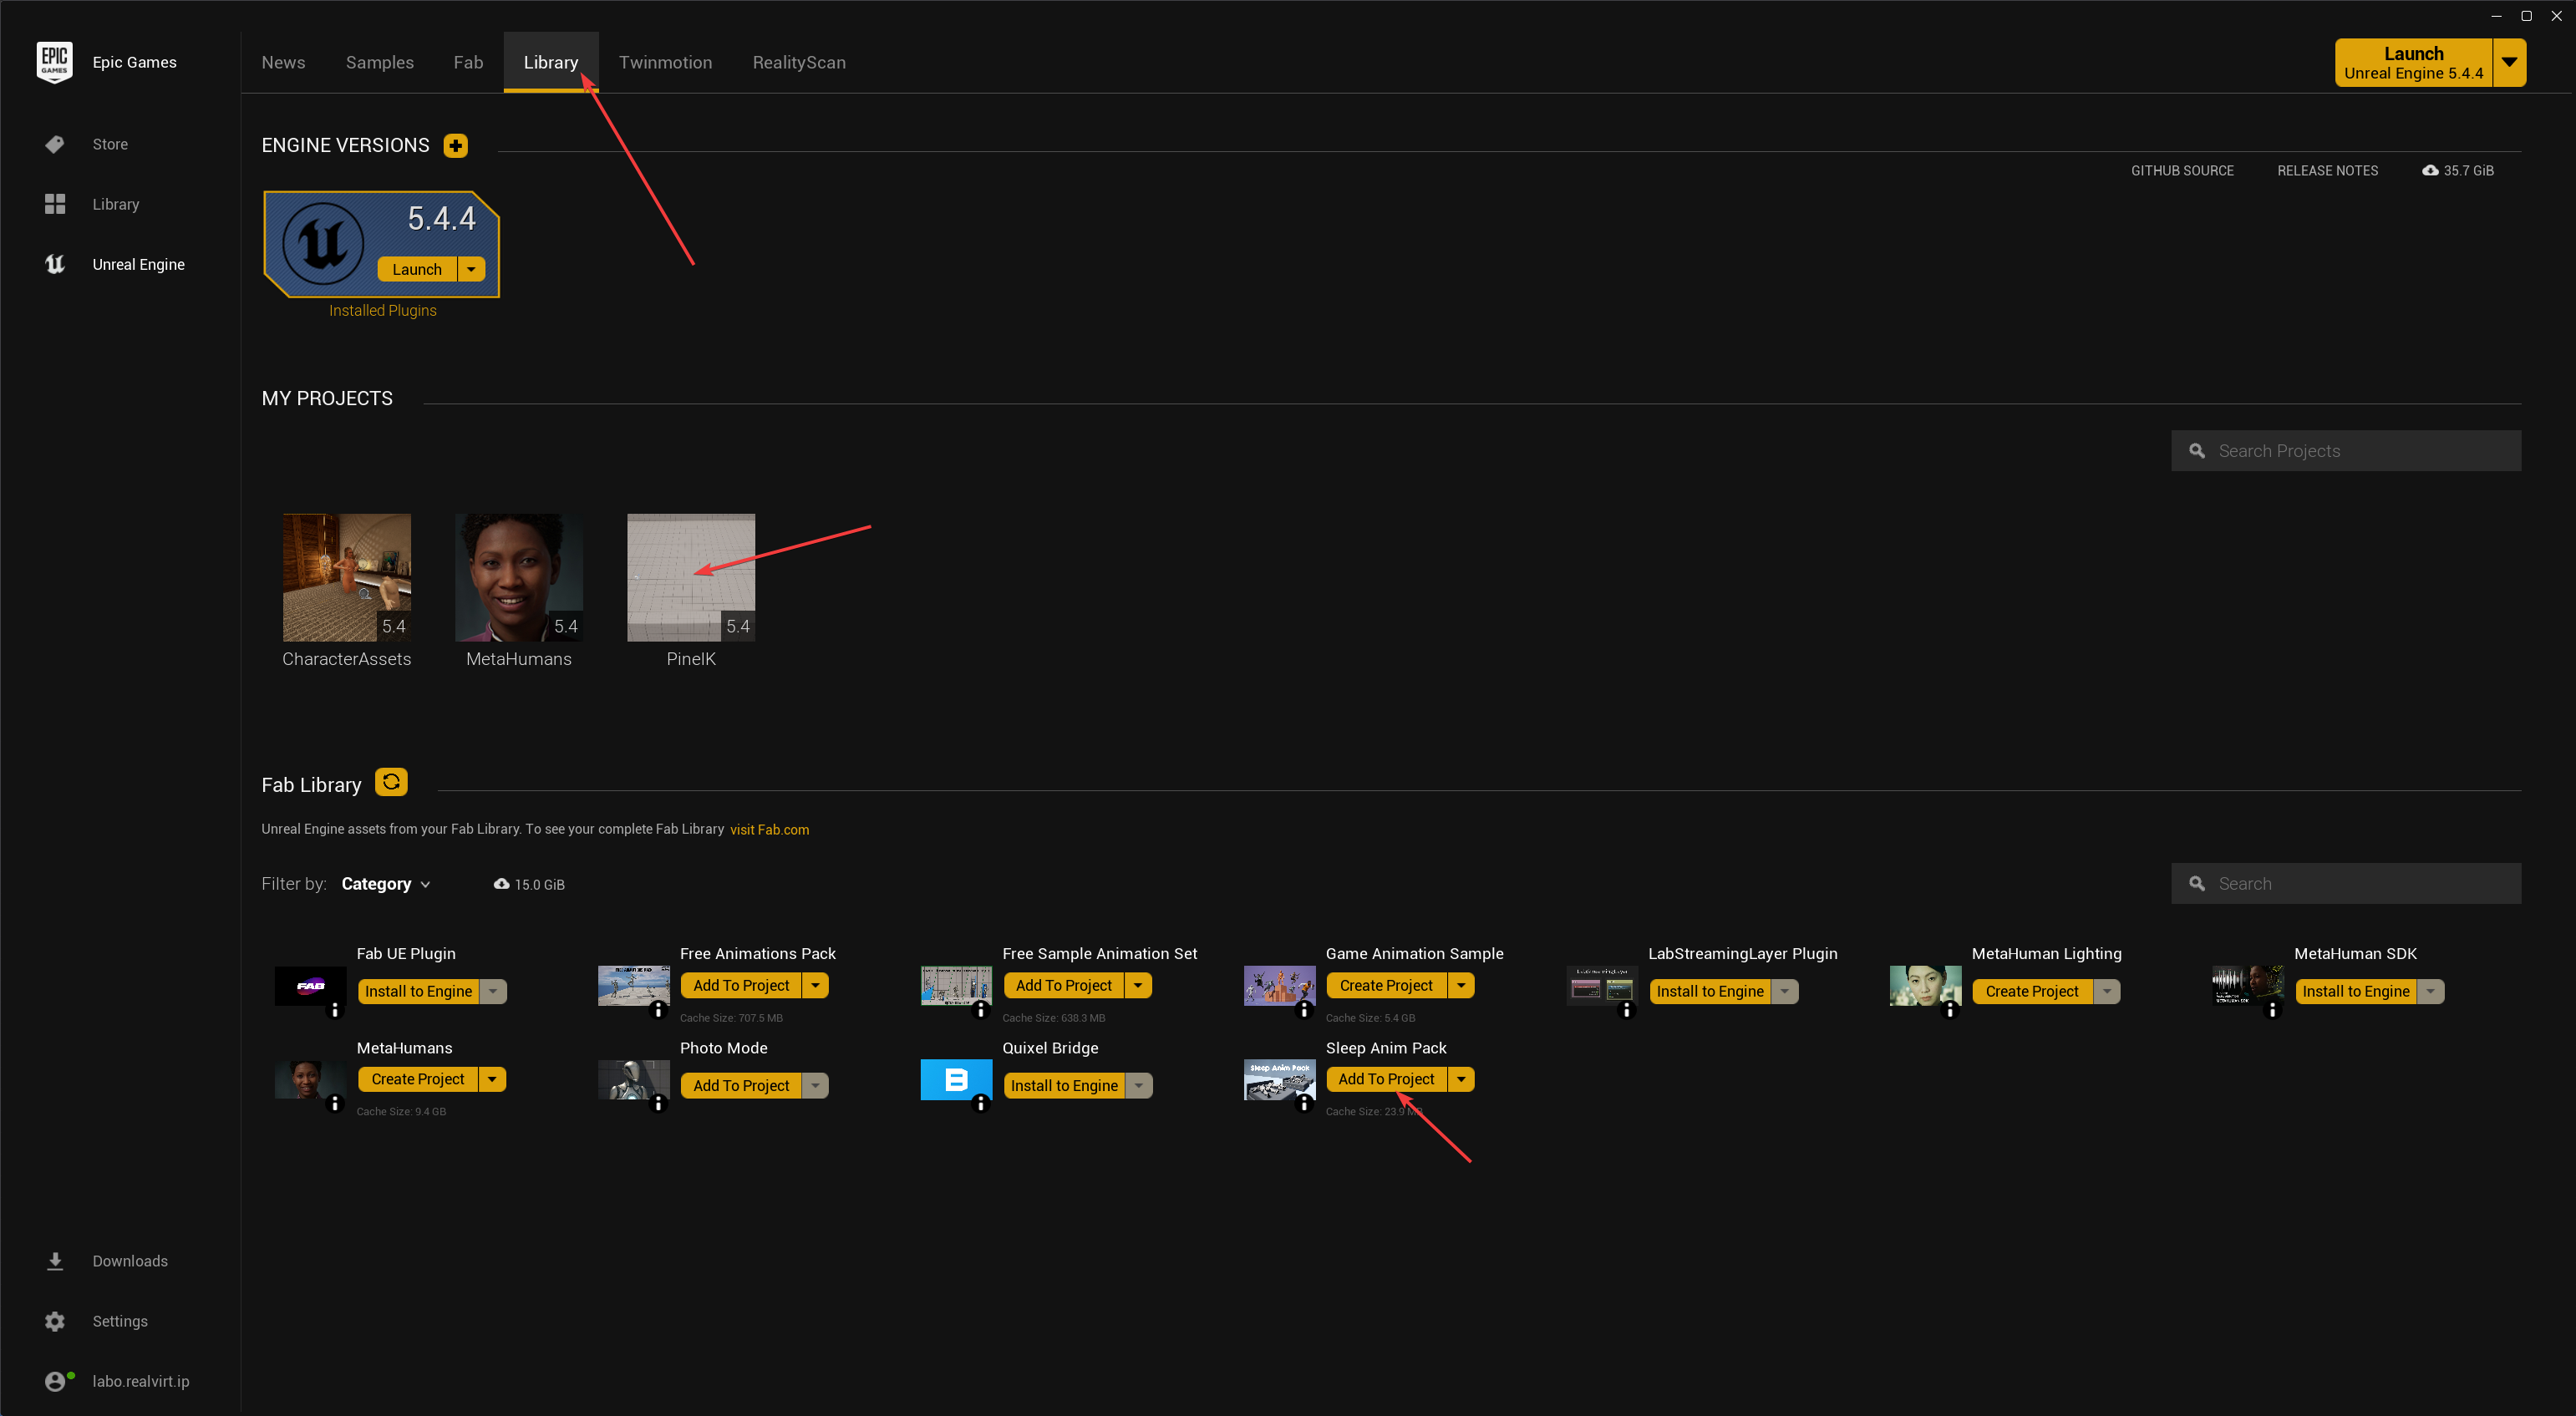
In my case, I purchased the SleepAnimPack from fab.com (formerly known as UE MarketPlace).
☝🏼
Once purchased, you will see it in your Epic Library where you can add it to your project by clicking on the “Add to Project” button next to the library item.
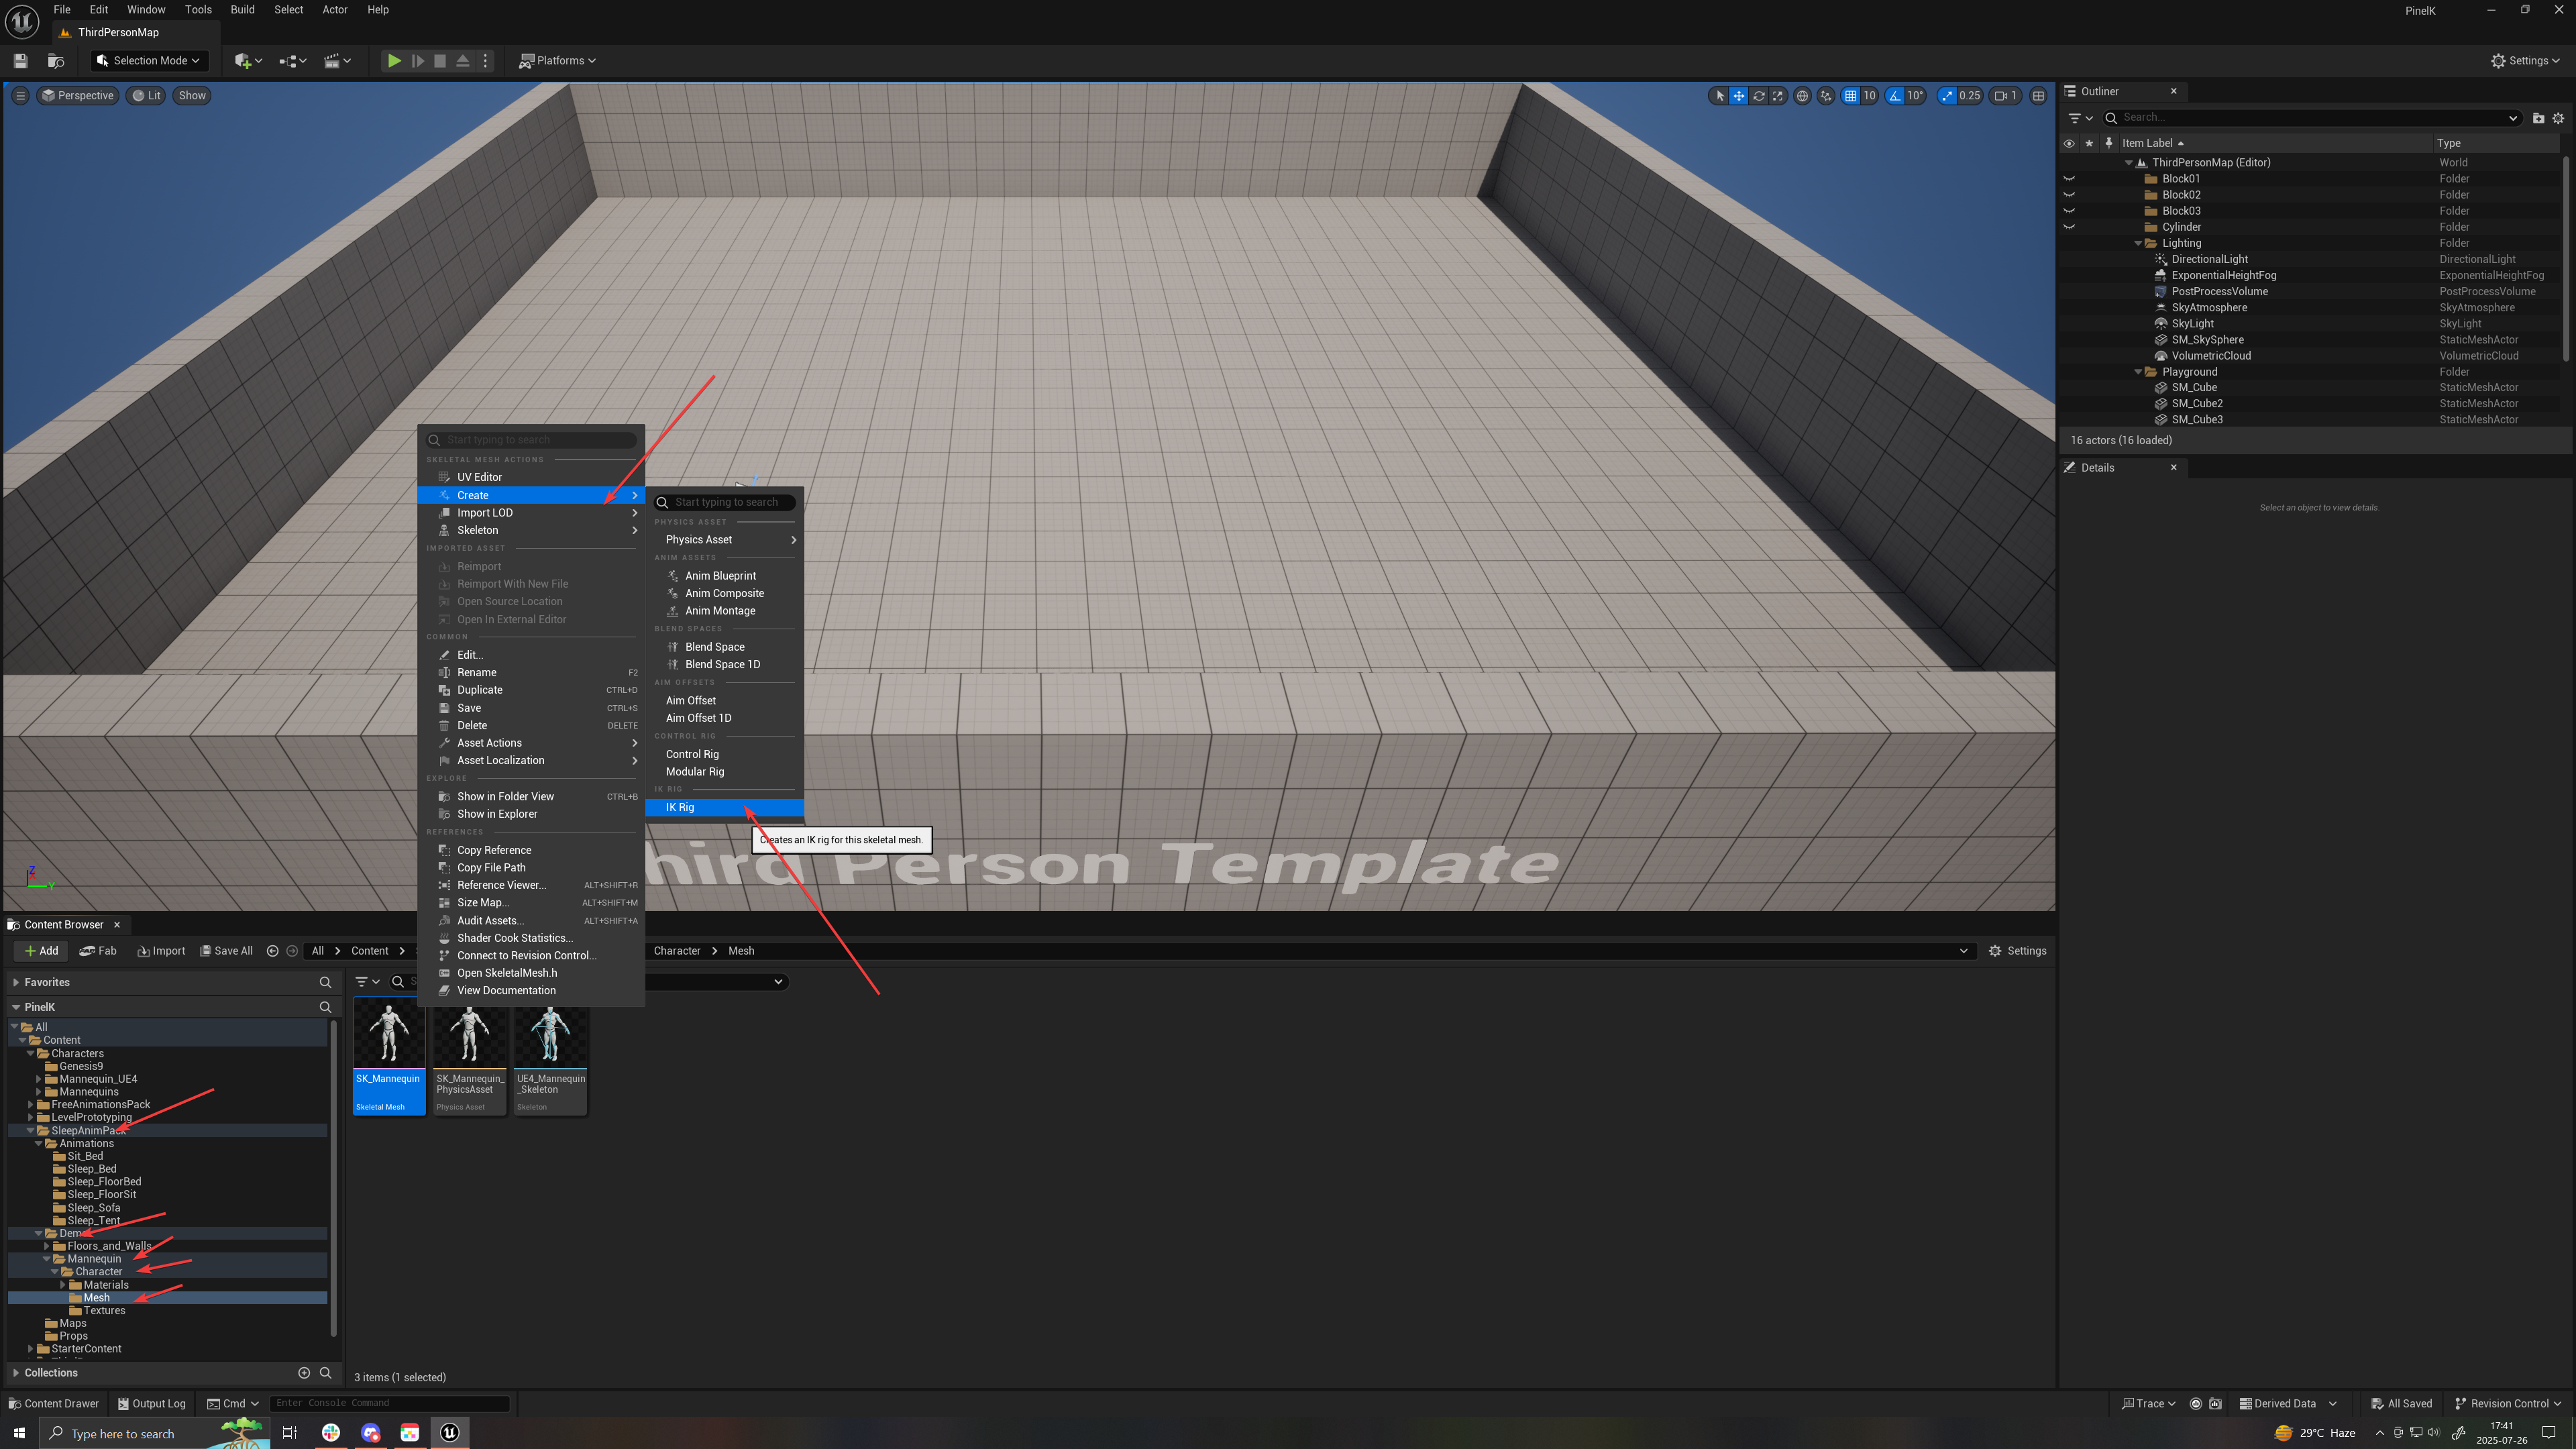
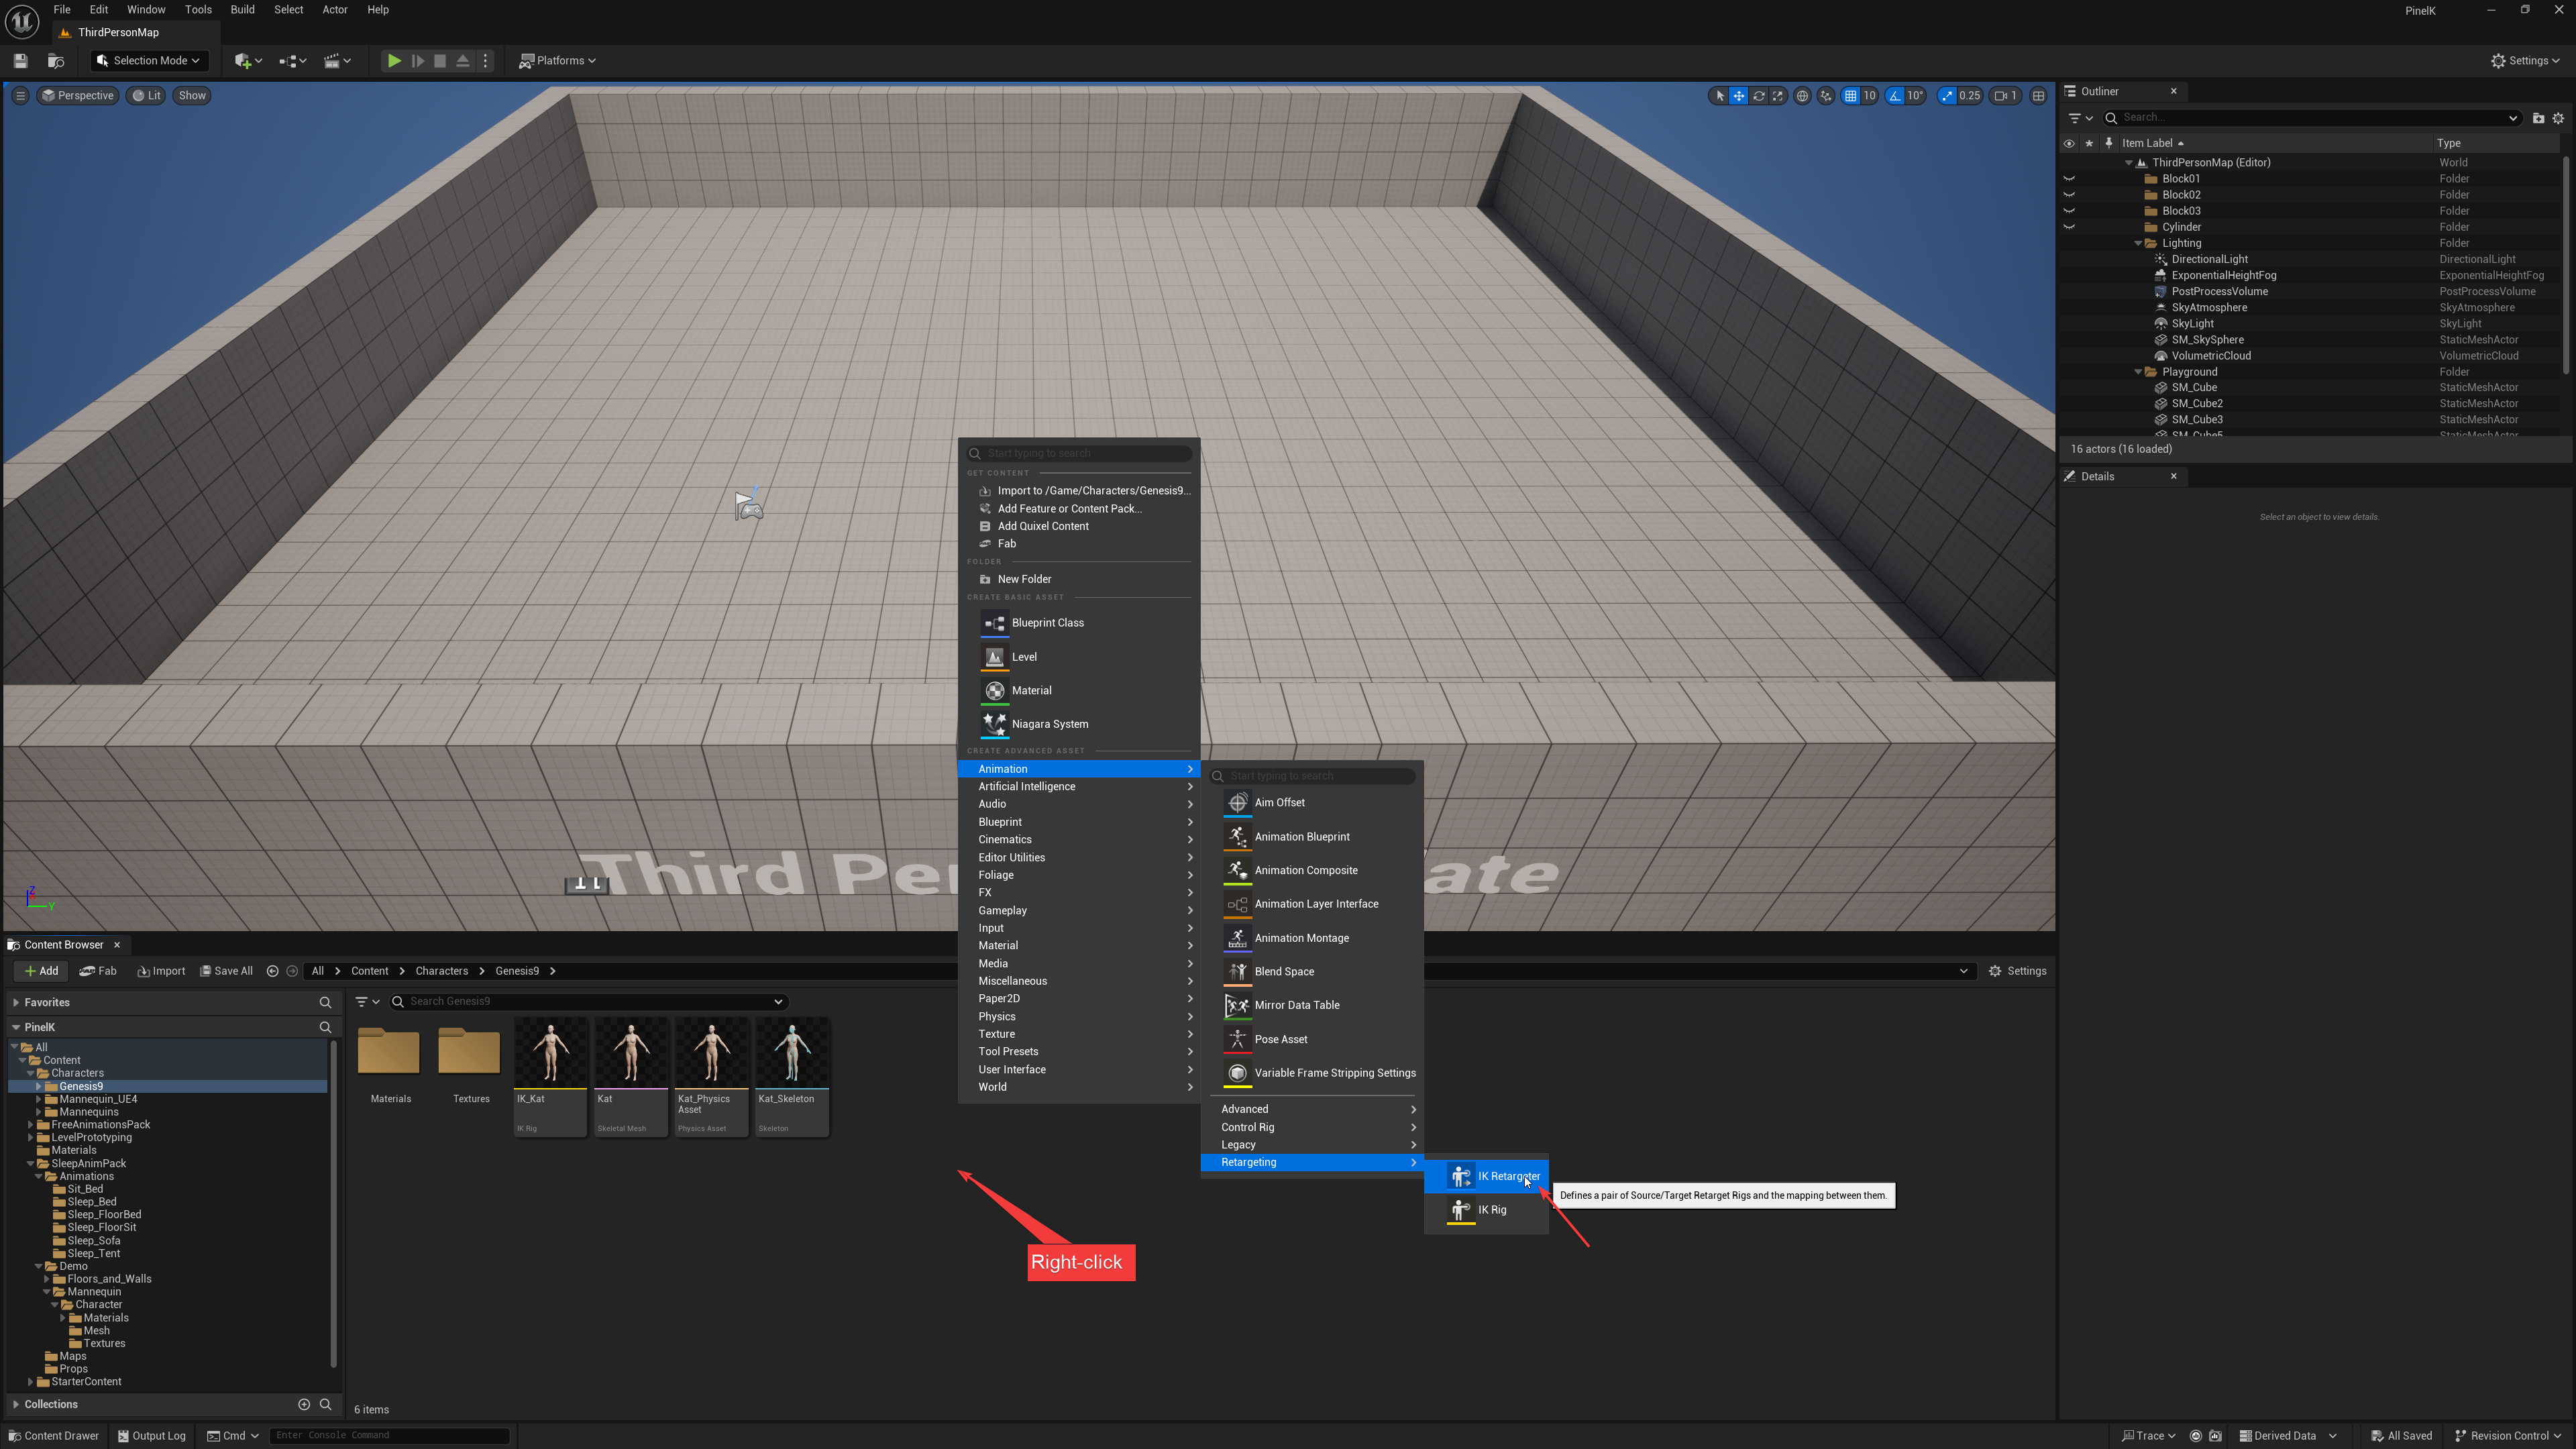
- Under the SleepAnimPack → Demo → Mannequin → Character → Mesh, right-click on the the SK_Mannequin assset and choose Create → IK Rig.
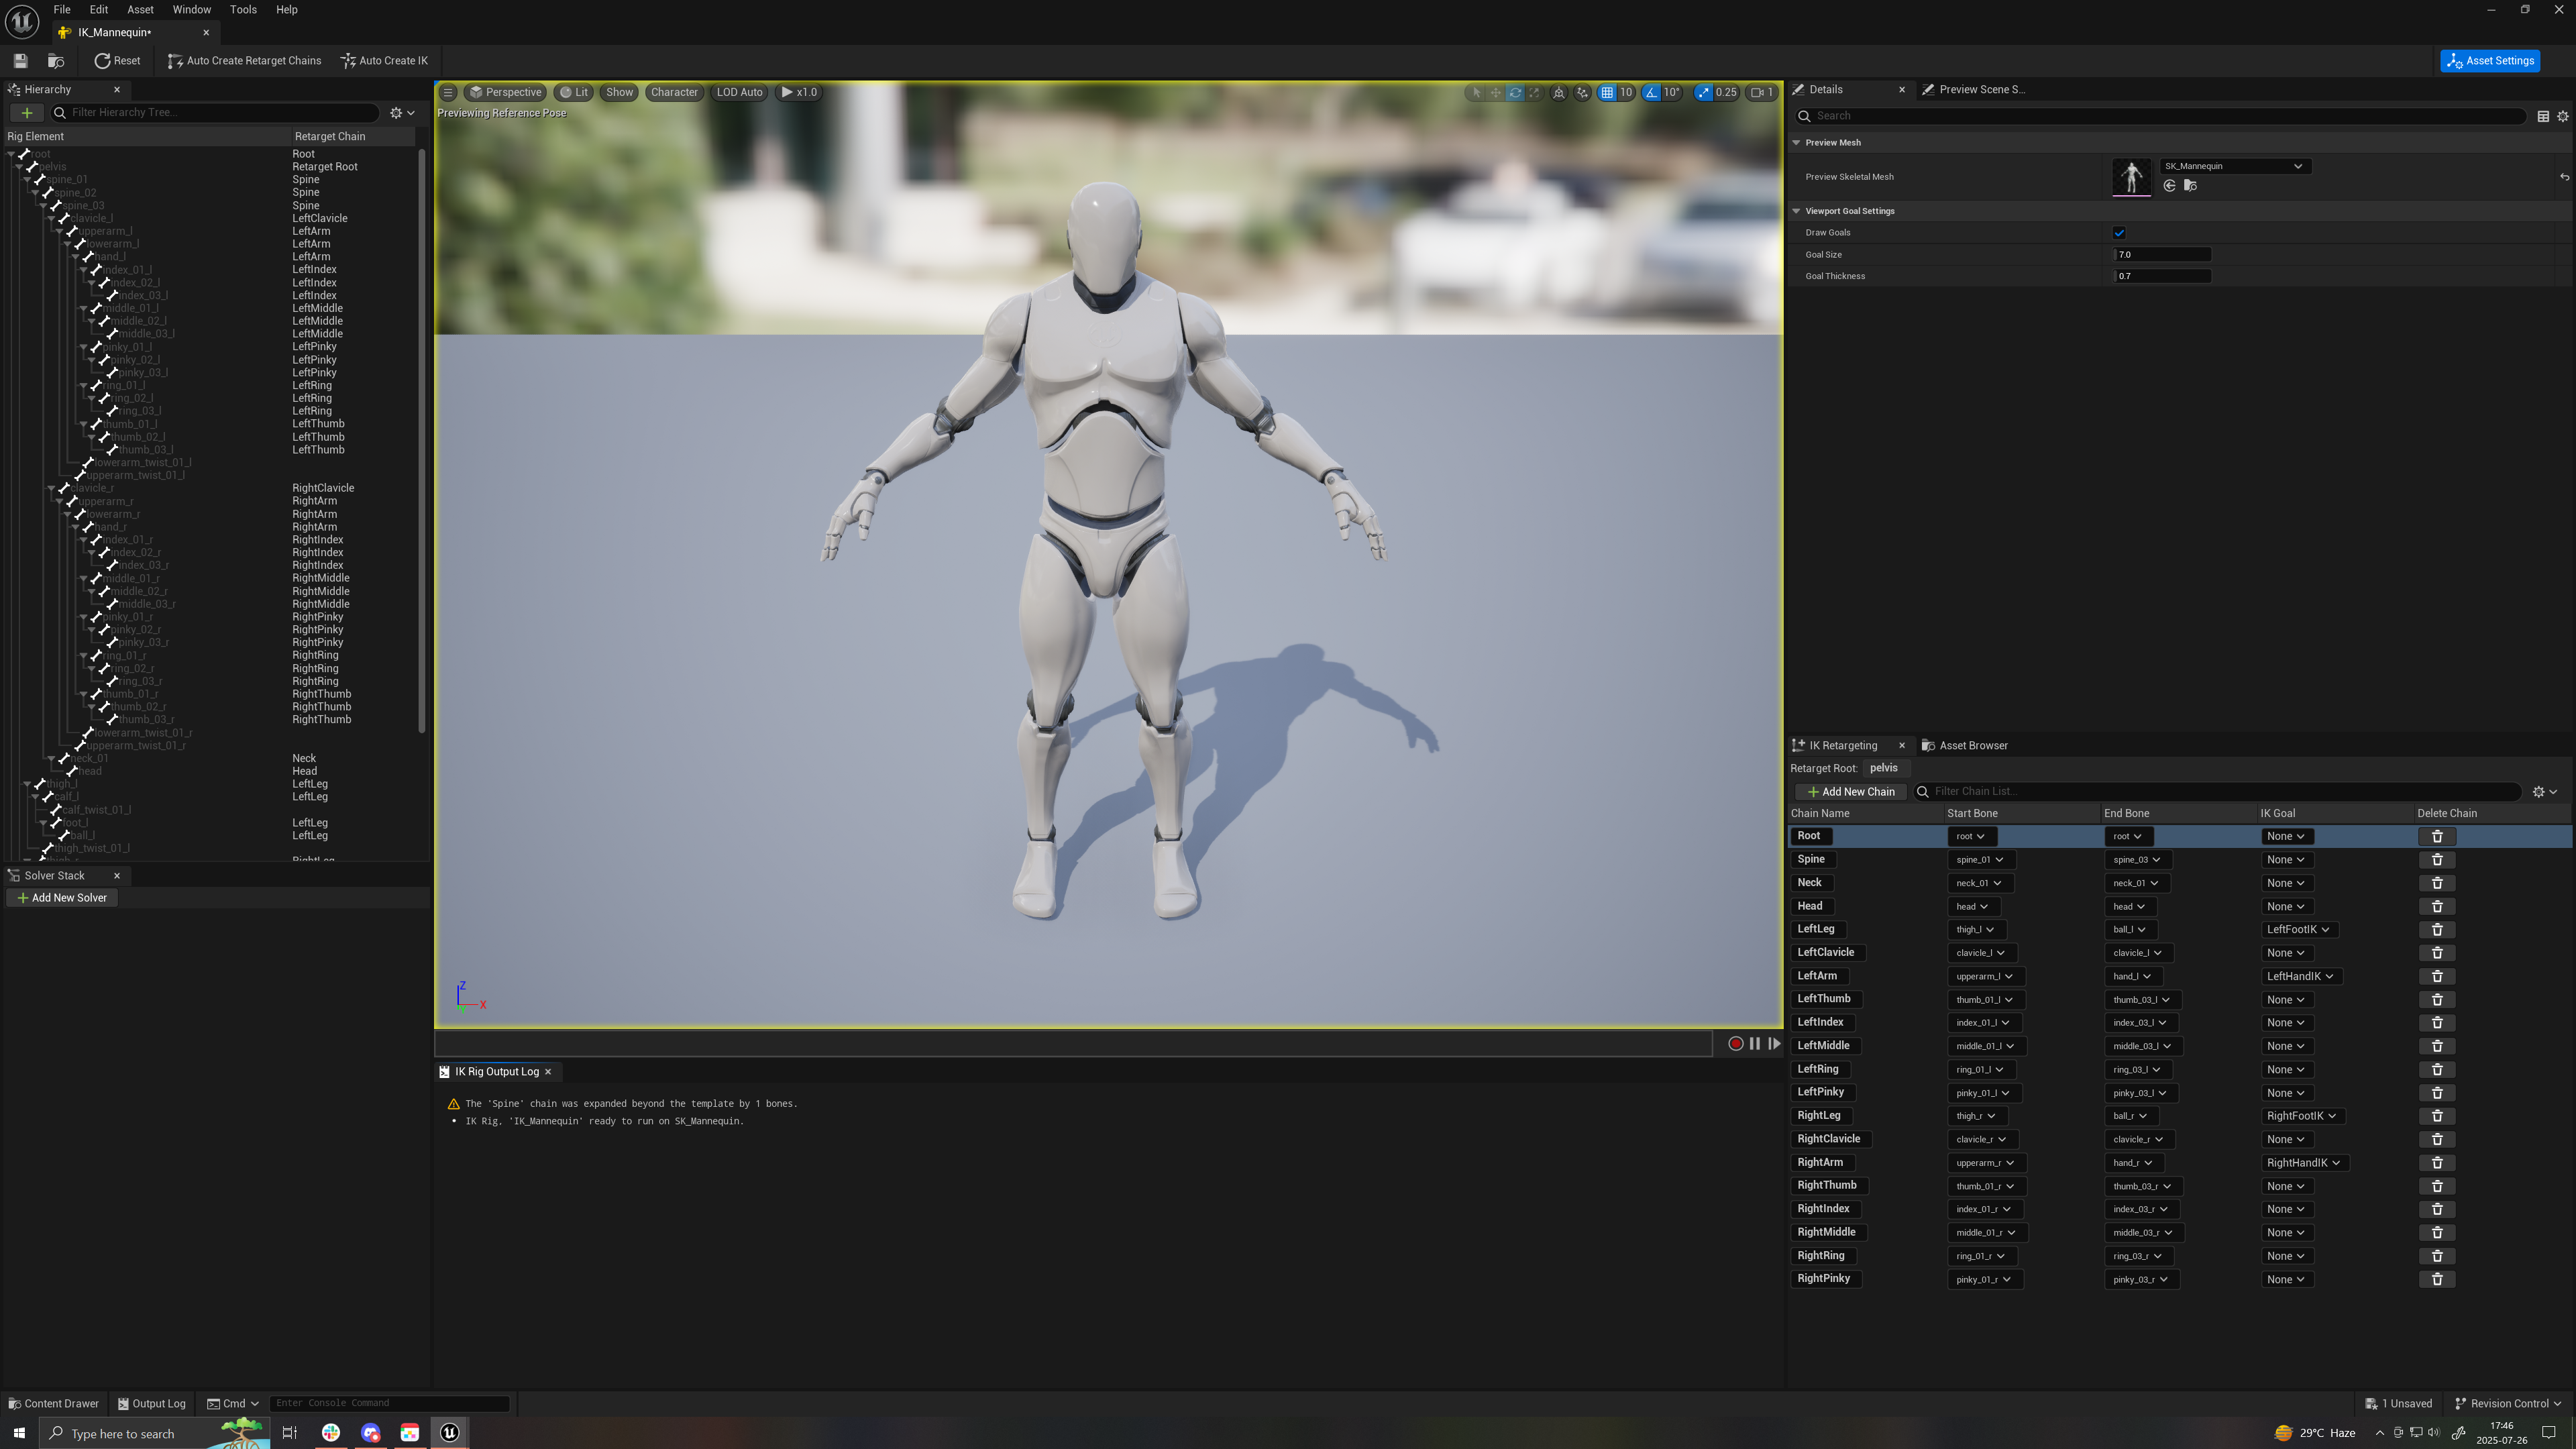
- We do not need to create an IK rig per say, but we need the retarget chain. double click on the newly created IK_Mannequin asset to open it
- Click on the “Auto Create Retarget Chains” button.
- Since this asset is an Unreal Engine well known skeleton, the retarget chains are perfect from the get go.
- However, add a new chain for Pelvis
- File → Save all.
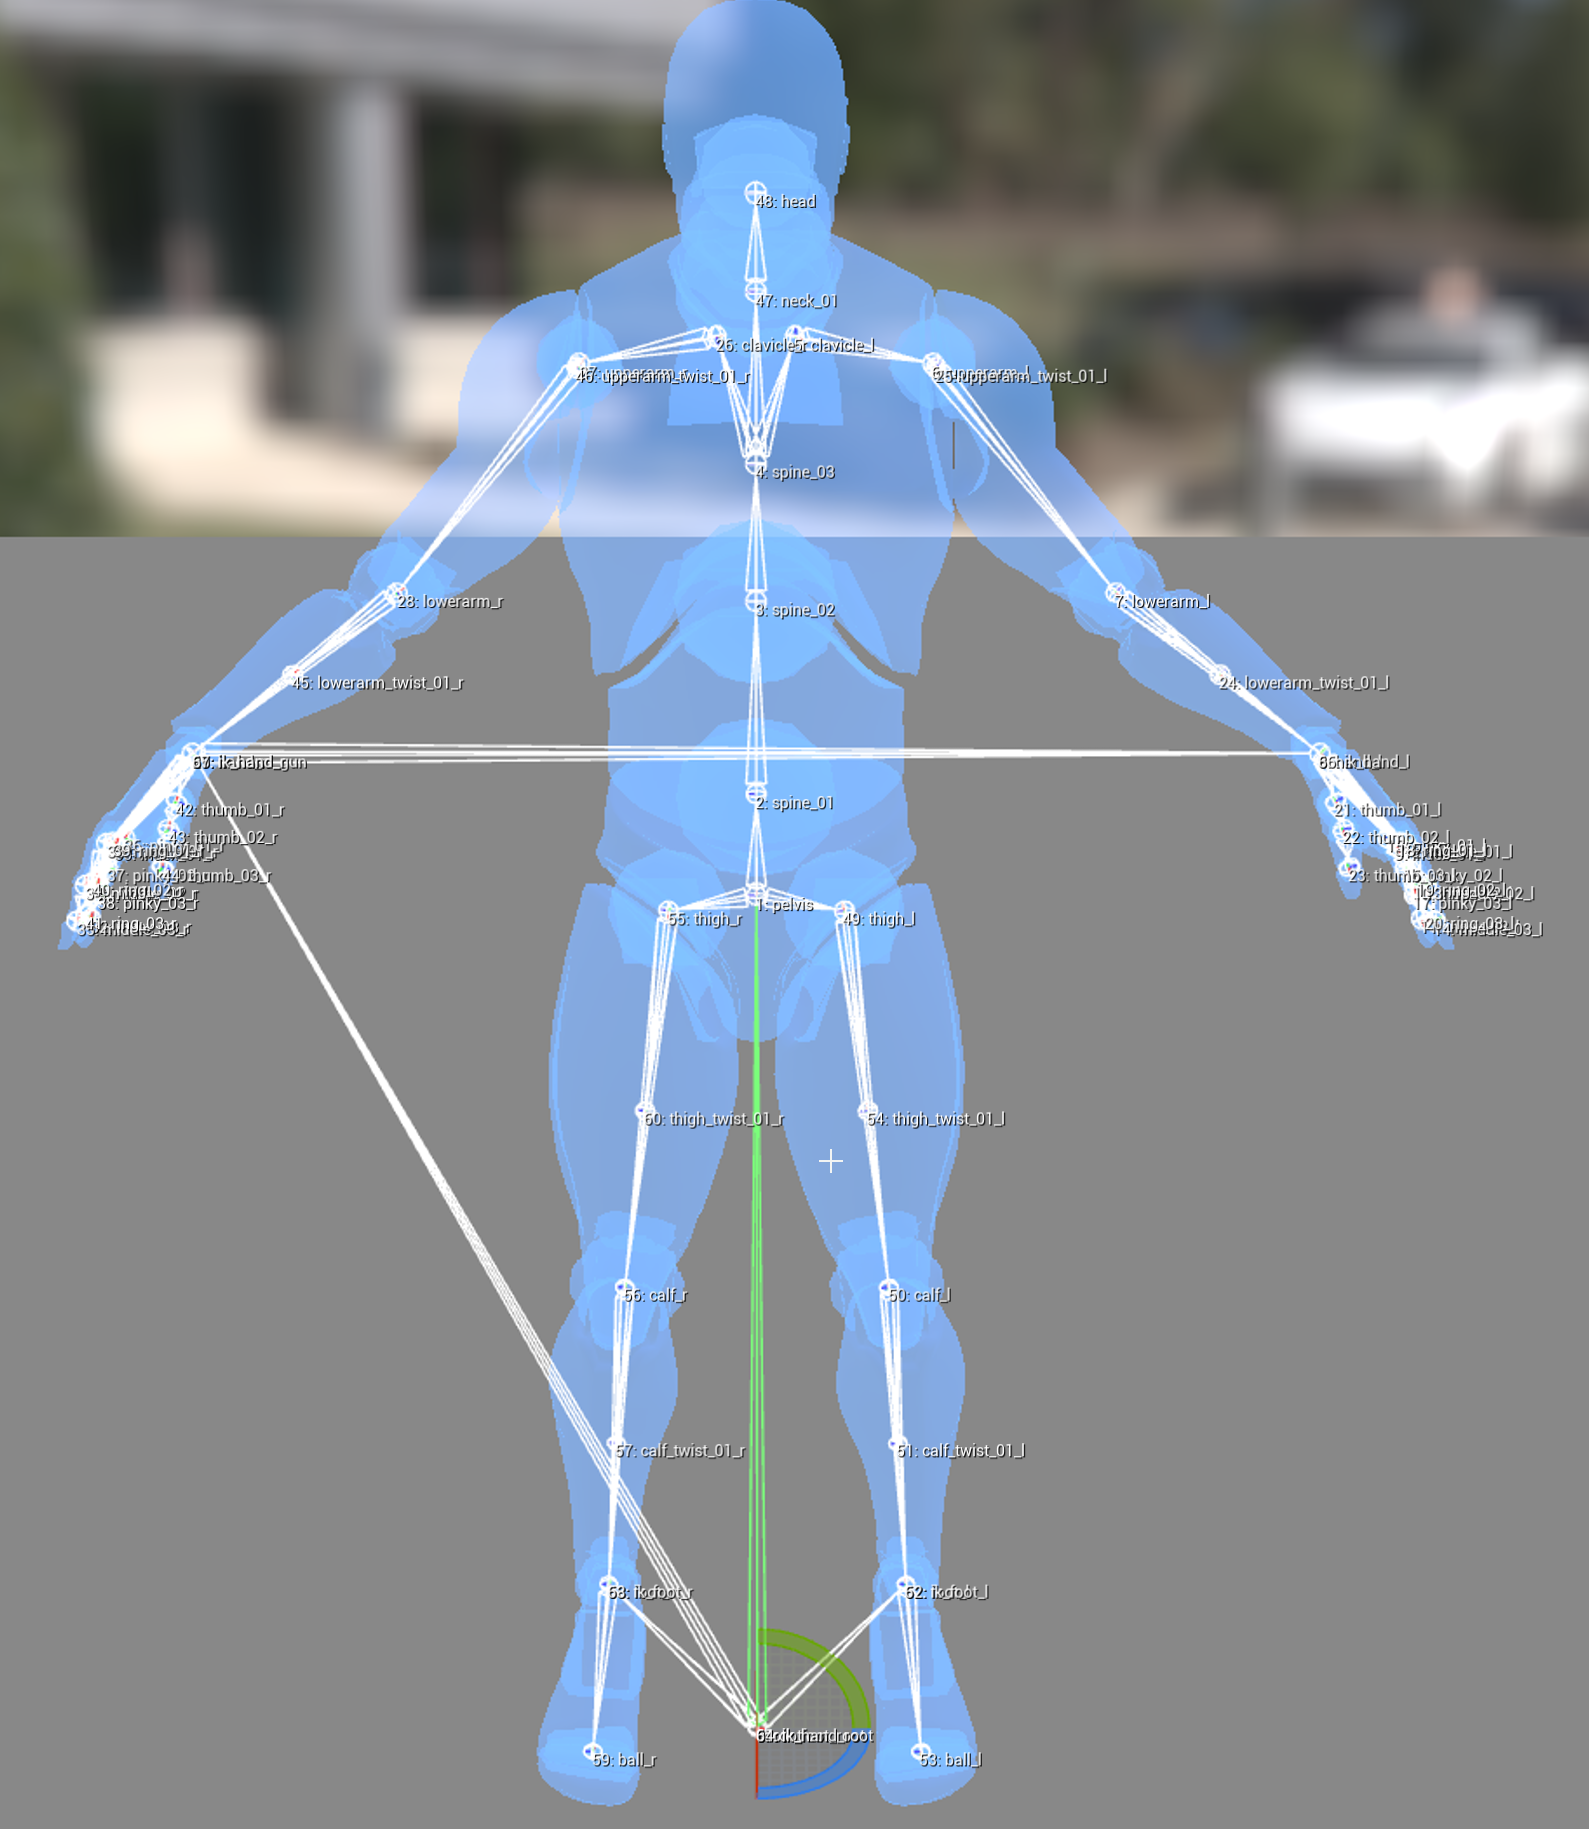
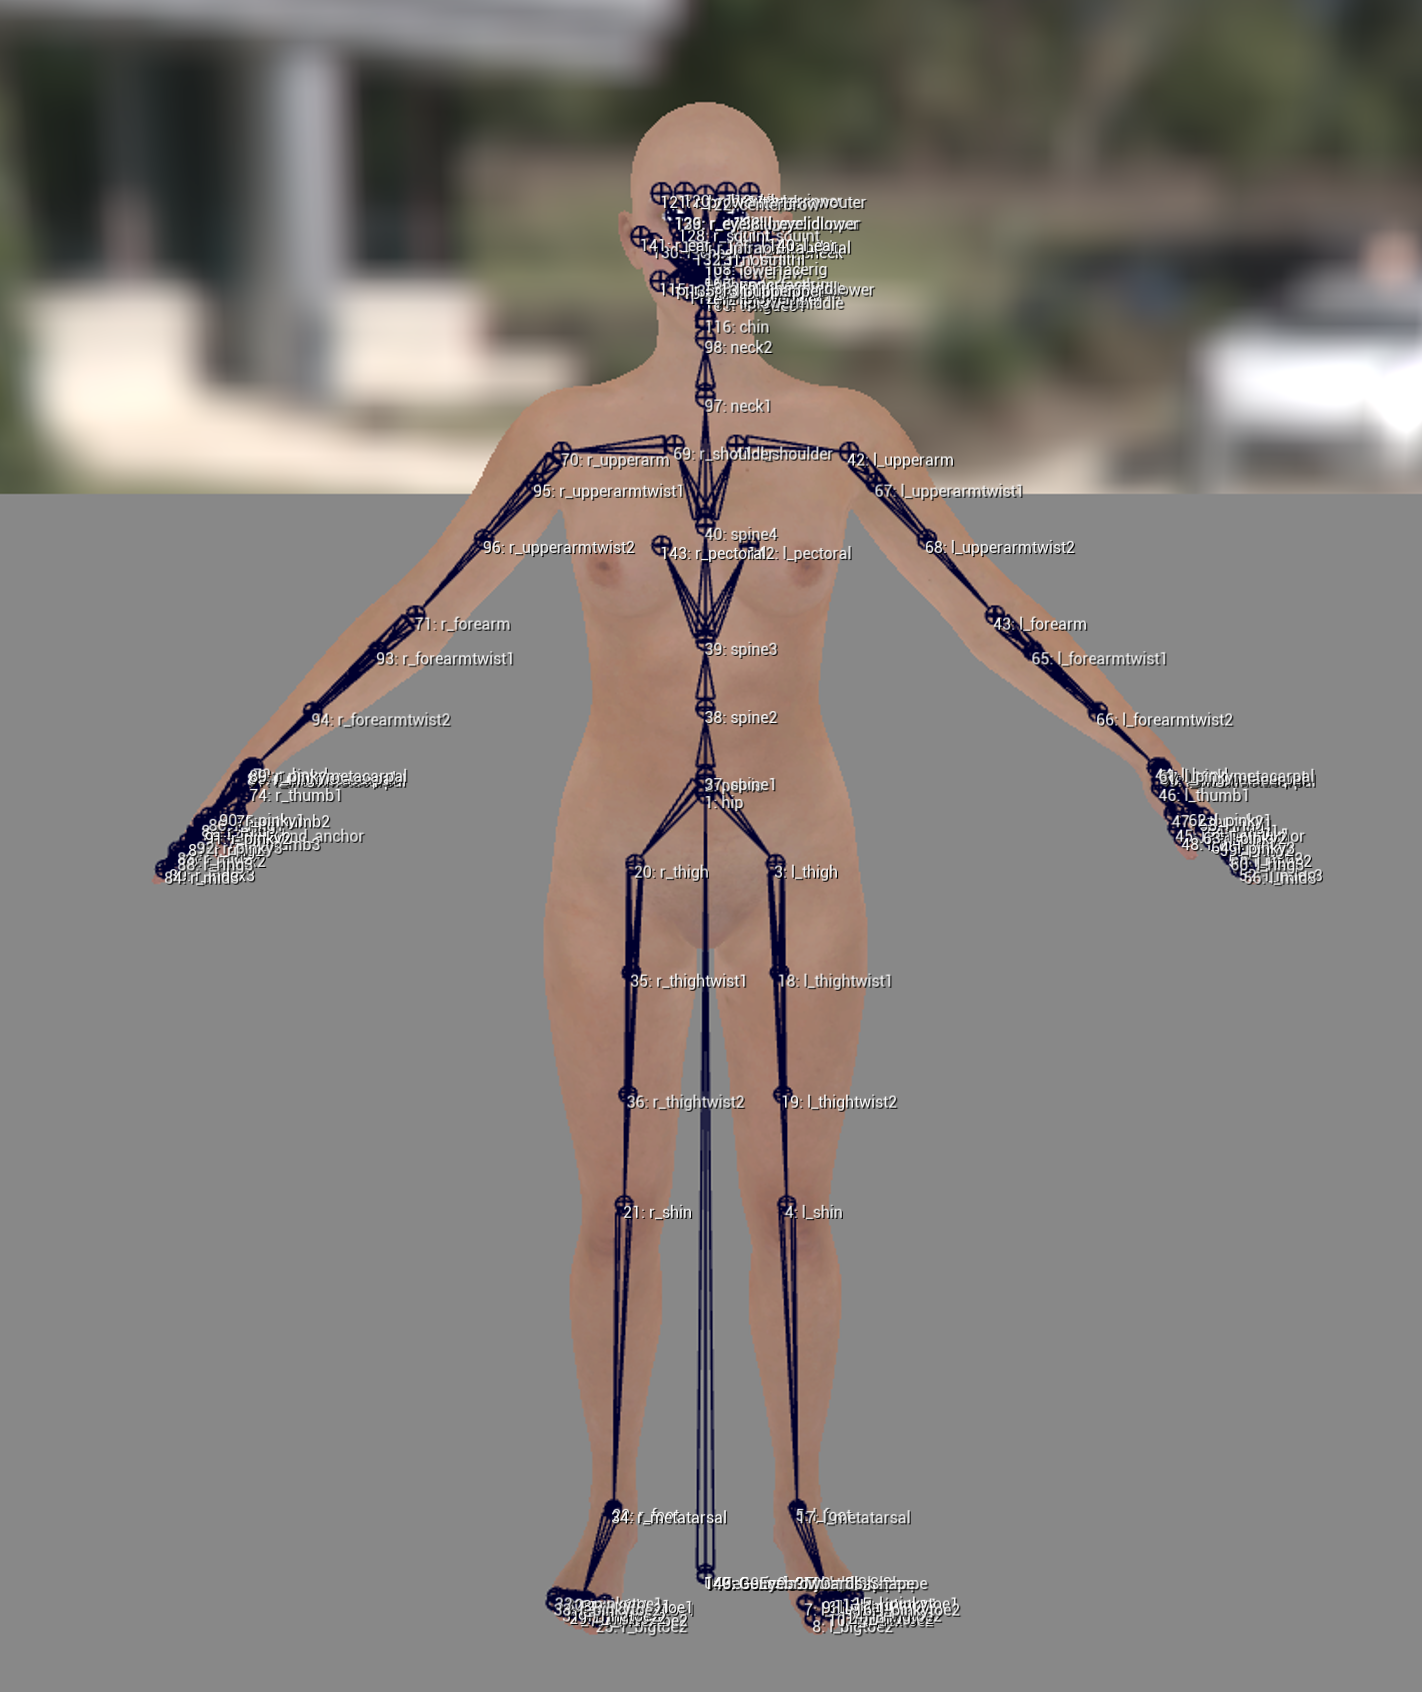
- Ok, let’s look at our UE Mannequin armature and main differences with our Genesis 9 character.
- UE Mannequin:
- And our DAZ Genesis 9 character:
And the most useful thing one can do, is laying and comparing the bone structure hierarchically in a comparison sheet, with the target on the left (Genesis 9, i.e. the one receiving the animation) and the source on the right (UE Mannequin, i.e. the one providing the animation).
⚠️
The original Google Shseet can be viewed here: https://docs.google.com/spreadsheets/d/1PQKg0pQ4rNe6lN1A4FWFIcYEXPyx1Oy0fjtPKxs53DQ/edit?usp=sharing
Or you can get the PDF version here: https://drive.google.com/file/d/1Cq9Eq6HKaYSYSOZ7e3iNPtsi6NOYuCEh/view?usp=sharing
So now that we have the mapping between the two armatures, we can create and/or match the retarget chains, especially for the areas where Genesis 9 has more bones than UE Mannequin (spine, neck).
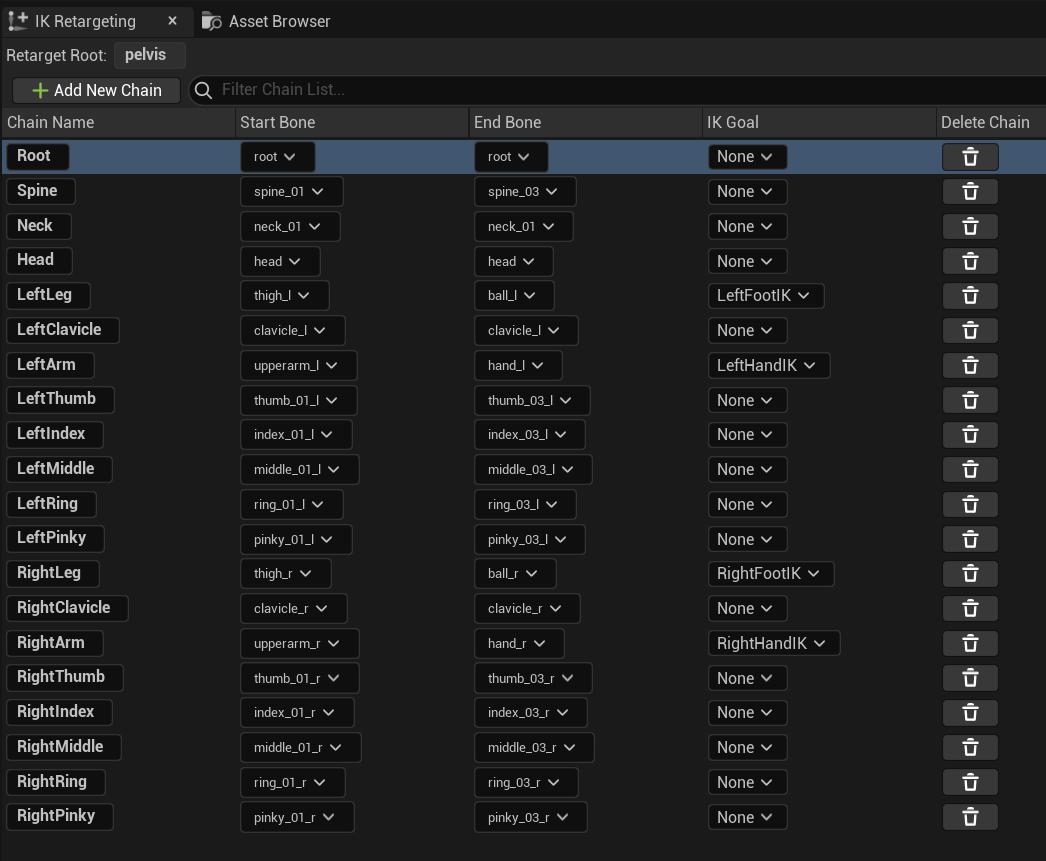
Open your UE Mannequin IK retarget asset. You should see, on the lower right corner, the IK Retarget chains:
☝🏼
The goals that you see (LeftFootIK, LeftHandIK, RightFootIK and RightHandIK) do not exist so you can set them tu None, but we can create IK controls and pivots with the following method:
Notice that the Retarget root is the pelvis, i.e. the first first “real” bone in the armature.
Notice also that the legs and hands have IK Goals.
We need to create similar chains on the Genesis 9 character, so let’s open the Genesis 9 IK asset.
You can see that it has more Chains then the UE Mannequin IK and that the retarget root is the hip, which is what’s needed because (refer to the armature mapping PDF above) the bone named “Hip” in Genesis 9 is matching the bone named “Pelvis” in the UE Mannequin armature.
So let’s make sure similar chain have exactly the same name and let’s make sure the span the correct amount of bones on the Genesis 9.
☝🏼
- For the neck and spine bones for example, you’ll notice that Genesis 9 has 4 spine bones instead of 3 compared to the UE Mannequin armature, and 2 neck bones instead of 1.
- We need to take that into account and tell the retarget to distribute the animation transformations for, say, the spine chain of a UE Mannequin (3 bones) across all the spine bones (4 bones) of the Genesis 9 armature.
- Ditto for the neck armature.
- Notice that Root, Neck and Spine chains are missing in the Genesis 9 IK.
- The LeftClavicle and RightClavicle chains are missing as well. The reason being that Genesis 9 calls them l_shoulder and r_shoulder (refer to the PDF bone mapping).
Close the UE Mannequin IK rig.
Open the Genesis 9 IK rig.
You can click on the + Add New Chain button to add a new chain.
Essentially, we not only need to create the chains that do not exist in Genesis 9 but are present in UE Mannequin, but also, for the existing chains, that the bones are the ones that match together (see bone mapping PDF above).
Here is what needs to be done on the Genesis 9 character:
| Action | Chain Name | Start bone | End bone | IK Goal |
| --- | --- | --- | --- | --- |
| Create | Root | Genesis 9 | Genesis 9 | None |
| Create | Spine | spine1 | spine4 | None |
| Create | Neck | neck1 | neck2 | None |
| Create | LeftClavicle | l_shoulder | l_shoulder | None |
| Create | RightClavicle | r_shoulder | r_shoulder | None |We’re done! Save the IK rig asset.
Right-click on an empty space in the asset browser where your Genesis 9 character is located (you could choose any folder really, just be consistent).
☝🏼
If you need to create more than one retargeter, you may want to consider creating a folder at the root (below “Content”) named “Retargeters” for example.
- Choose Animation → Retargeting → IK Retarget to create a new one.
Double click on it to open it.
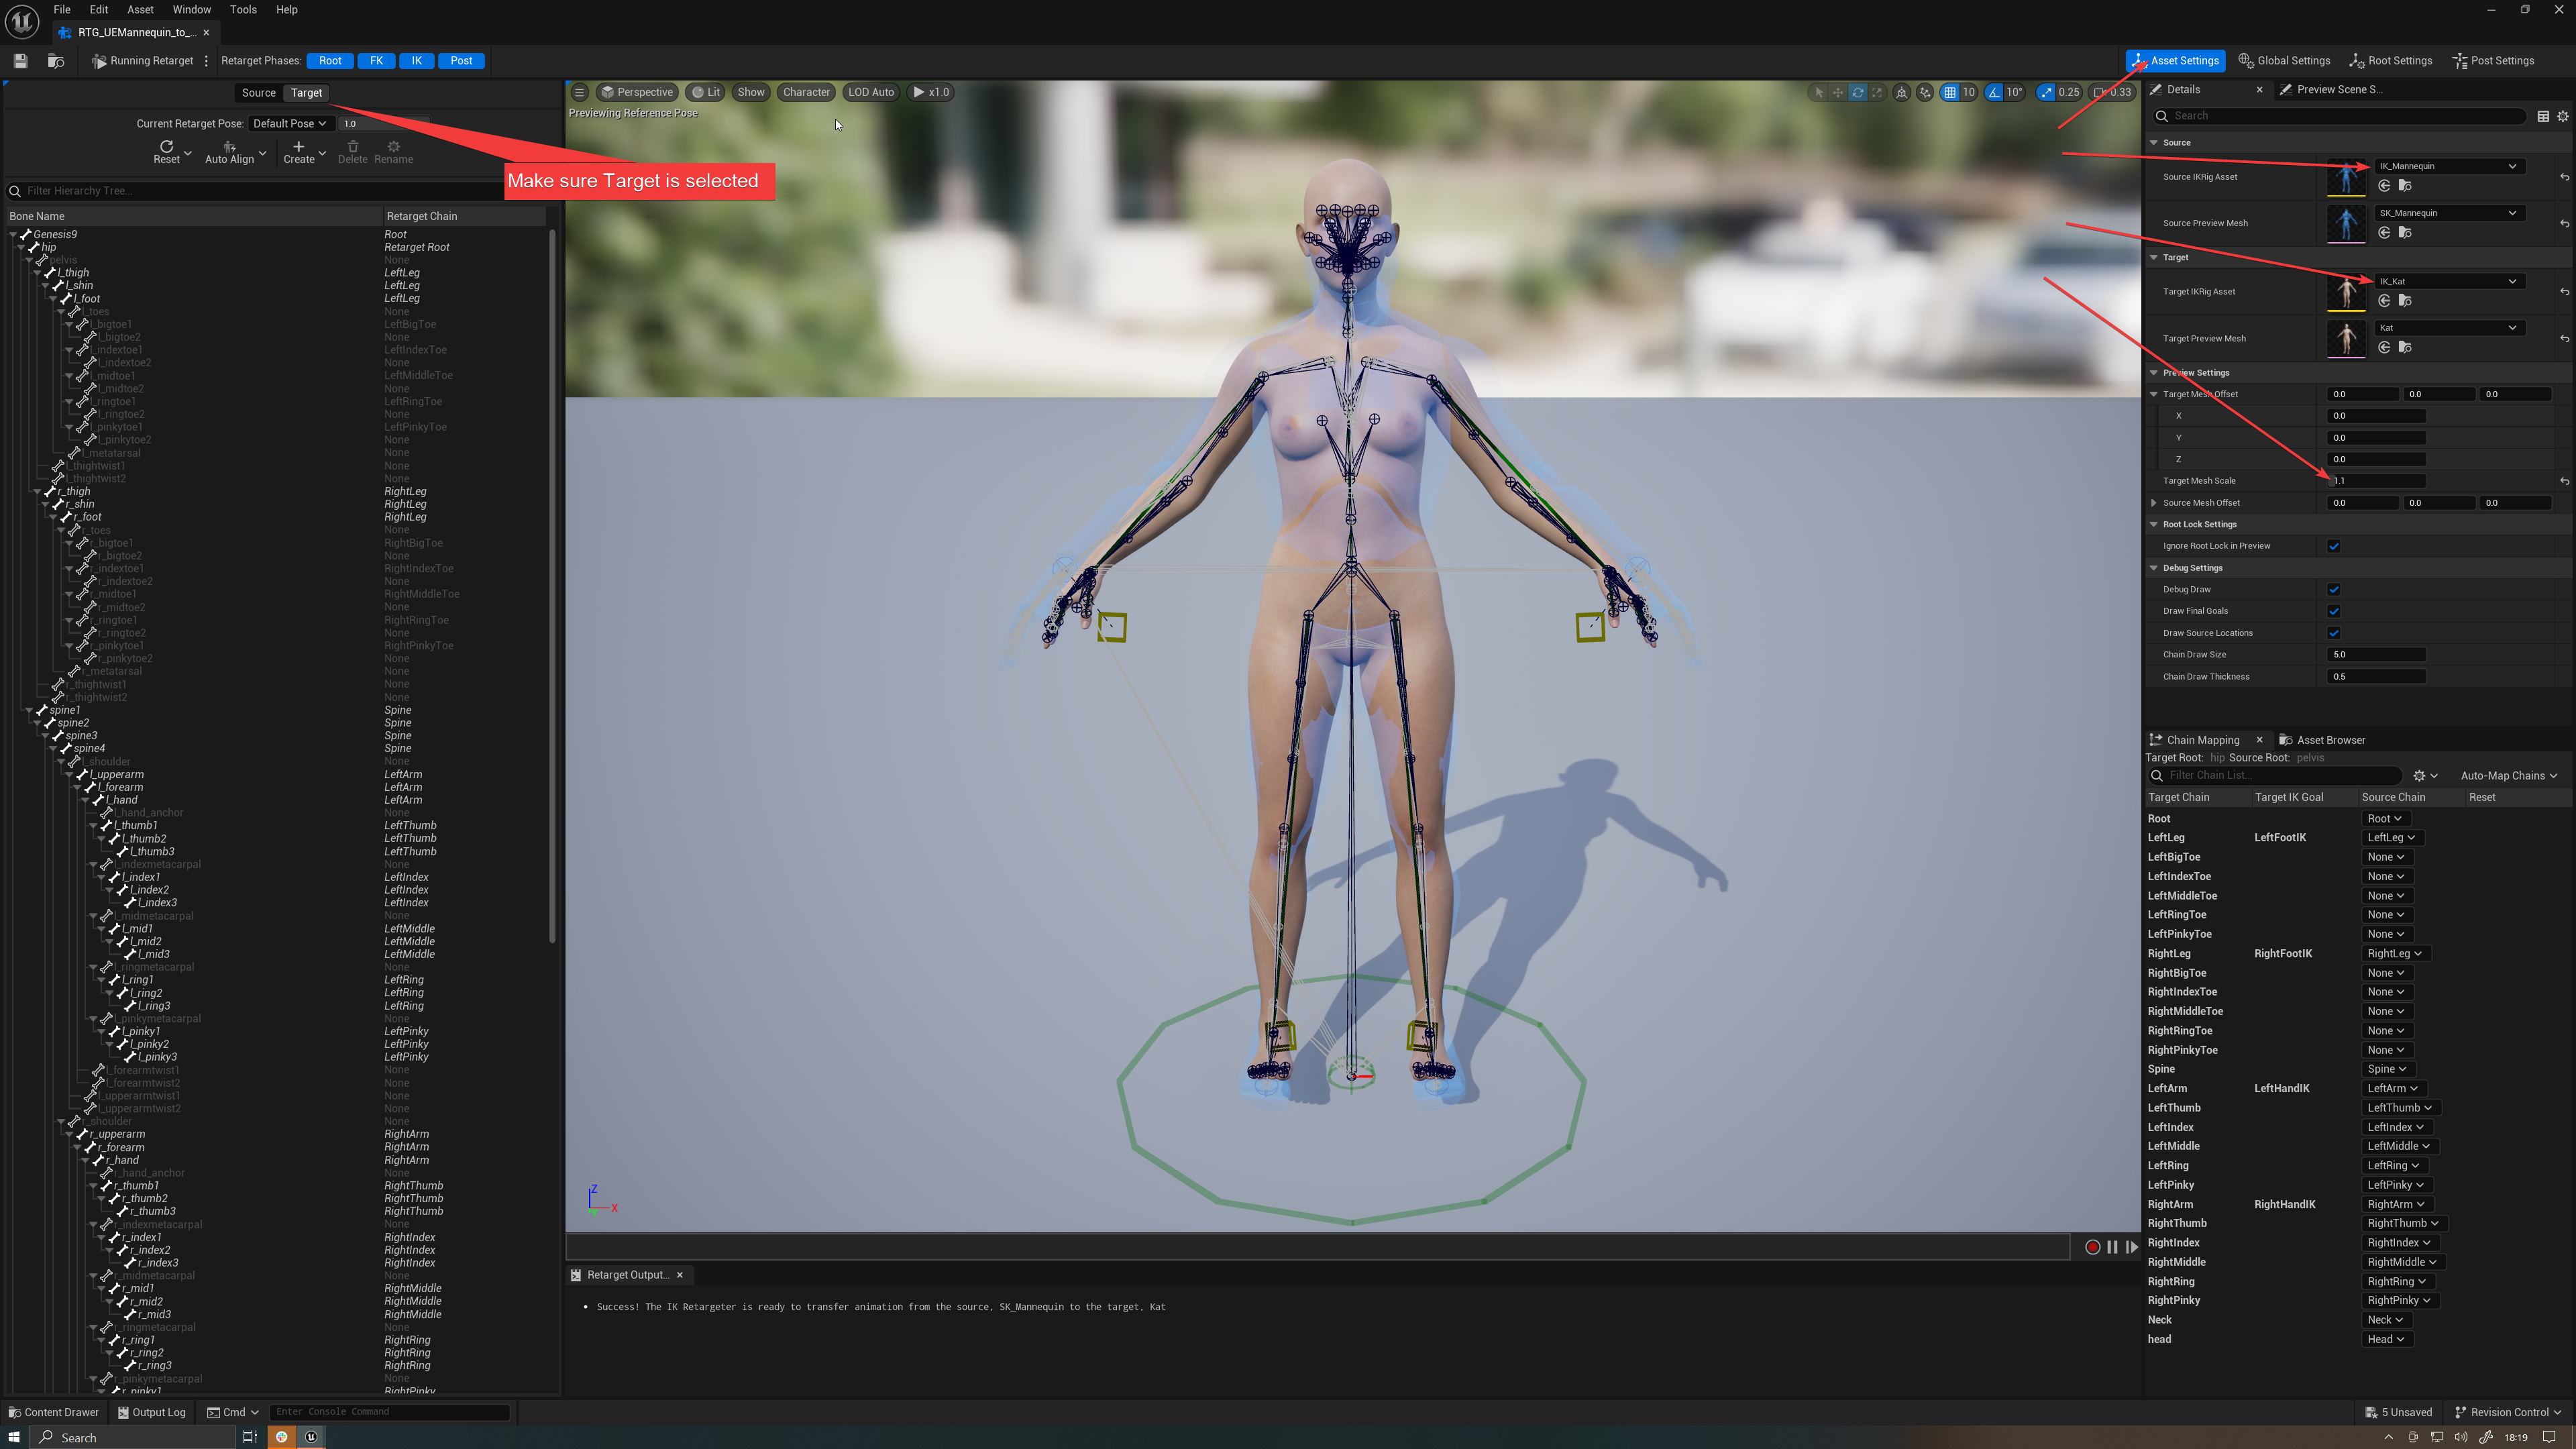
Make sure that, on the left, “Target” is selected, we want to work and modify/edit the target charcater, i.e. the Genesis 9 one.
Under Asset Settings, in the Details panel on the right, set source mesh to your UE Mannequin IK Rig (mine is called IK_Mannequin) and target to your Genesis 9 IK rig (mine is called IK_Kat).
Under the “Target Mesh Offset” drop down, set target mesh scale to 1.1 so that the size of the Genesis 9 is as close as possible to the one of the mannequin.
☝🏼
You may need to use a slightly different scale value, the idea is to try to match both sizes as closely as possible.
It does not affect the real size of the Genesis 9 character, do not worry.
- Save!
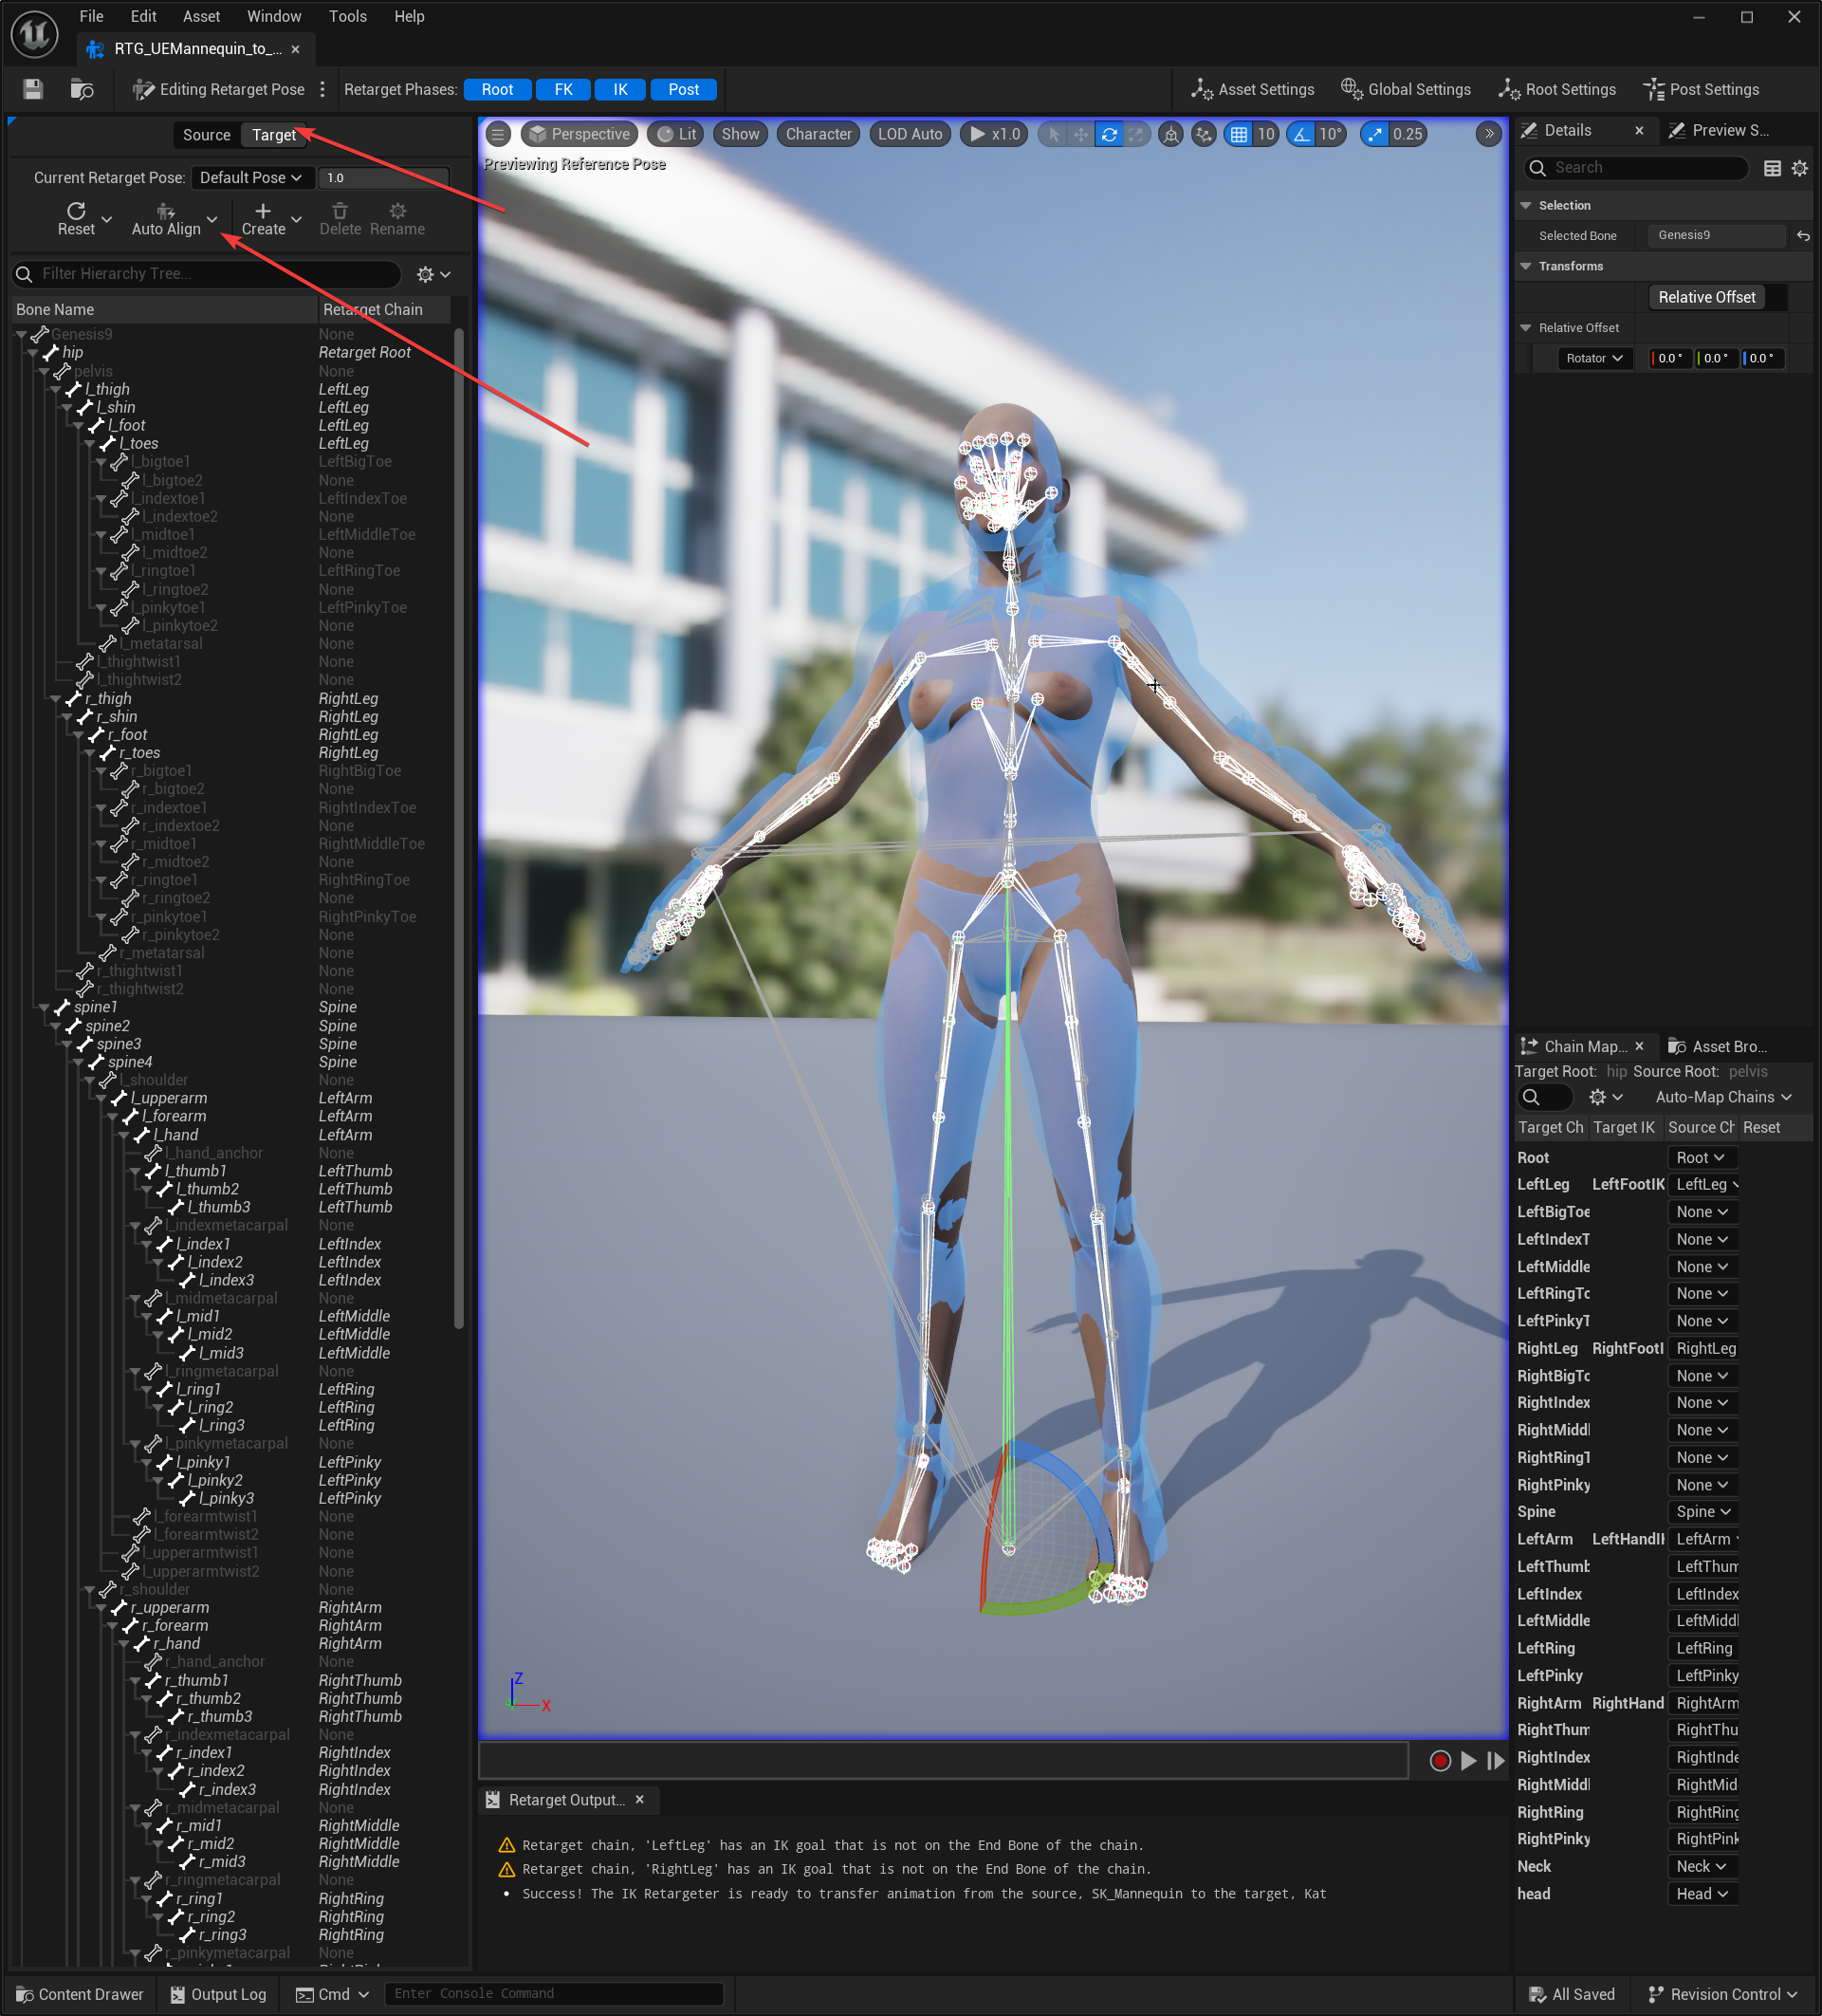
- Click on the “Running Retarget” button so that we switch to “Edit Retarget Pose” instead.
- On the left, where you see the target bone structure, make sure the “hip” bone is set to “Retarget root”. It should be by default. If not, we need to change it.
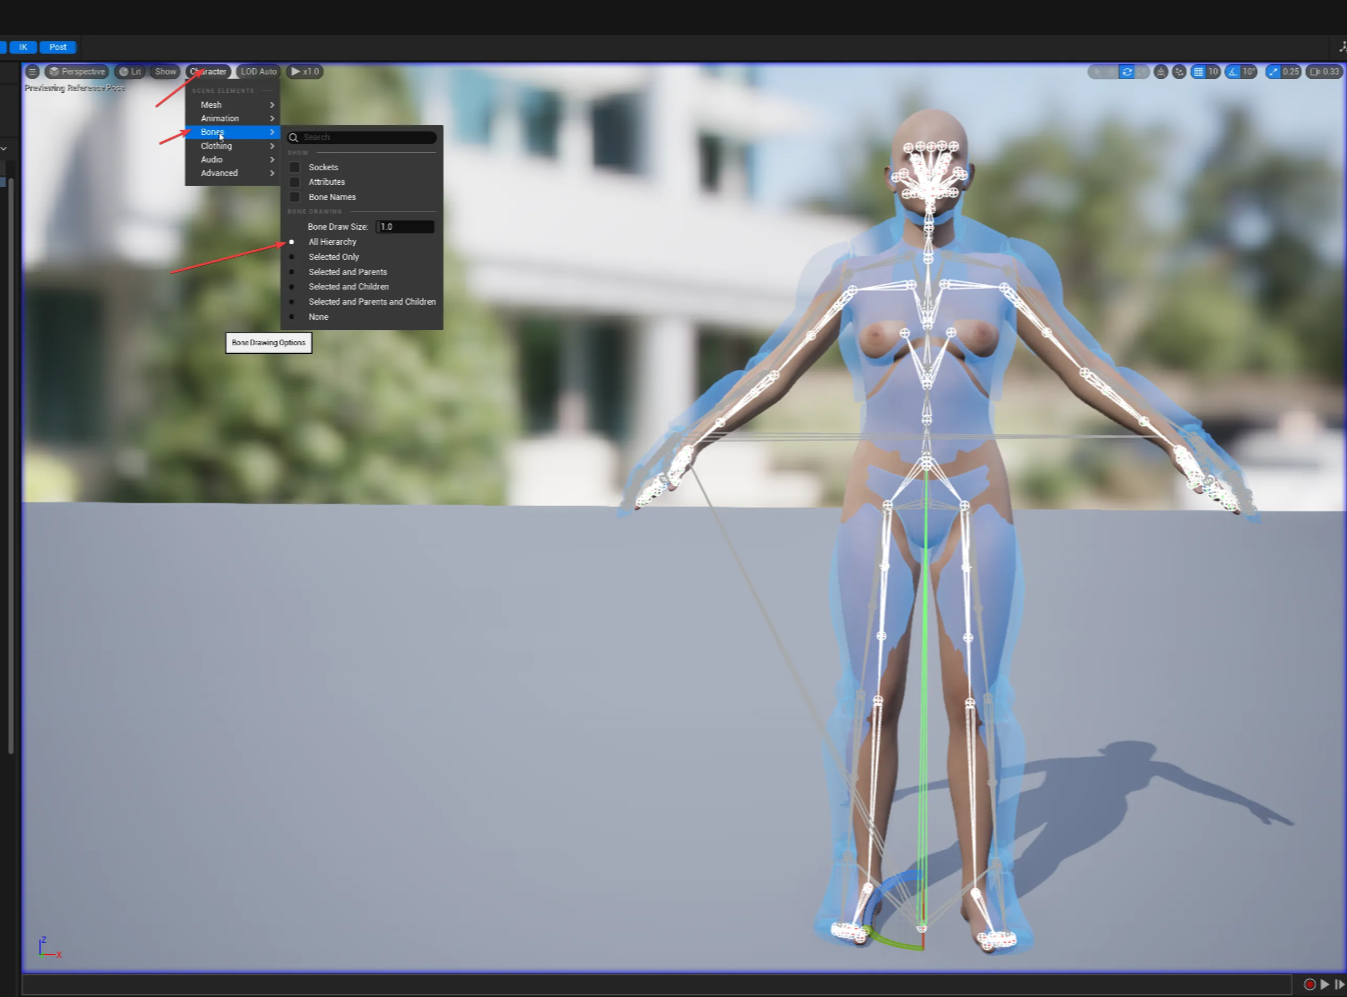
- In the viewport, click on Character and enable the display of the bones, it will help us with the pose alignment.
☝🏼
If you look at the chain mapping section on the lower right part, everything should be mapped, i.e. the target chain to the same chain name on the source, EXCEPT for the toes, as UE Mannequins do not have any.
Save but keep the retargeting window open.
Browse to your UE Mannequin animations.
Select a UE Mannequin animation that you have and want to retarget.
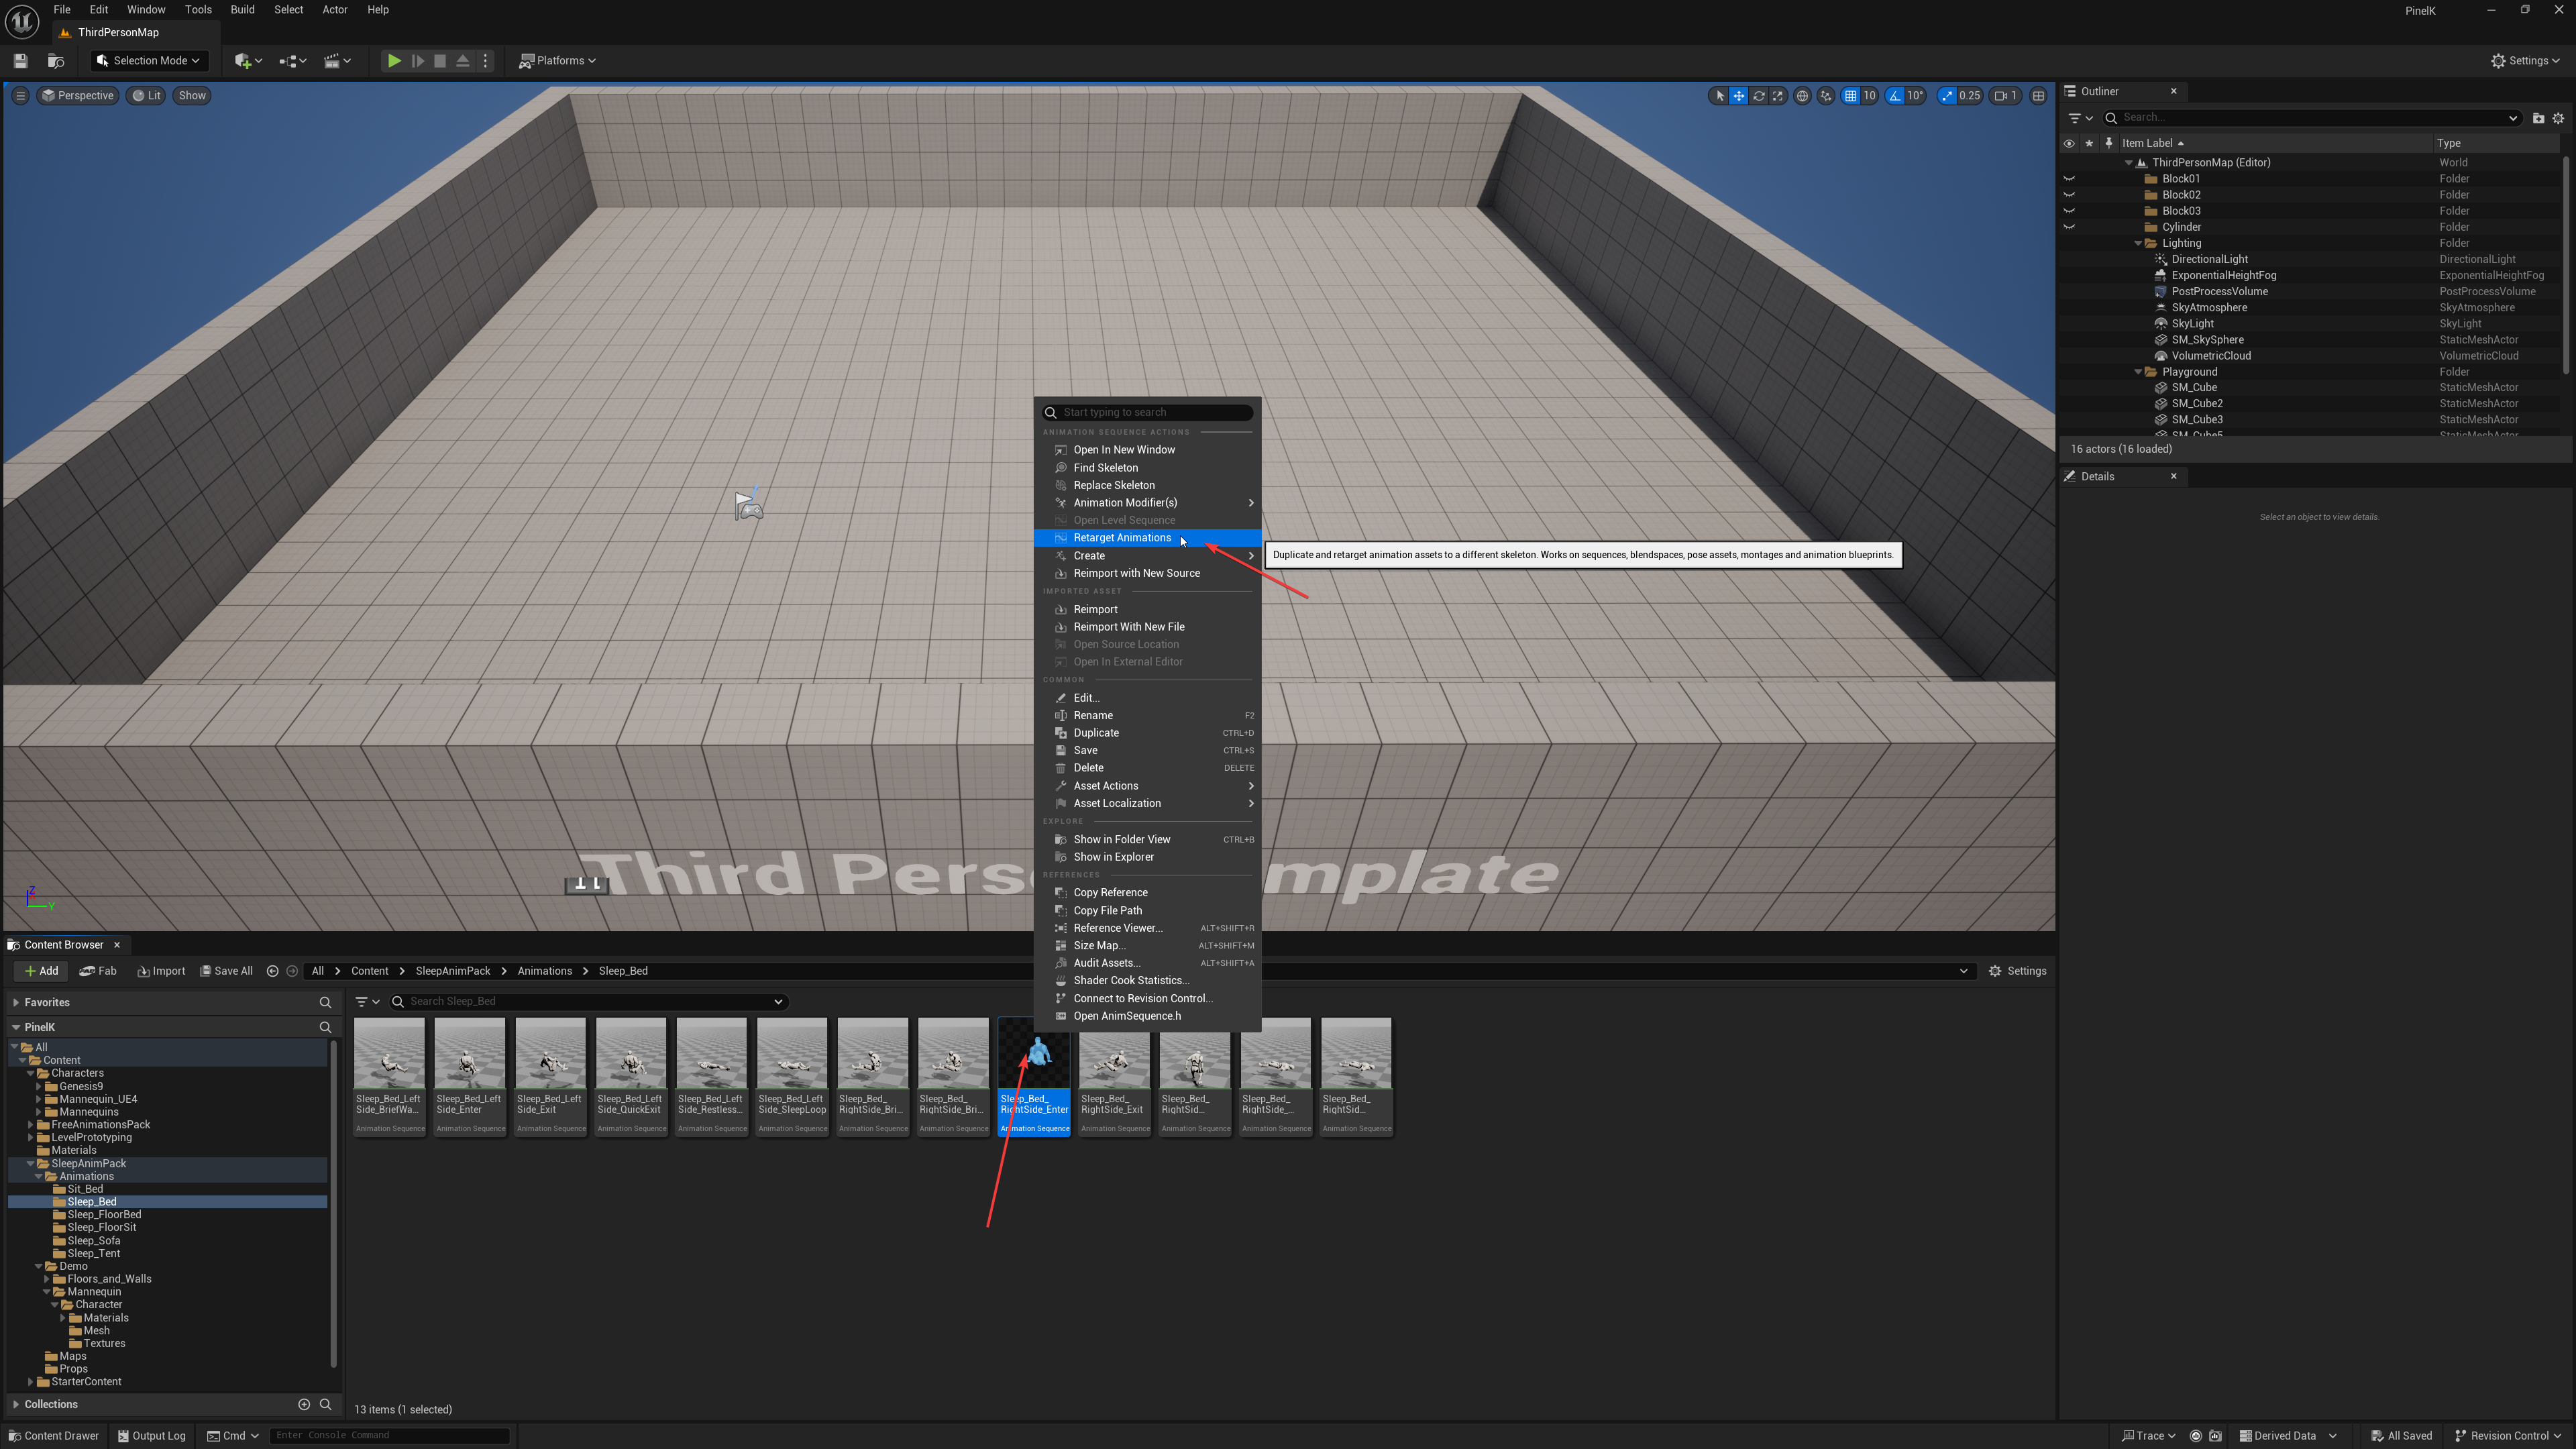
Right-click and choose Retarget Animation.
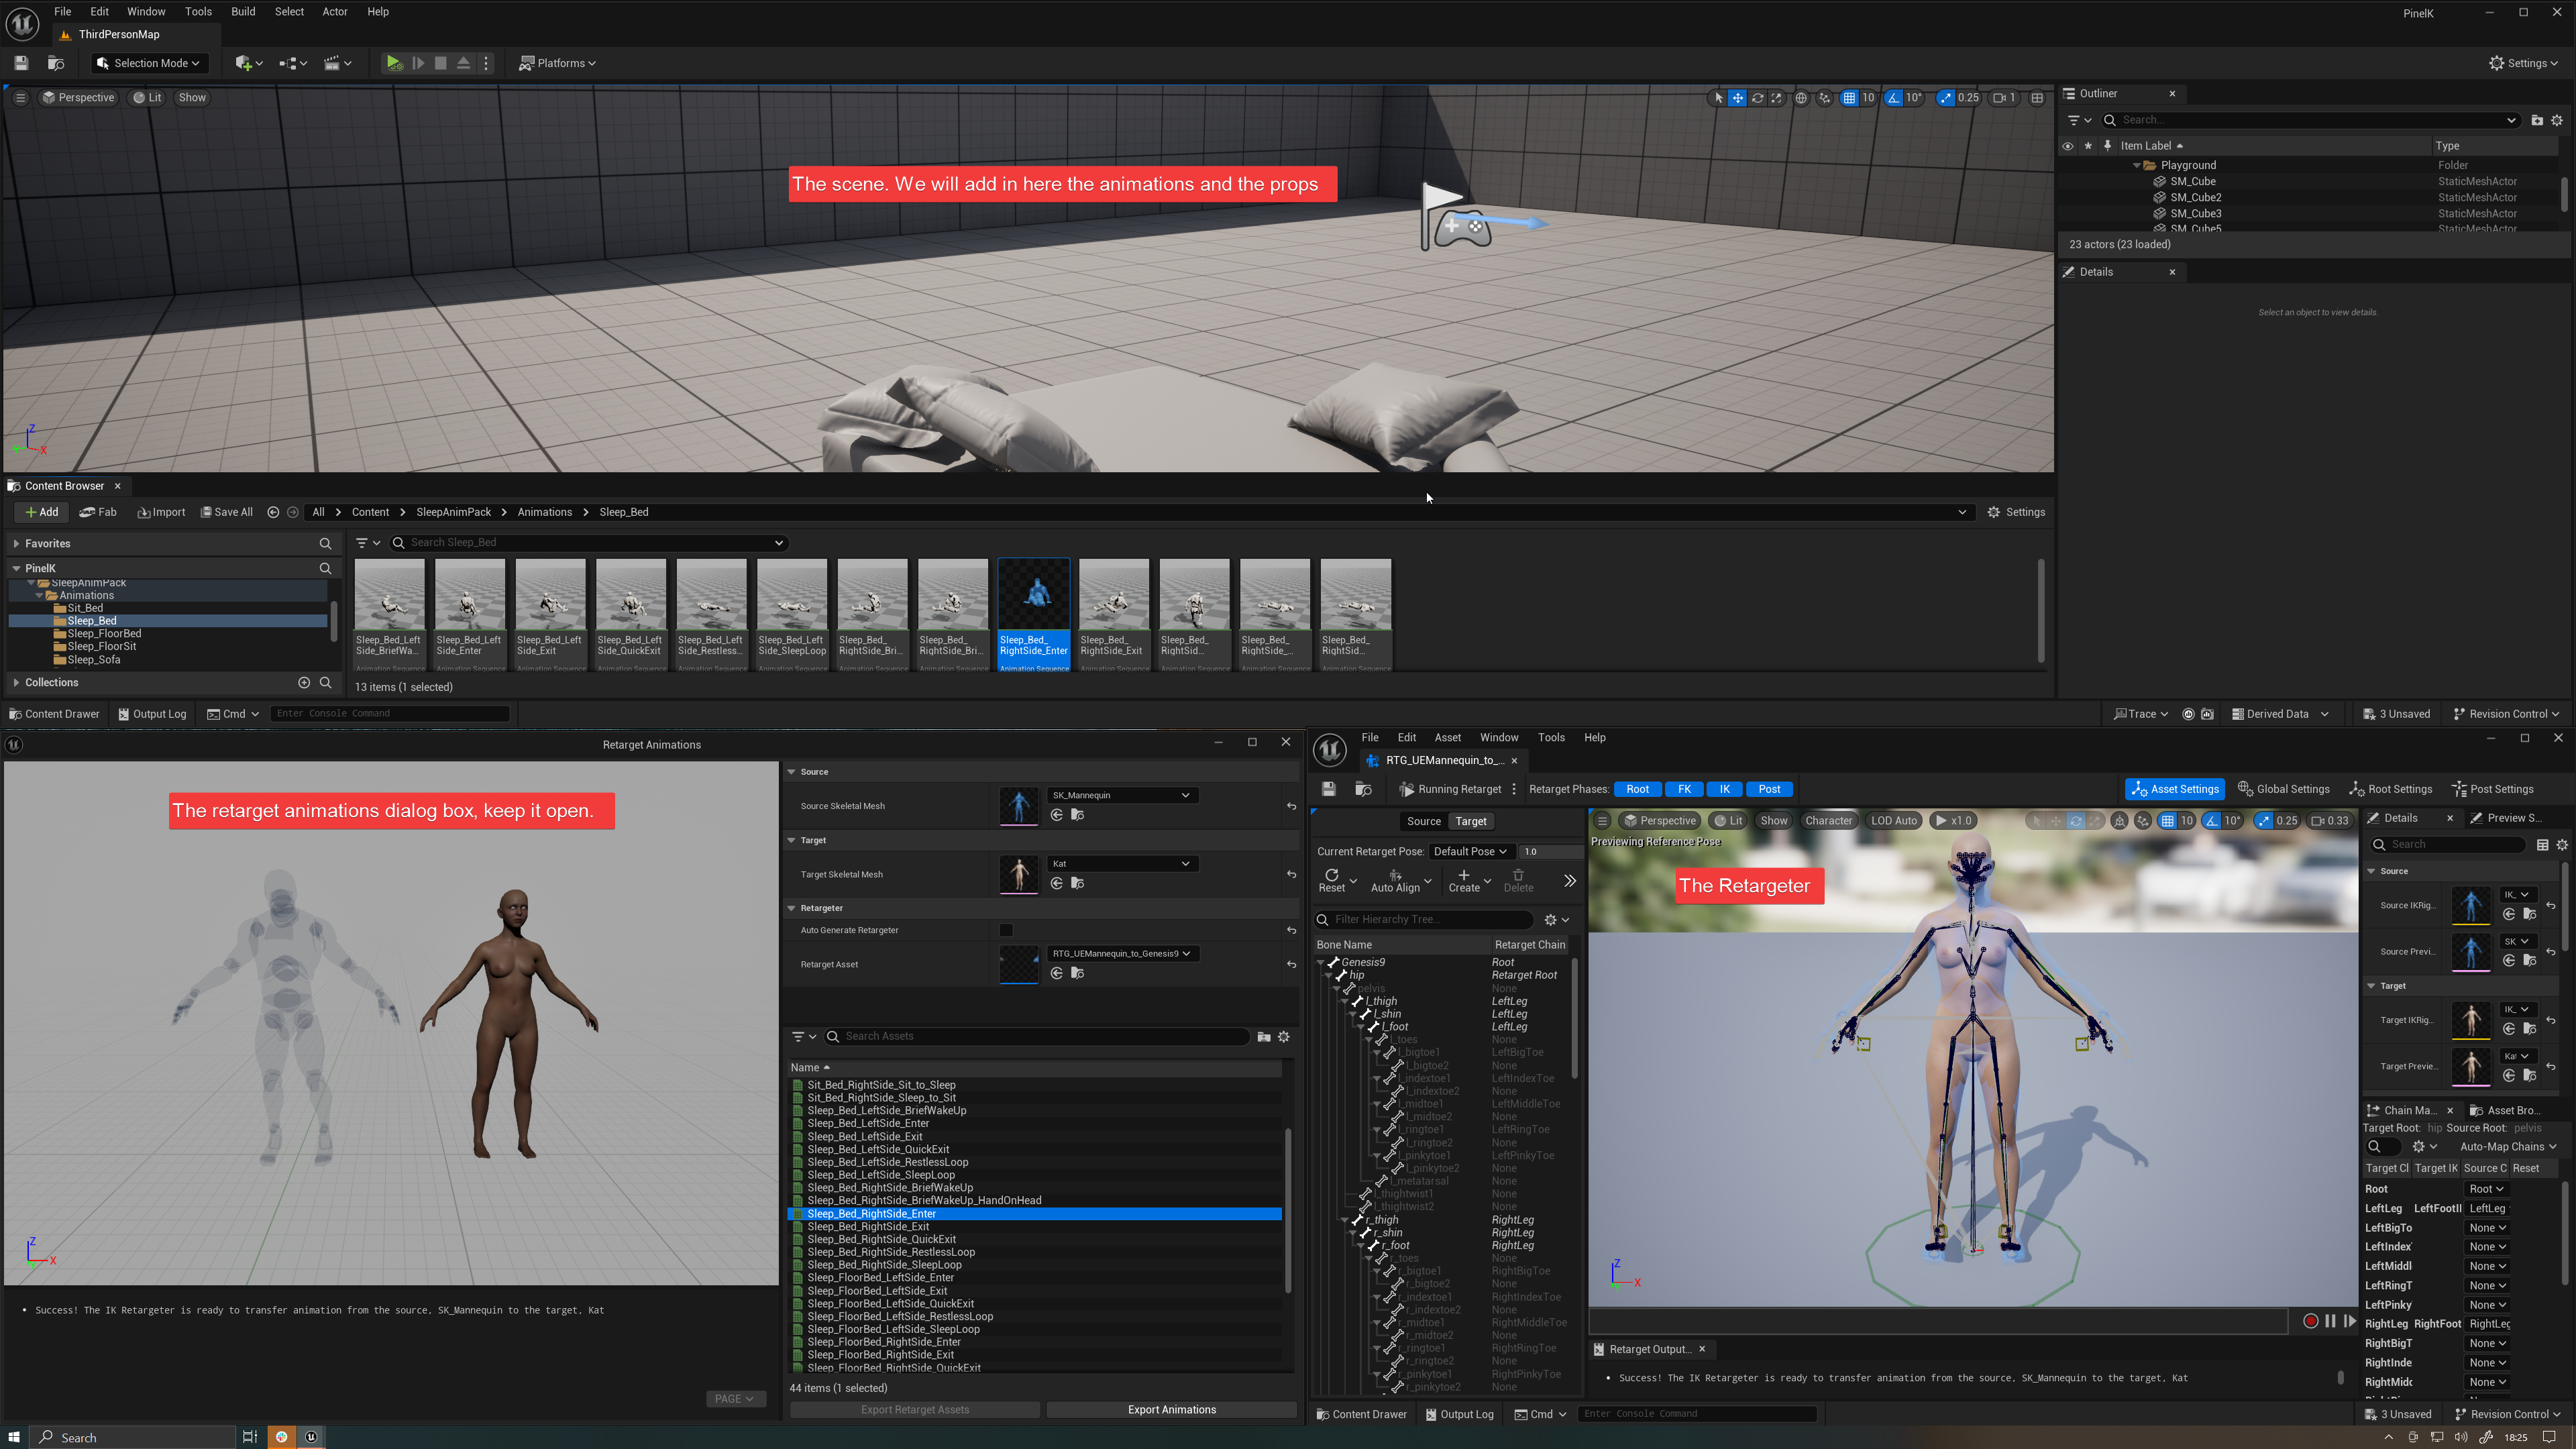
- In IK Retargeter window will appear.
- Keep it open as we will iterate back and forth between the RTG window that defines the retargeting, and the dialog we just open that actually retargets an animation.
- Also, keep your main window handy, we will drag and drop both animated characters, at exactly the same place, to compare the original and retargeted animation.
- Ok, now the tedious work of aligning the bones and their orientation. Kat’s bones have to match the angles and directions of the UE Mannequin bones, so we need select each bone and rotate it accordingly.
- What I notice right away (but it may not require fixing, so, again, change a single thing, generate the animation, verify, iterate):
- UE Mannequin’s clavicle are tilted down a bit.
- Retargeted roots are misaligned: the target’s hip is higher than the source’s Pelvis.
- The forearms are rotated frontward on the Mannequin.
- The mannequin Legs are more angled laterally.
- But the feet are pointing forward.
- So first things first, let’s try an auto-realign, it might fix most issues.
- However, we don’t to perfectly align everything, it would never end and that’s why we have set the root bones (”Genesis 9” and “hip”) retarget to “Animation Scaled” instead of “skeleton”’ remember?
- On the retargeter window, click on the Target button , then click on the Auto-Align→Align All bones.
☝🏼
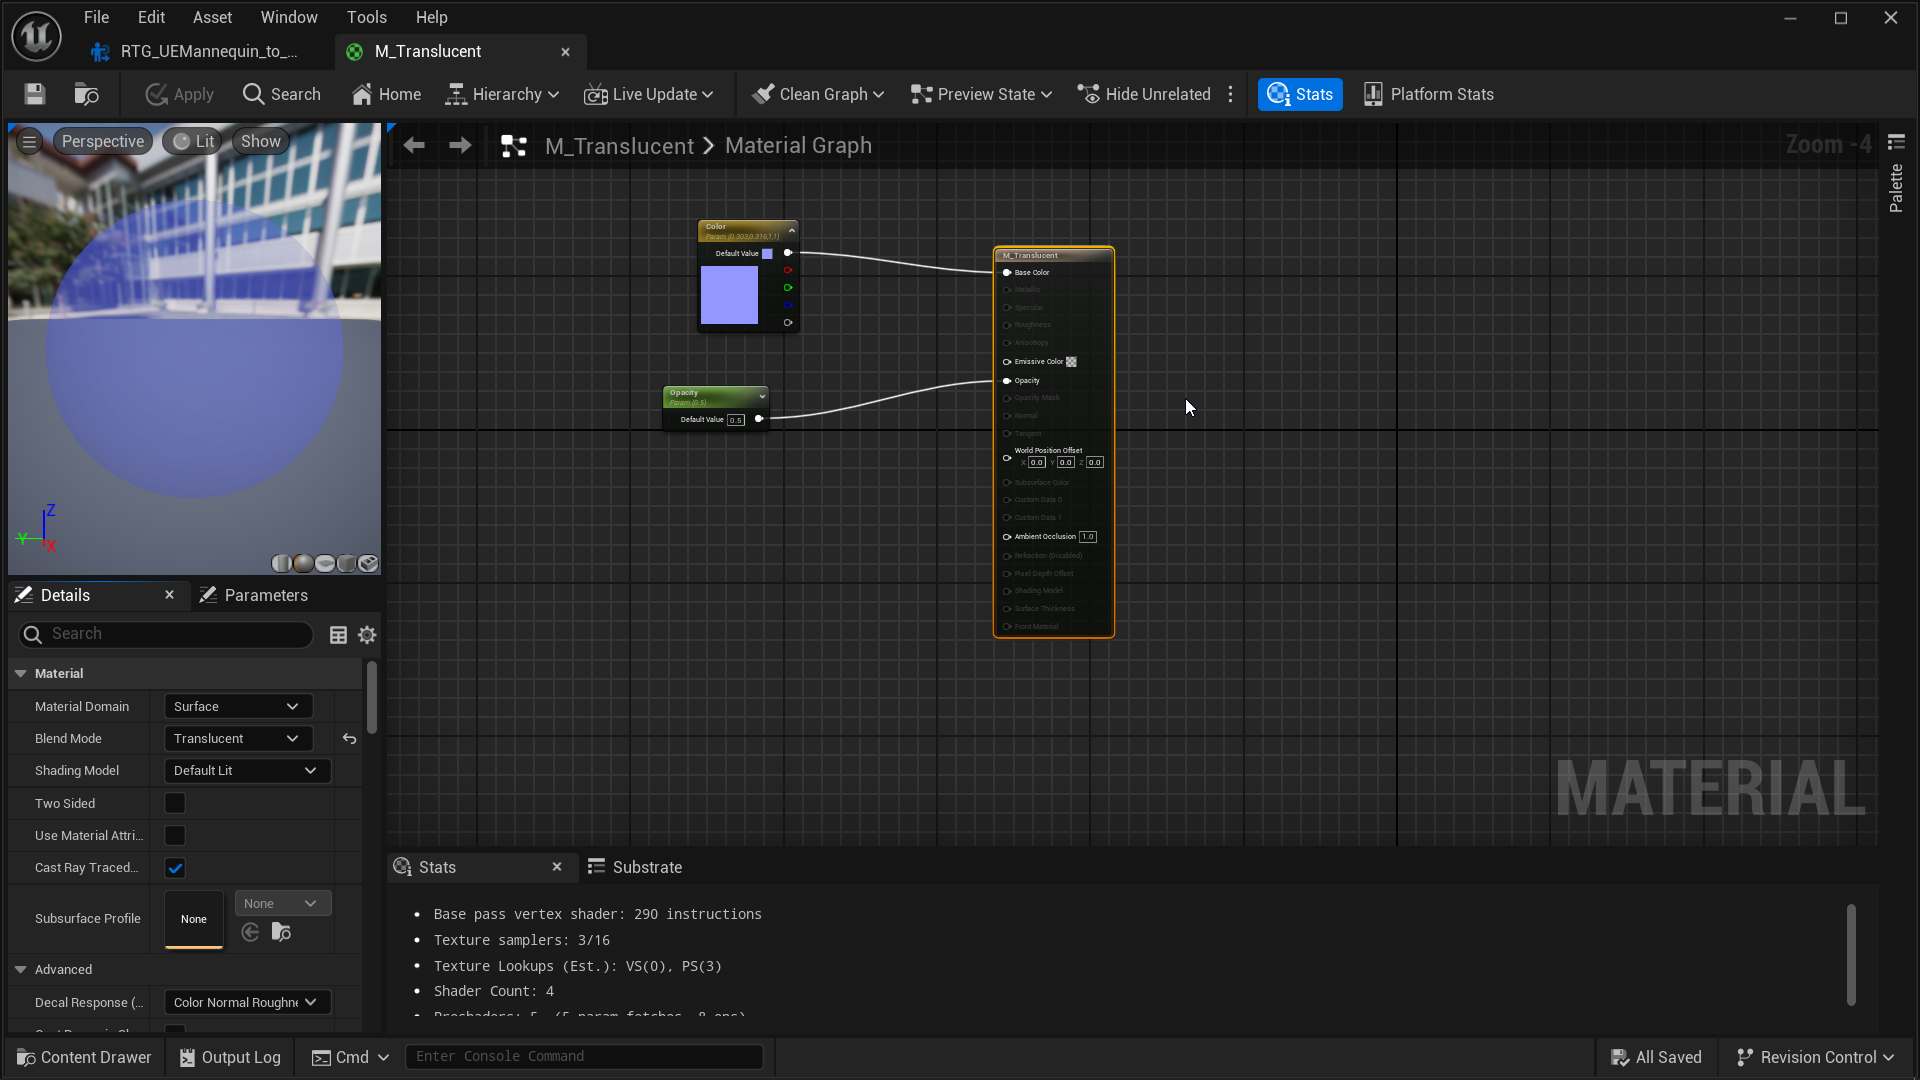
- Now you understand why I changed the material of the UE Mannequin to a simple translucent one :).
P.S.: I used a simple material with blend mode set to Translucent and an opacity value that I can change as a parameter:
- Let’s try.
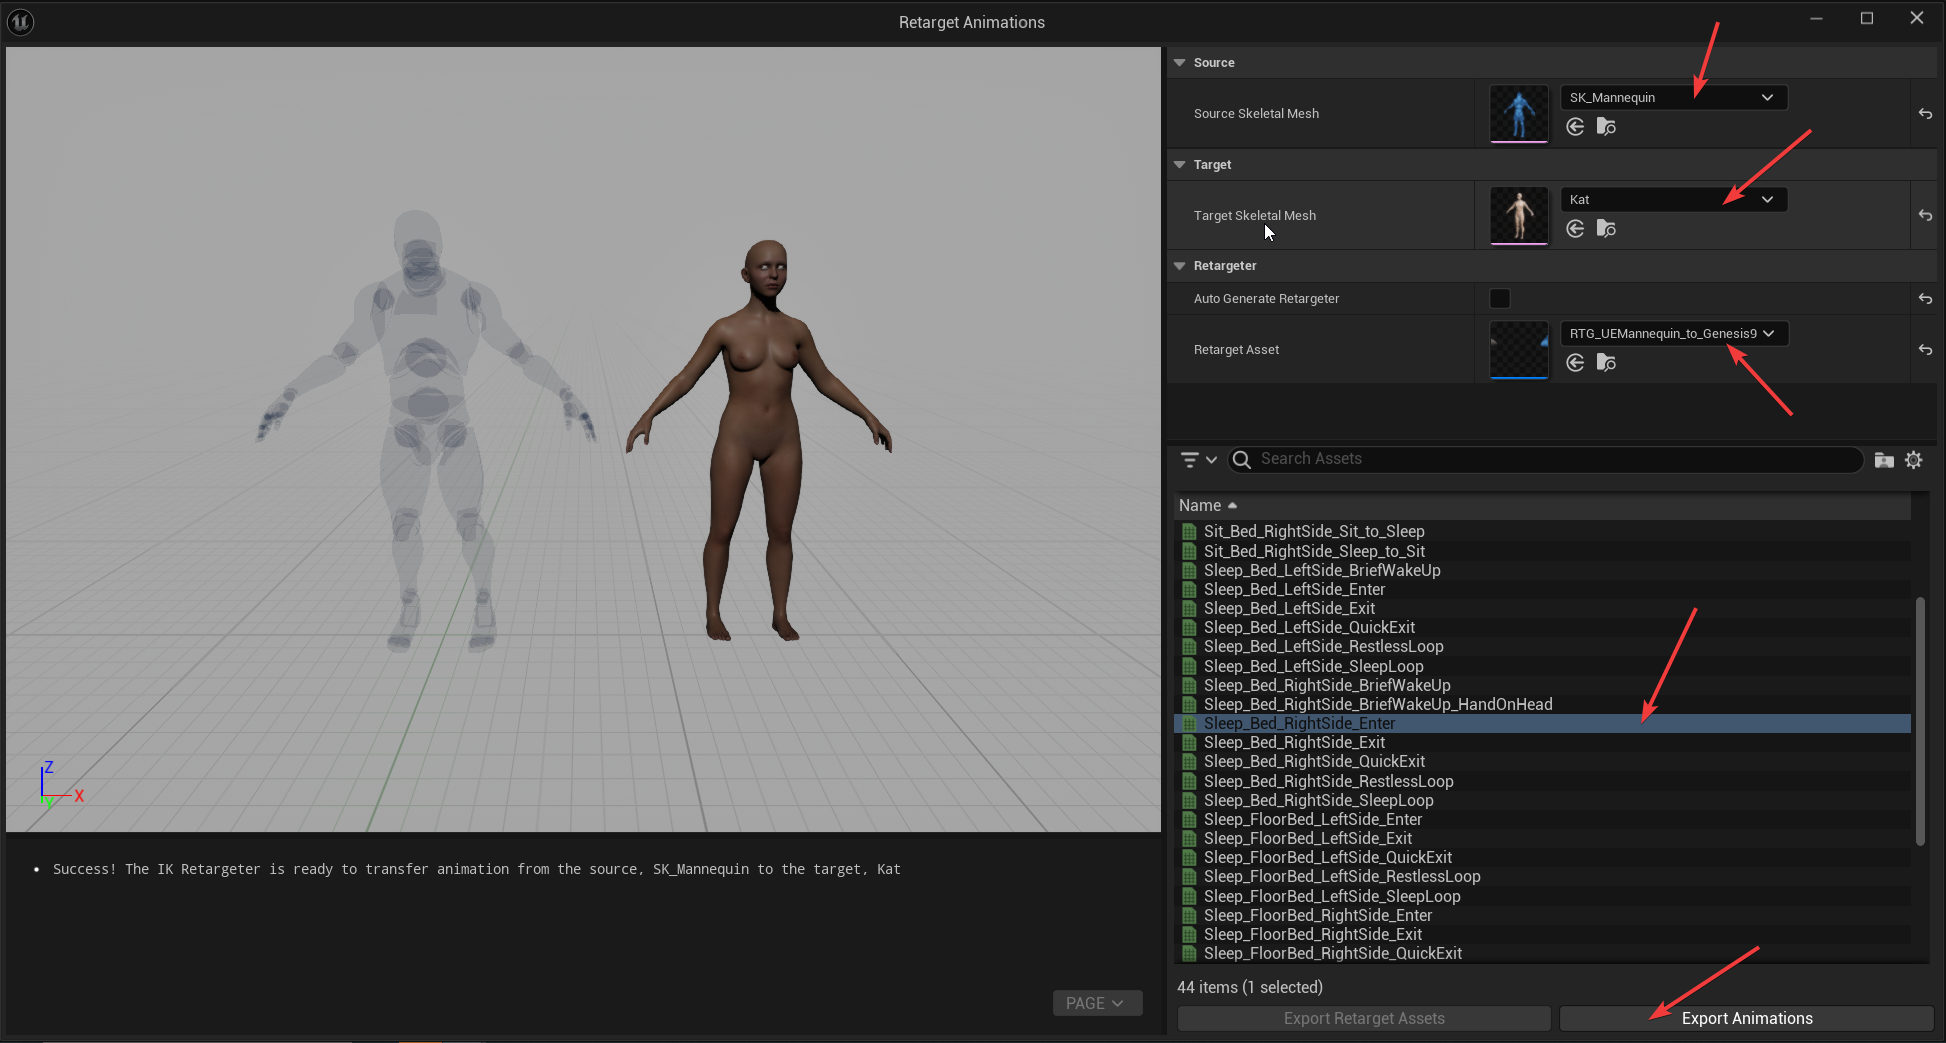
- So, in the Animation Retarget dialog box, uncheck “Auto Generate Retargeter” and choose “RTG_UEMannequin_to_Genesis9” instead.
- Choose also the animation you want to retarget. When everything will work perfectly, we will be able to select many animations at once.
☝🏼
If your Genesis character seems crooked, tense or dislocated, when you choose the retargeter, it means the latter needs more work.
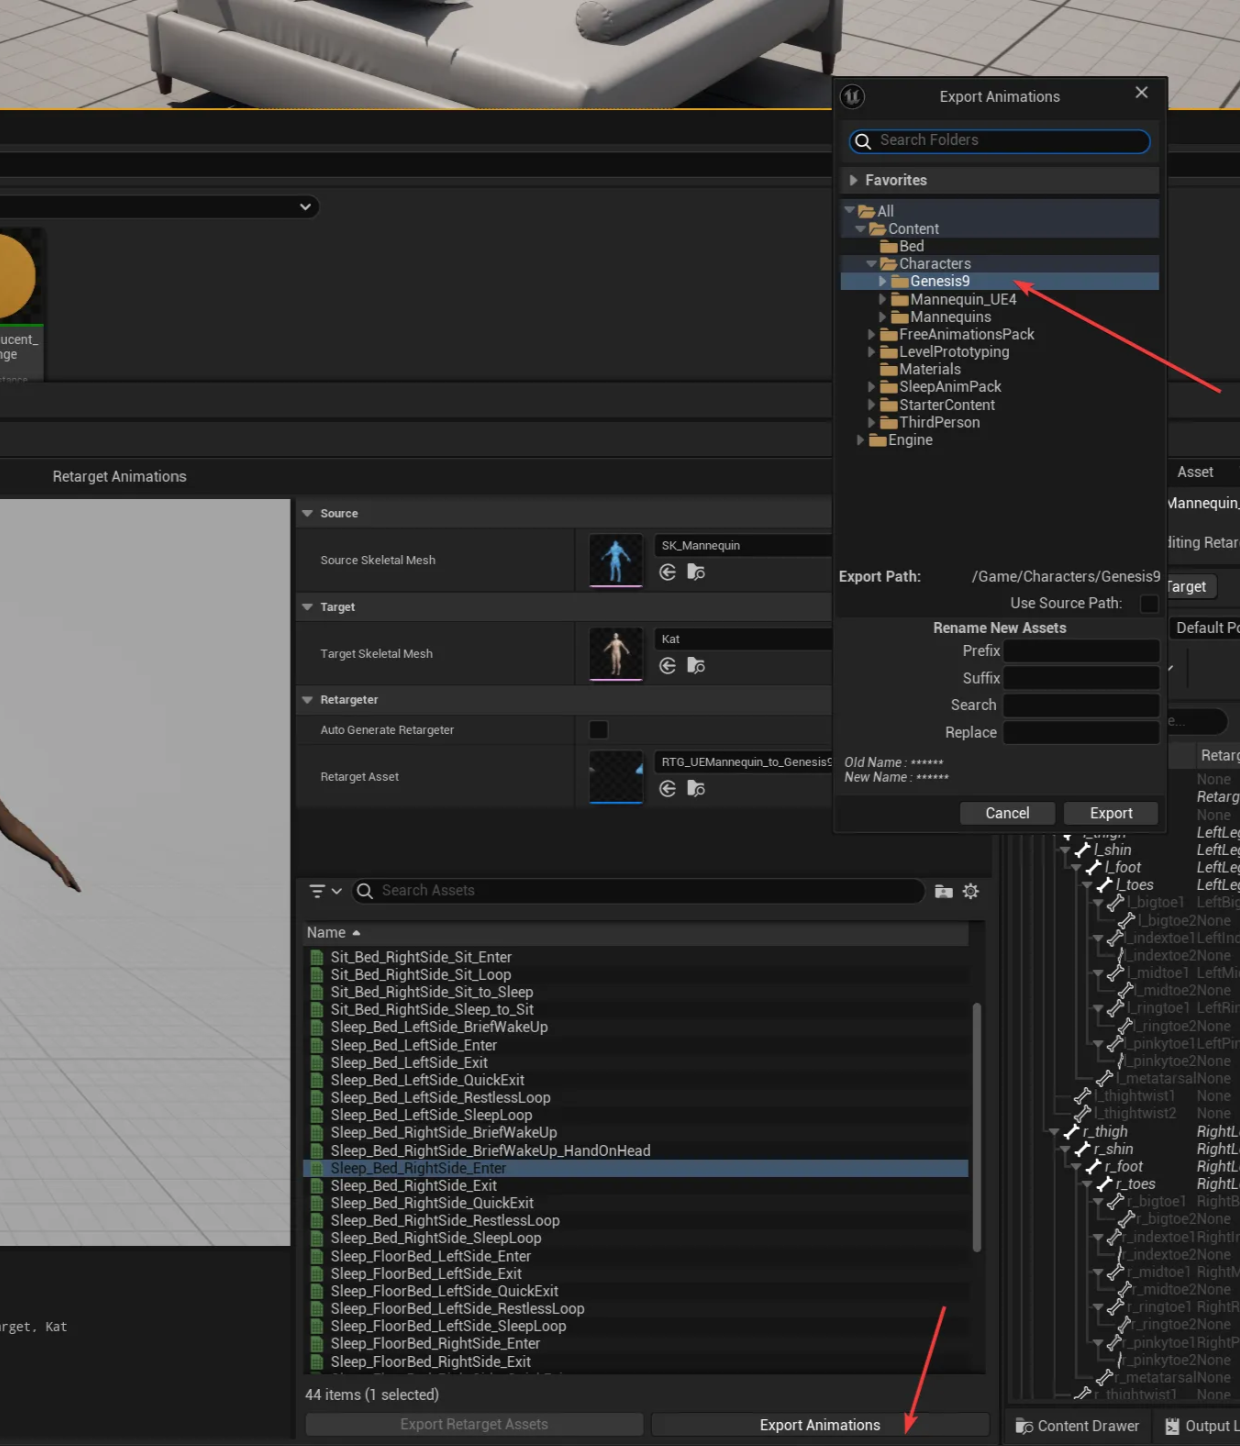
- Click on “Export Animations” and choose the destination (I chose the folder when my Genesis 9 characters are) and then click on the Export button.
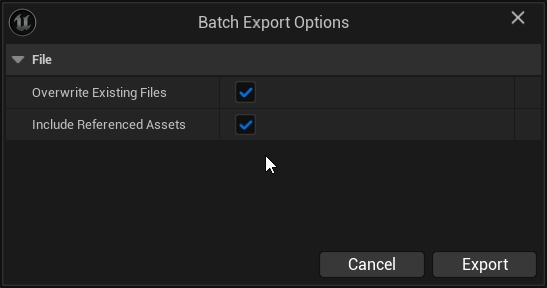
- A new dialog box will appear. Make sure you check “Overwrite Existing Files” as we will be doing this many times!
- In the content browser, UE should have switched to that target directory and you should see your animation.
- Double click on it and check if the animation seems okay.
☝🏼
If the retargeter is berzerk, so will be your Genesis 9 character! For example, here, the root chain was set to use the “hip” bone instead of the “Genesis 9” bone. See for yourself what it does to our poor character:
Let’s set up the scene with our props and drag and drop both the original animation (the UK_Mannequin character) and the retargeted one (on the Genesis 9 character).
Make sure you match and align the position (lead by the root bone) of both characters.
Play the scene and move around.
Pay specific attention to what feels like tensions or stiffness on the Genesis 9 character.
Not bad eh!
- I however do not like how the butt and back move up when Kat lays down, but the original animation seems to have the same behaviour, to a lesser extent because the UE Mannequin is bulkier.
- This, my friend, is fixed with fine-tuning and keyframing of the animation in an animation blueprint or, better, the Cinematics Level Sequence.
☝🏼
For UE 5.6.1, You need to clickon the retargeter, on the buton “Add Defaults Ops” and your retargetting will work.
Don’t forget to align as best as possible your target A or T pose to the source.Also, remove chains not present in the source or the target (typically toes chains, metacarpal chains).