
📌
Dernière mise à jour: 20025-07-28
# Control rig on a DAZ Genesis 9 Character
- Here’s a complete manual way to create a control rig.
☝🏼
You can start with the control rig provided by David Vodhanel’s DAZ to Unreal plugin, but it is incomplete and the hierarchy is quite messed up albeit it is fixable.
# DAZ Genesis 9 to Unreal - Retargeting from a Unreal Engine Mannequin skeleton/animation
☝🏼
Why UE Mannequin and not MEtahuman? Because we often need to use UE animations found on fab.com that were designed for UE mannequins. But it is relatively easy to retarget a UE Mannequin animation to a MetaHuman skeleton. Similarly, retargeting a Genesis 9 skeleton to a Metahuman character will also be documented, see below sections.
# Retargeting a DAZ Genesis 9 to a UE Mannequin
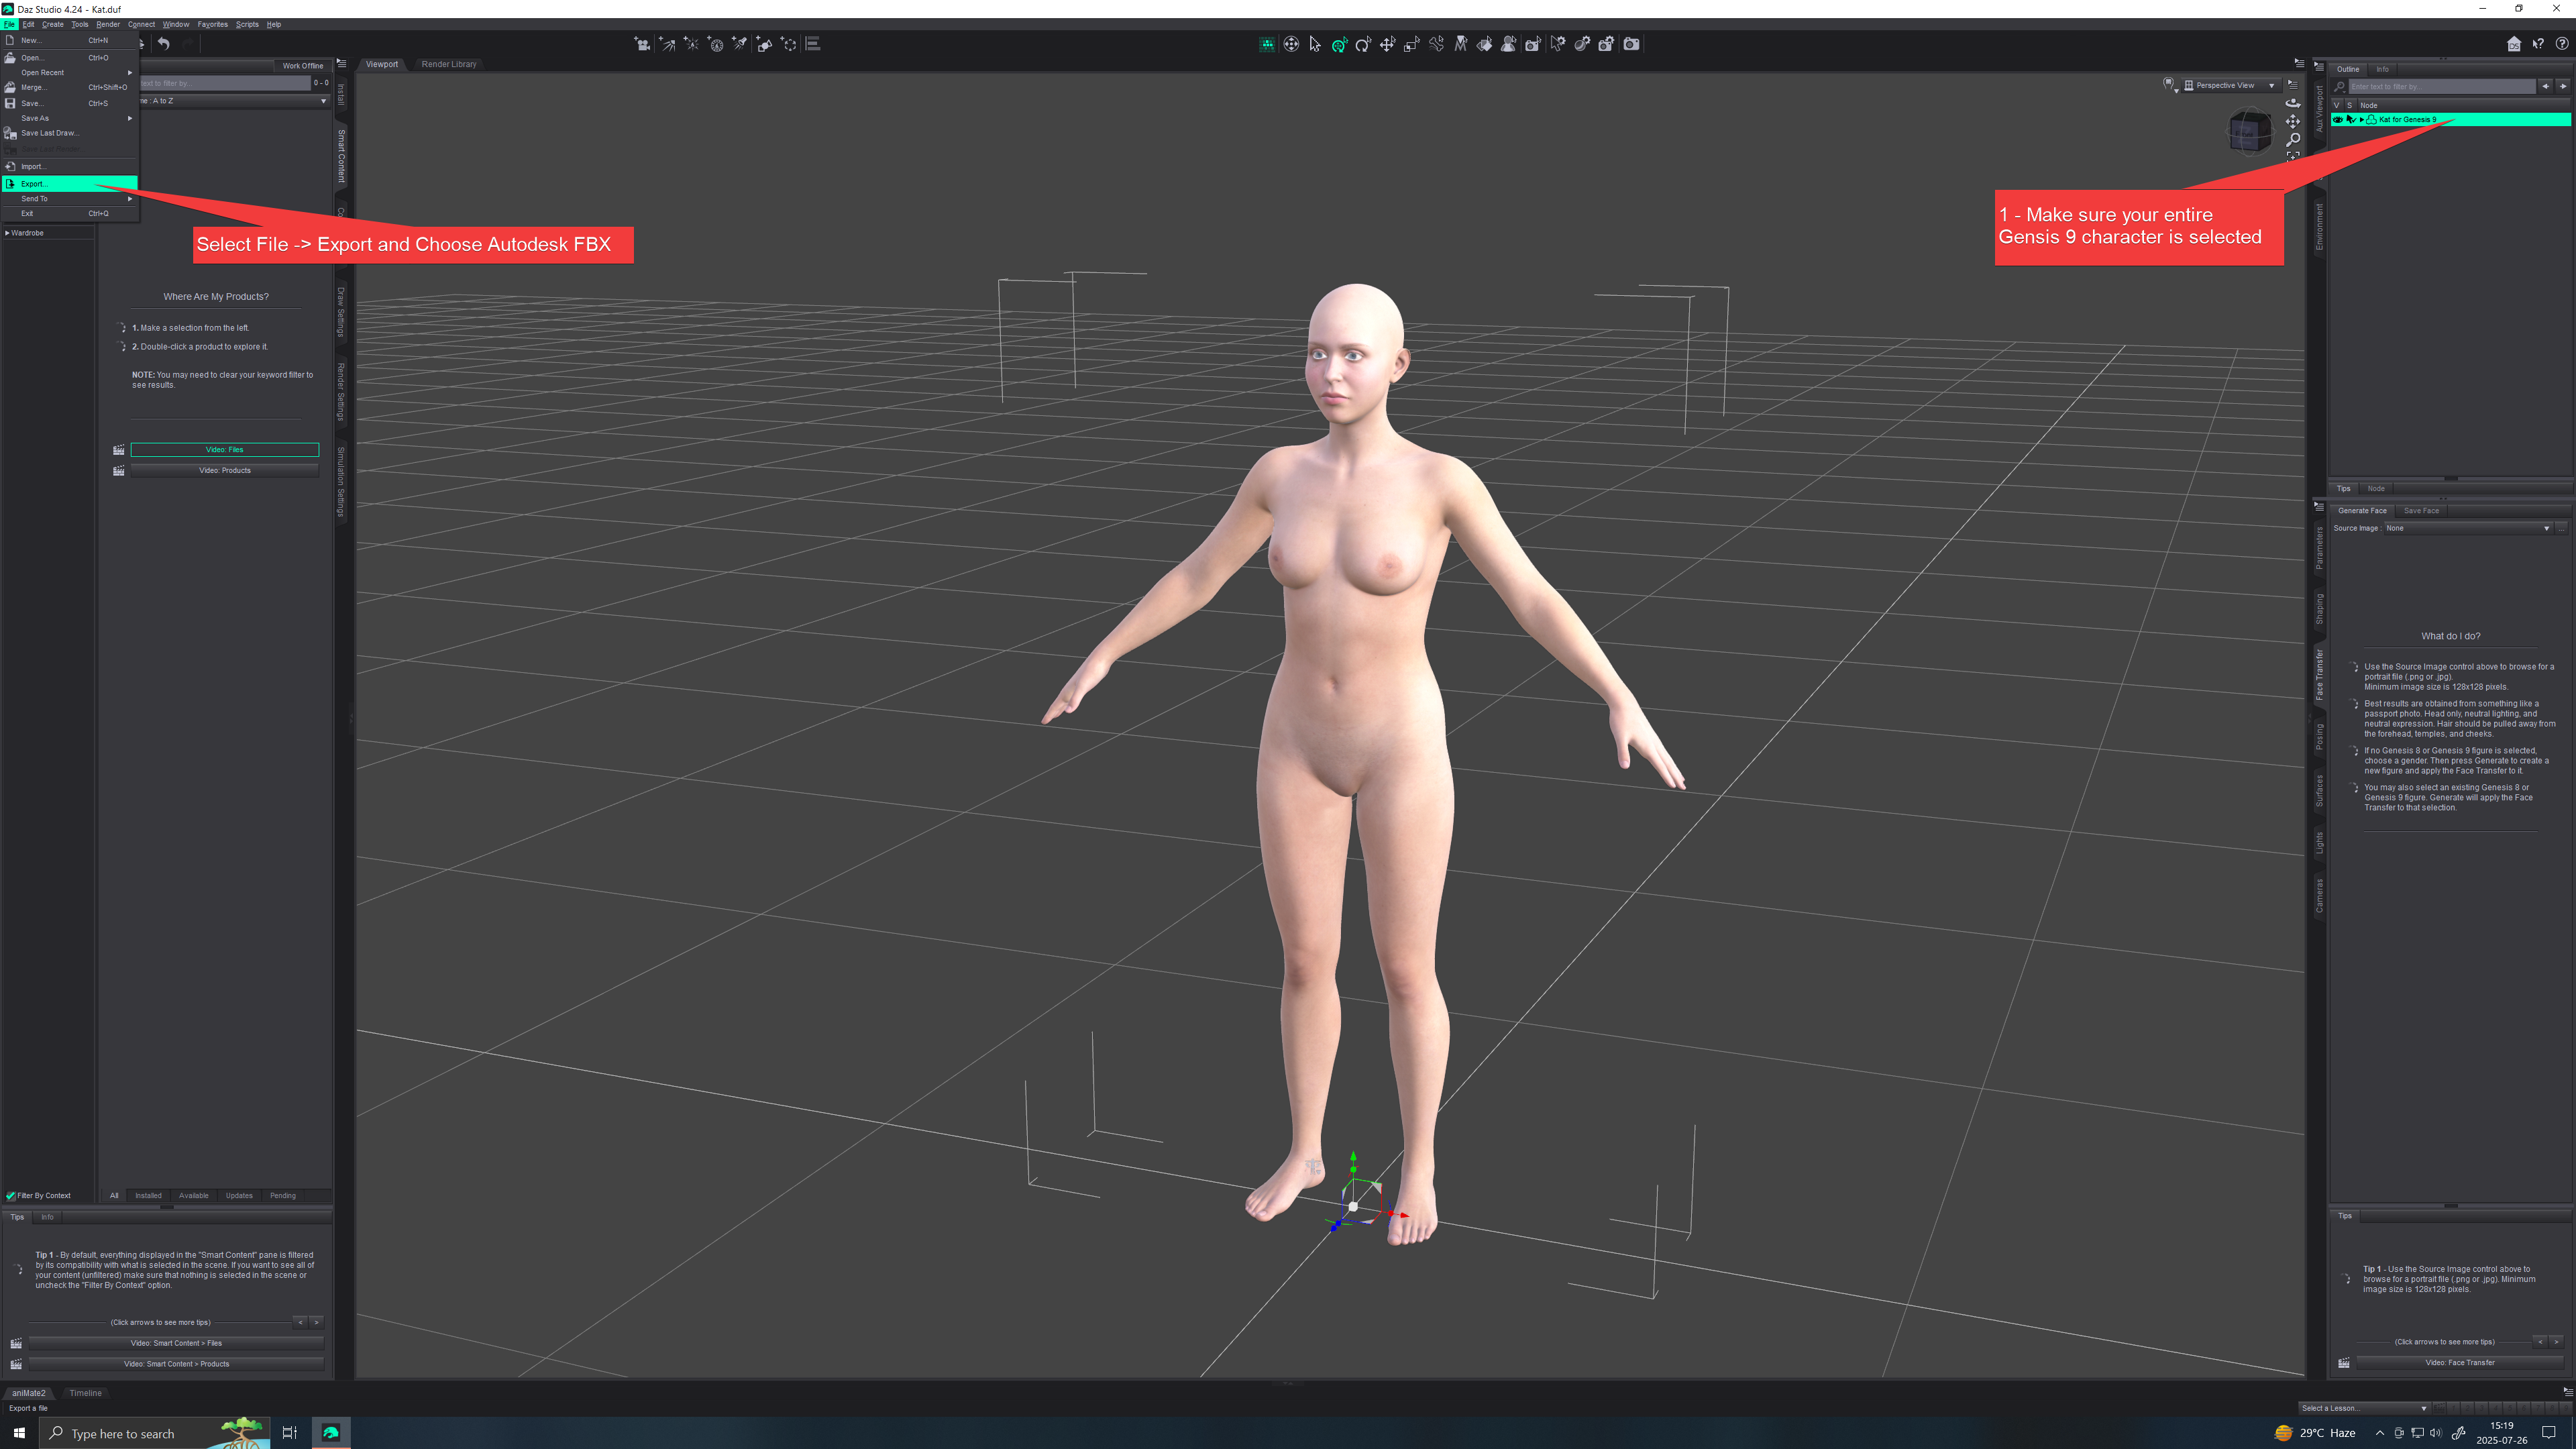
Open DAZ 3D, open your Genesis 9 character or create a new one. In this tutorial, I chose Kat with no props.
With your Genesis 9 character selected, click File → Export and Choose Autodesk FBX
☝🏼
- TBD - Karim: How about including Morphs?
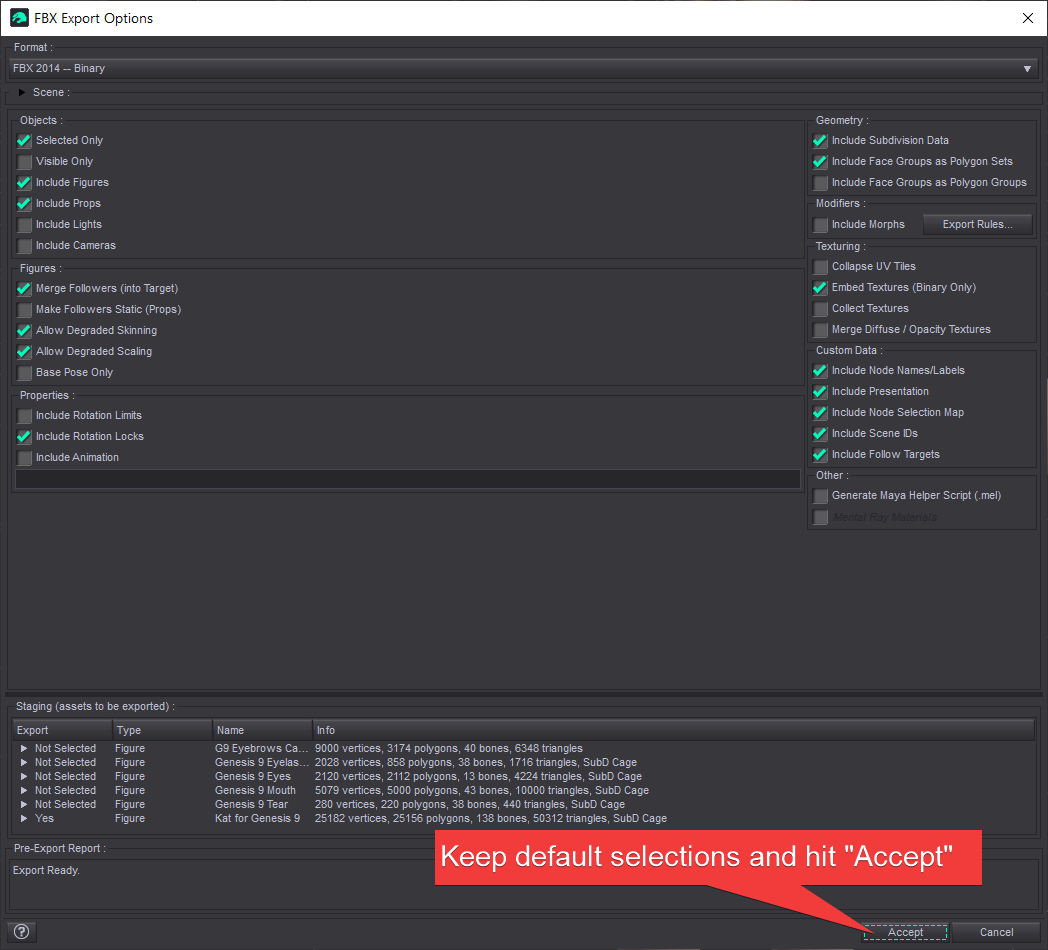
Keep the default Selections (as of version 4.24 of DAZ Studio) and Hit accept:
- We are done with DAZ 3D!
- In UE 5.4.4, either in 1st or a 3rd person project
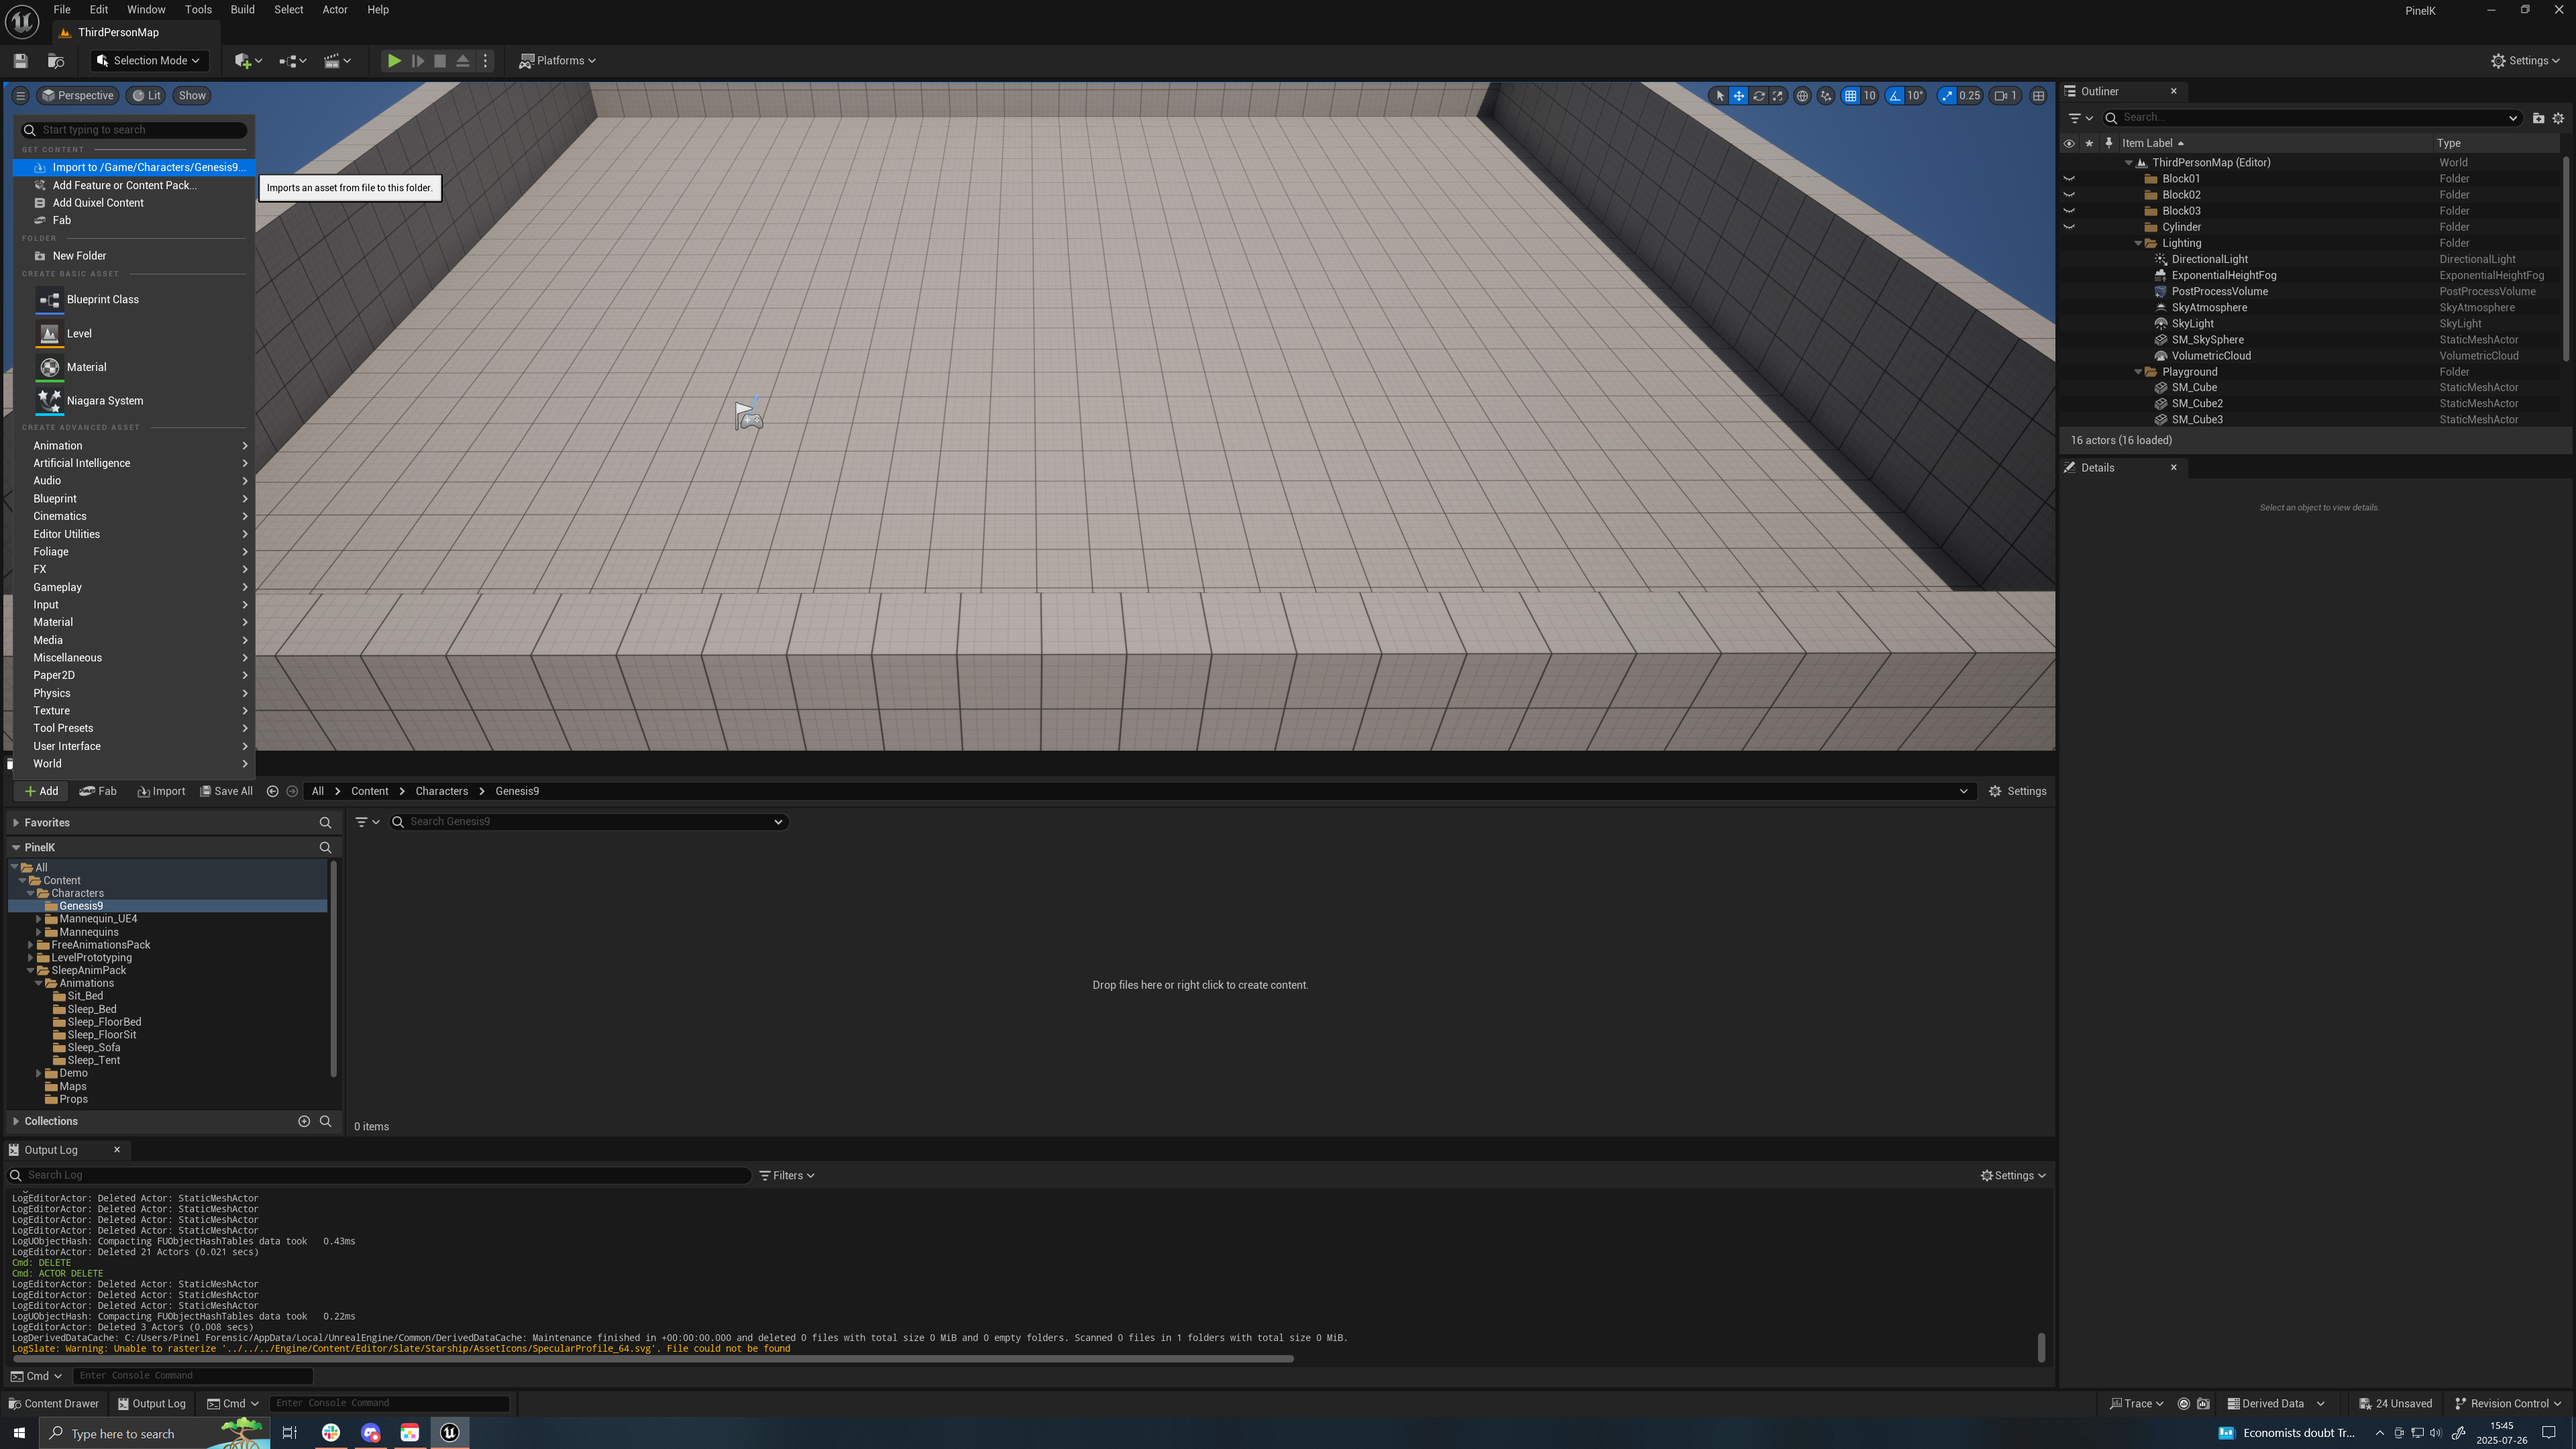
- Create a folder in the content browser called “Genesis9”. I like to create it under the “Character” folder.
- Hit the +Add button and choose “import to”
- Choose your fbx you exported from DAZ Studio.
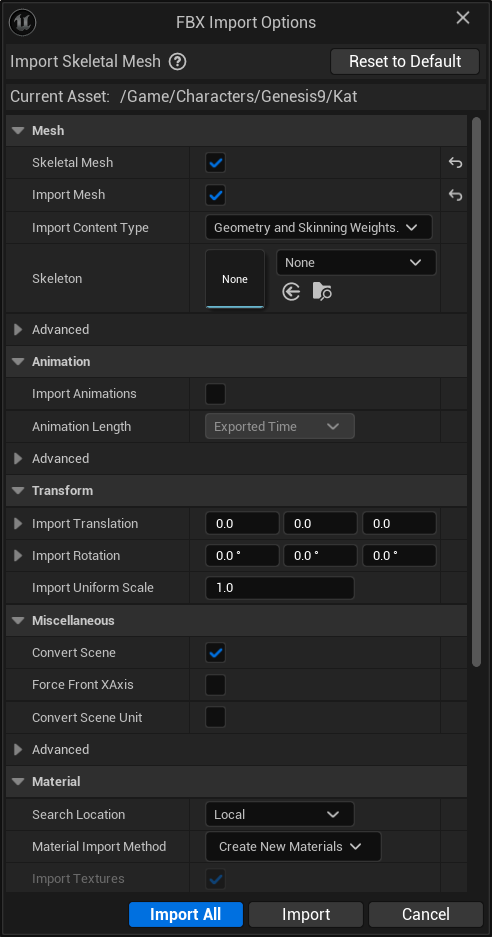
- Using the following default values and hit “Import All”
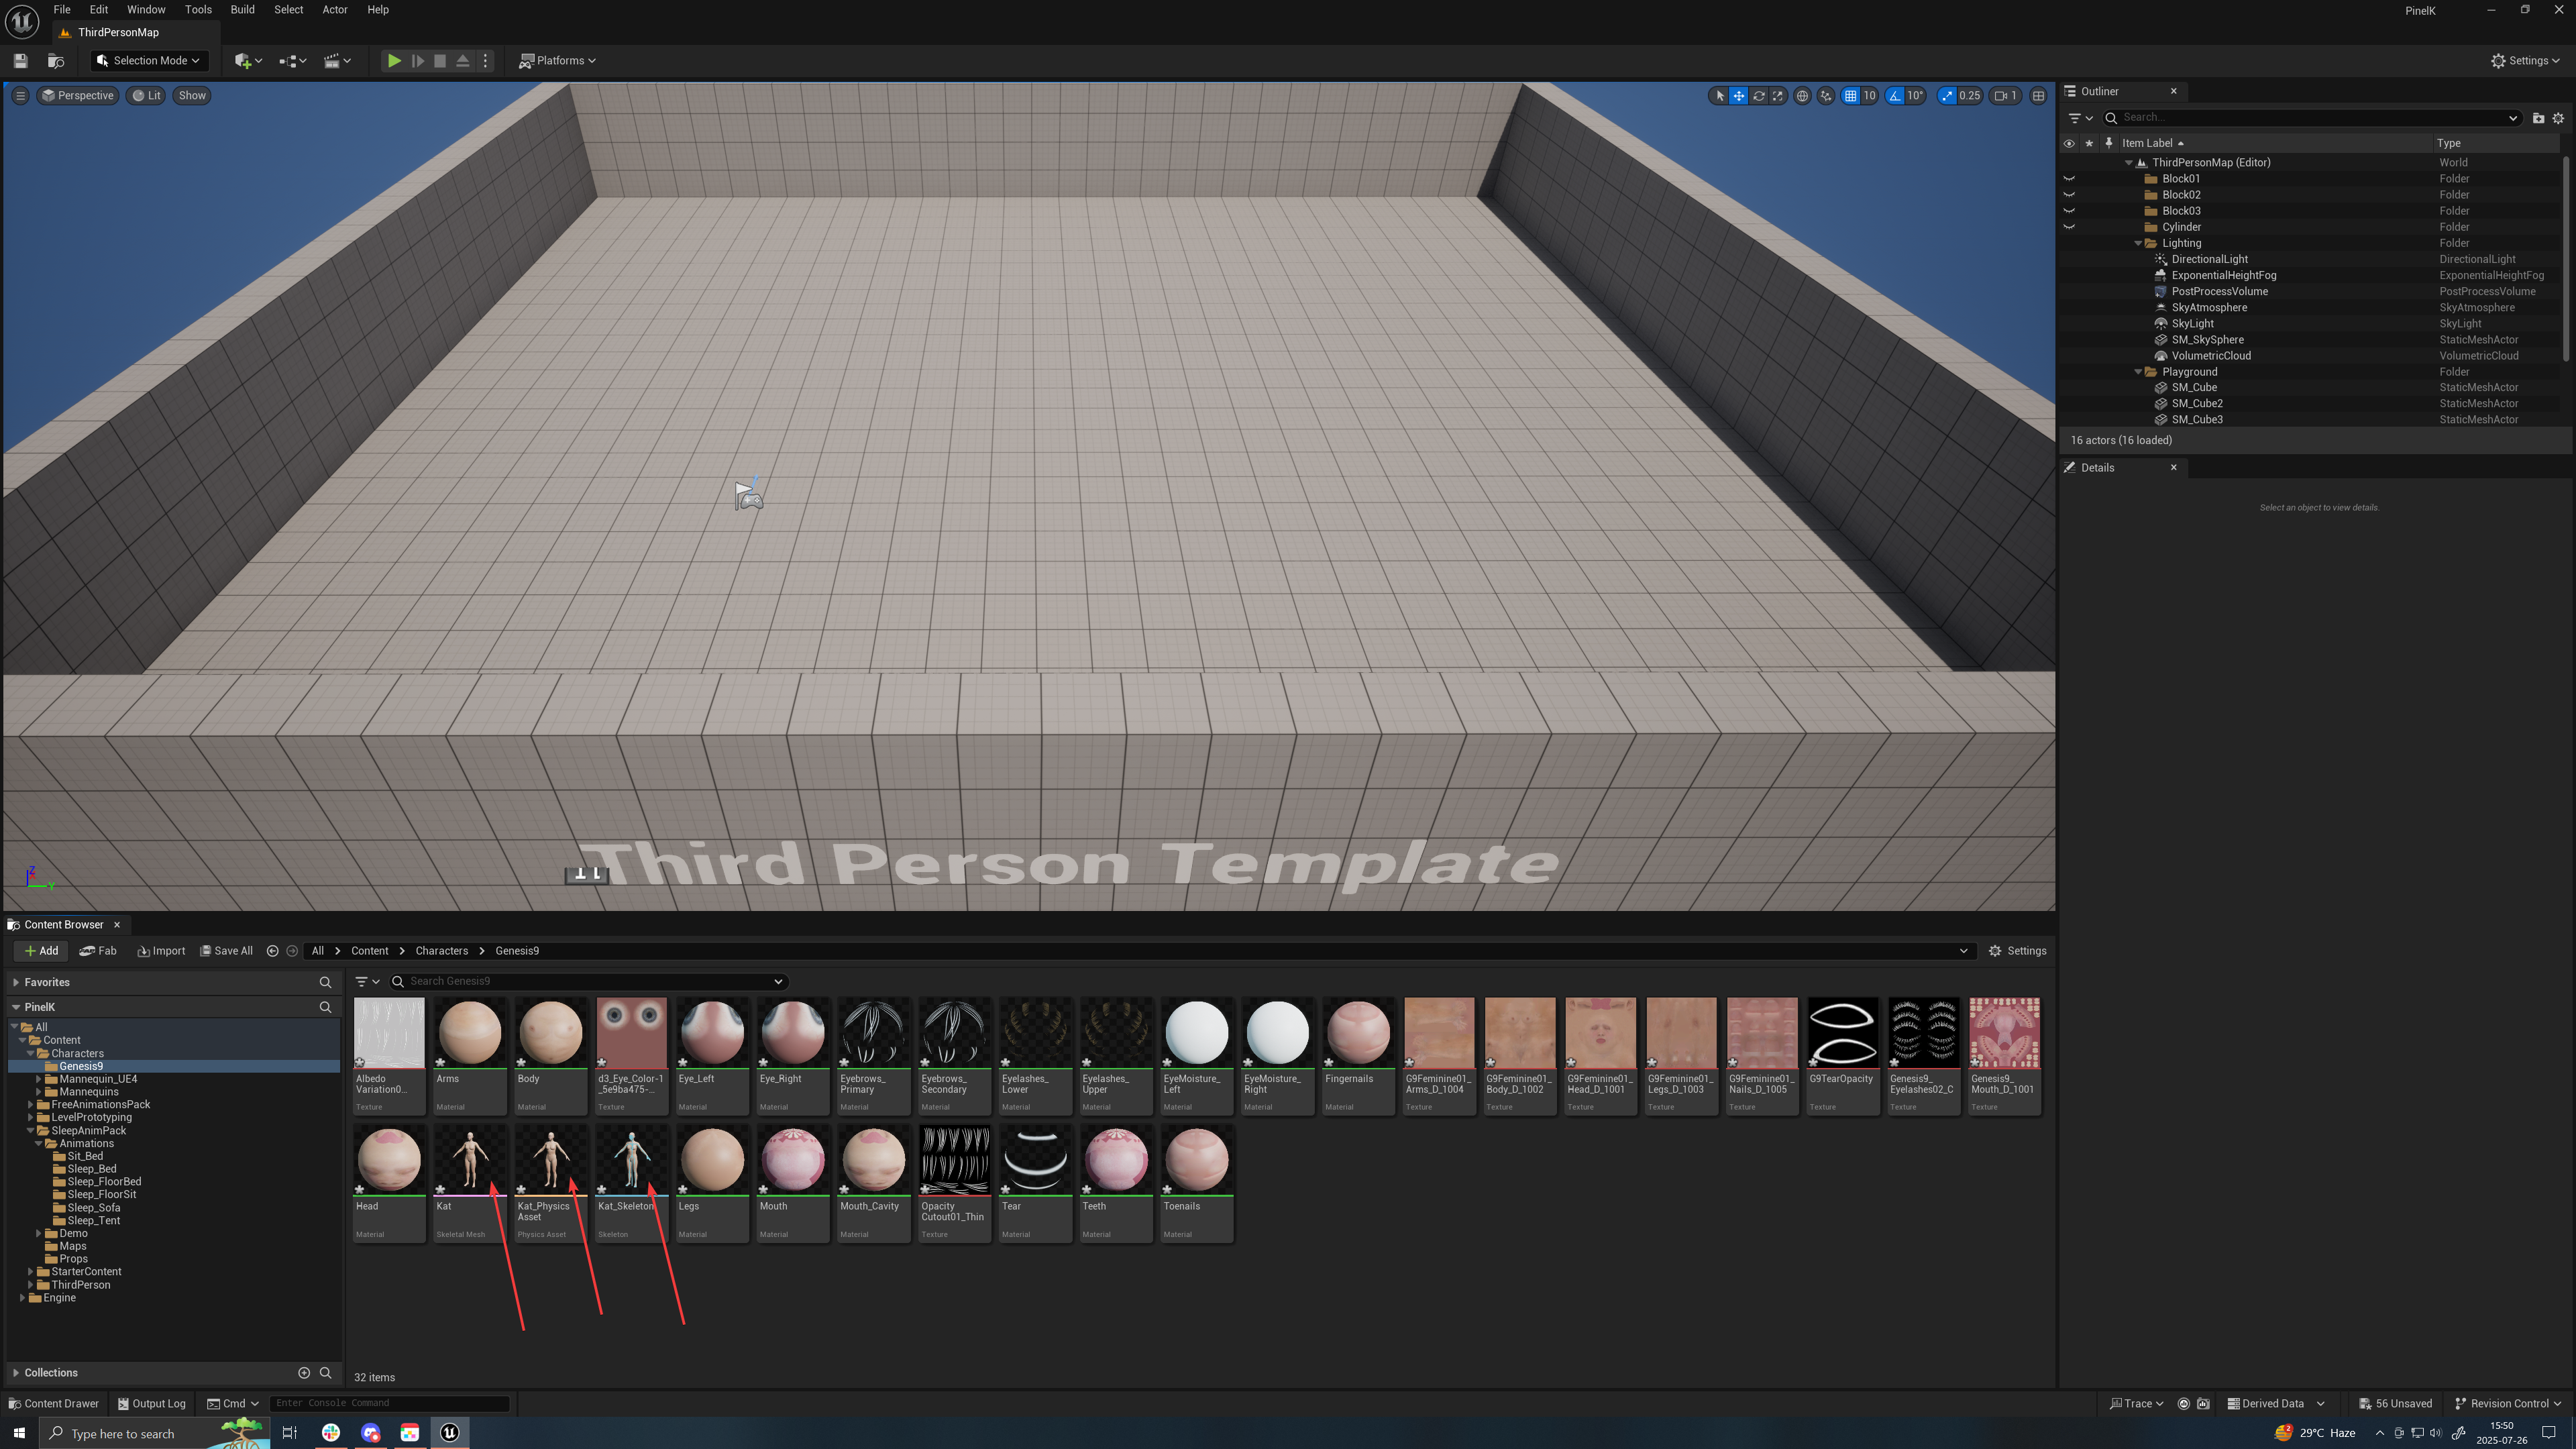
- You should now have imported all the textures and materials and the Genesis 9 Skeleton, Physical Asset and Mesh:
- The character (see the red arrows) should be facing forward. Double click on the skeletal mesh, it should be facing forward.
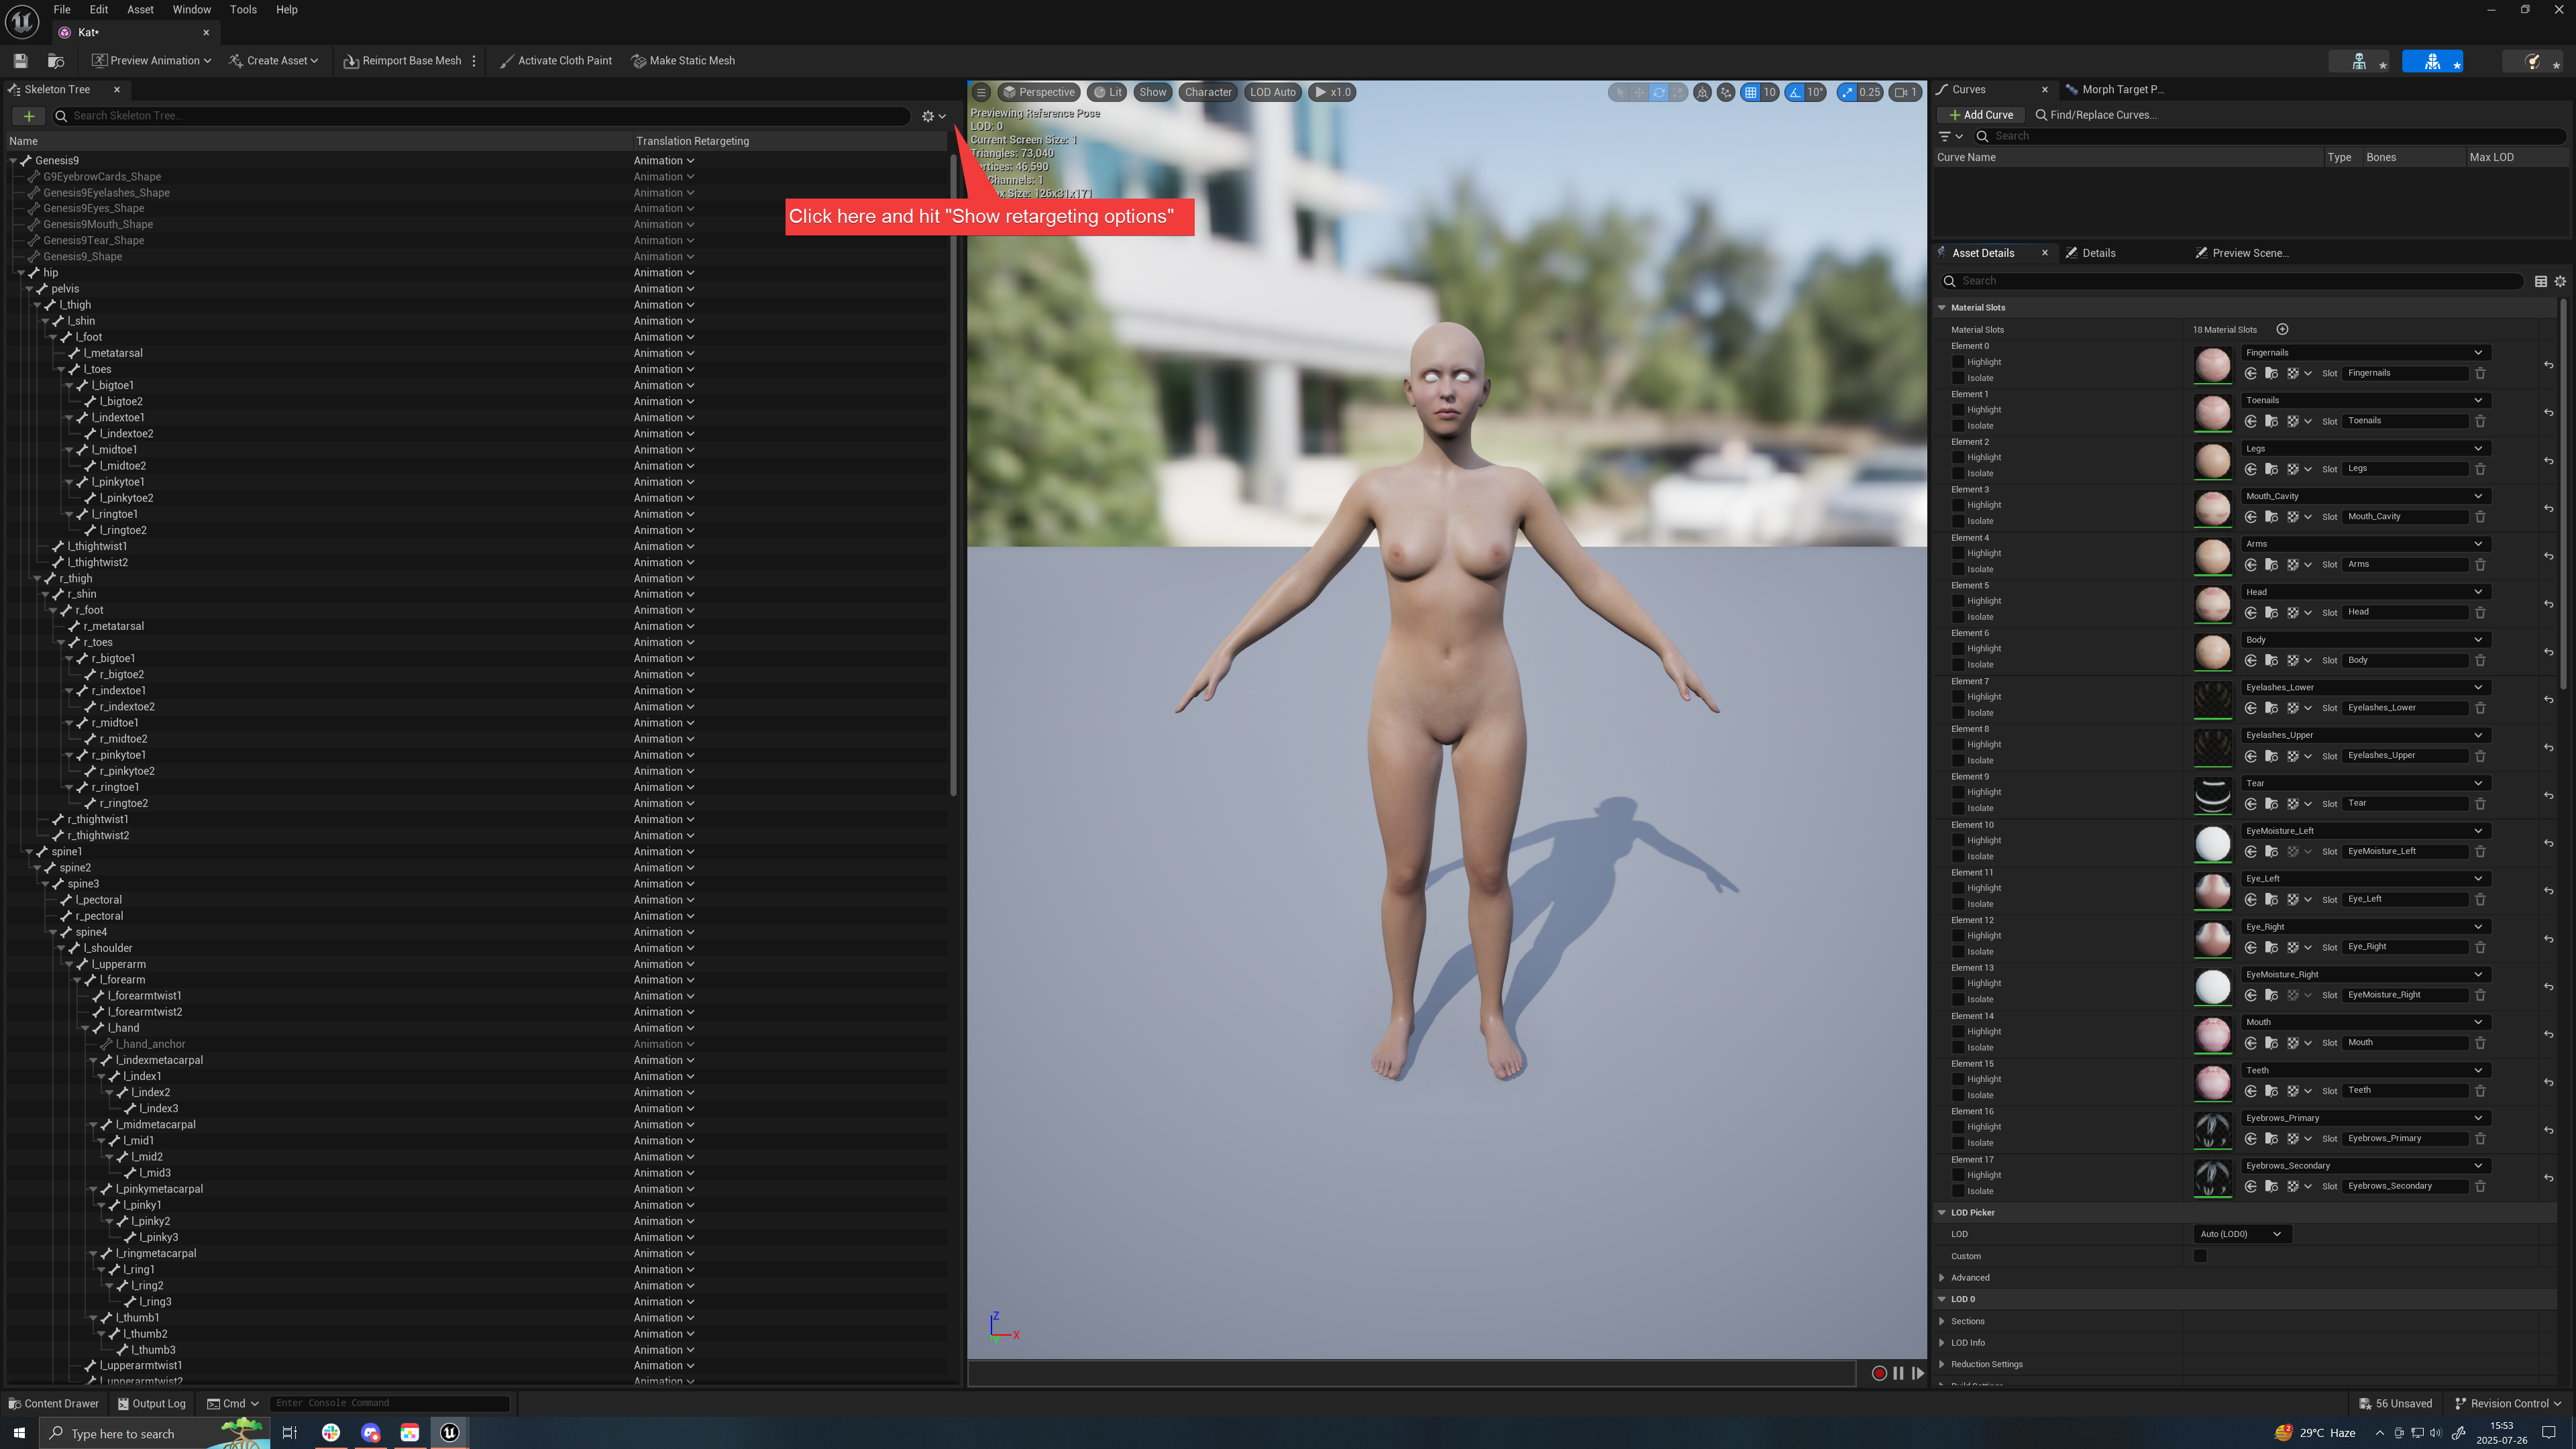
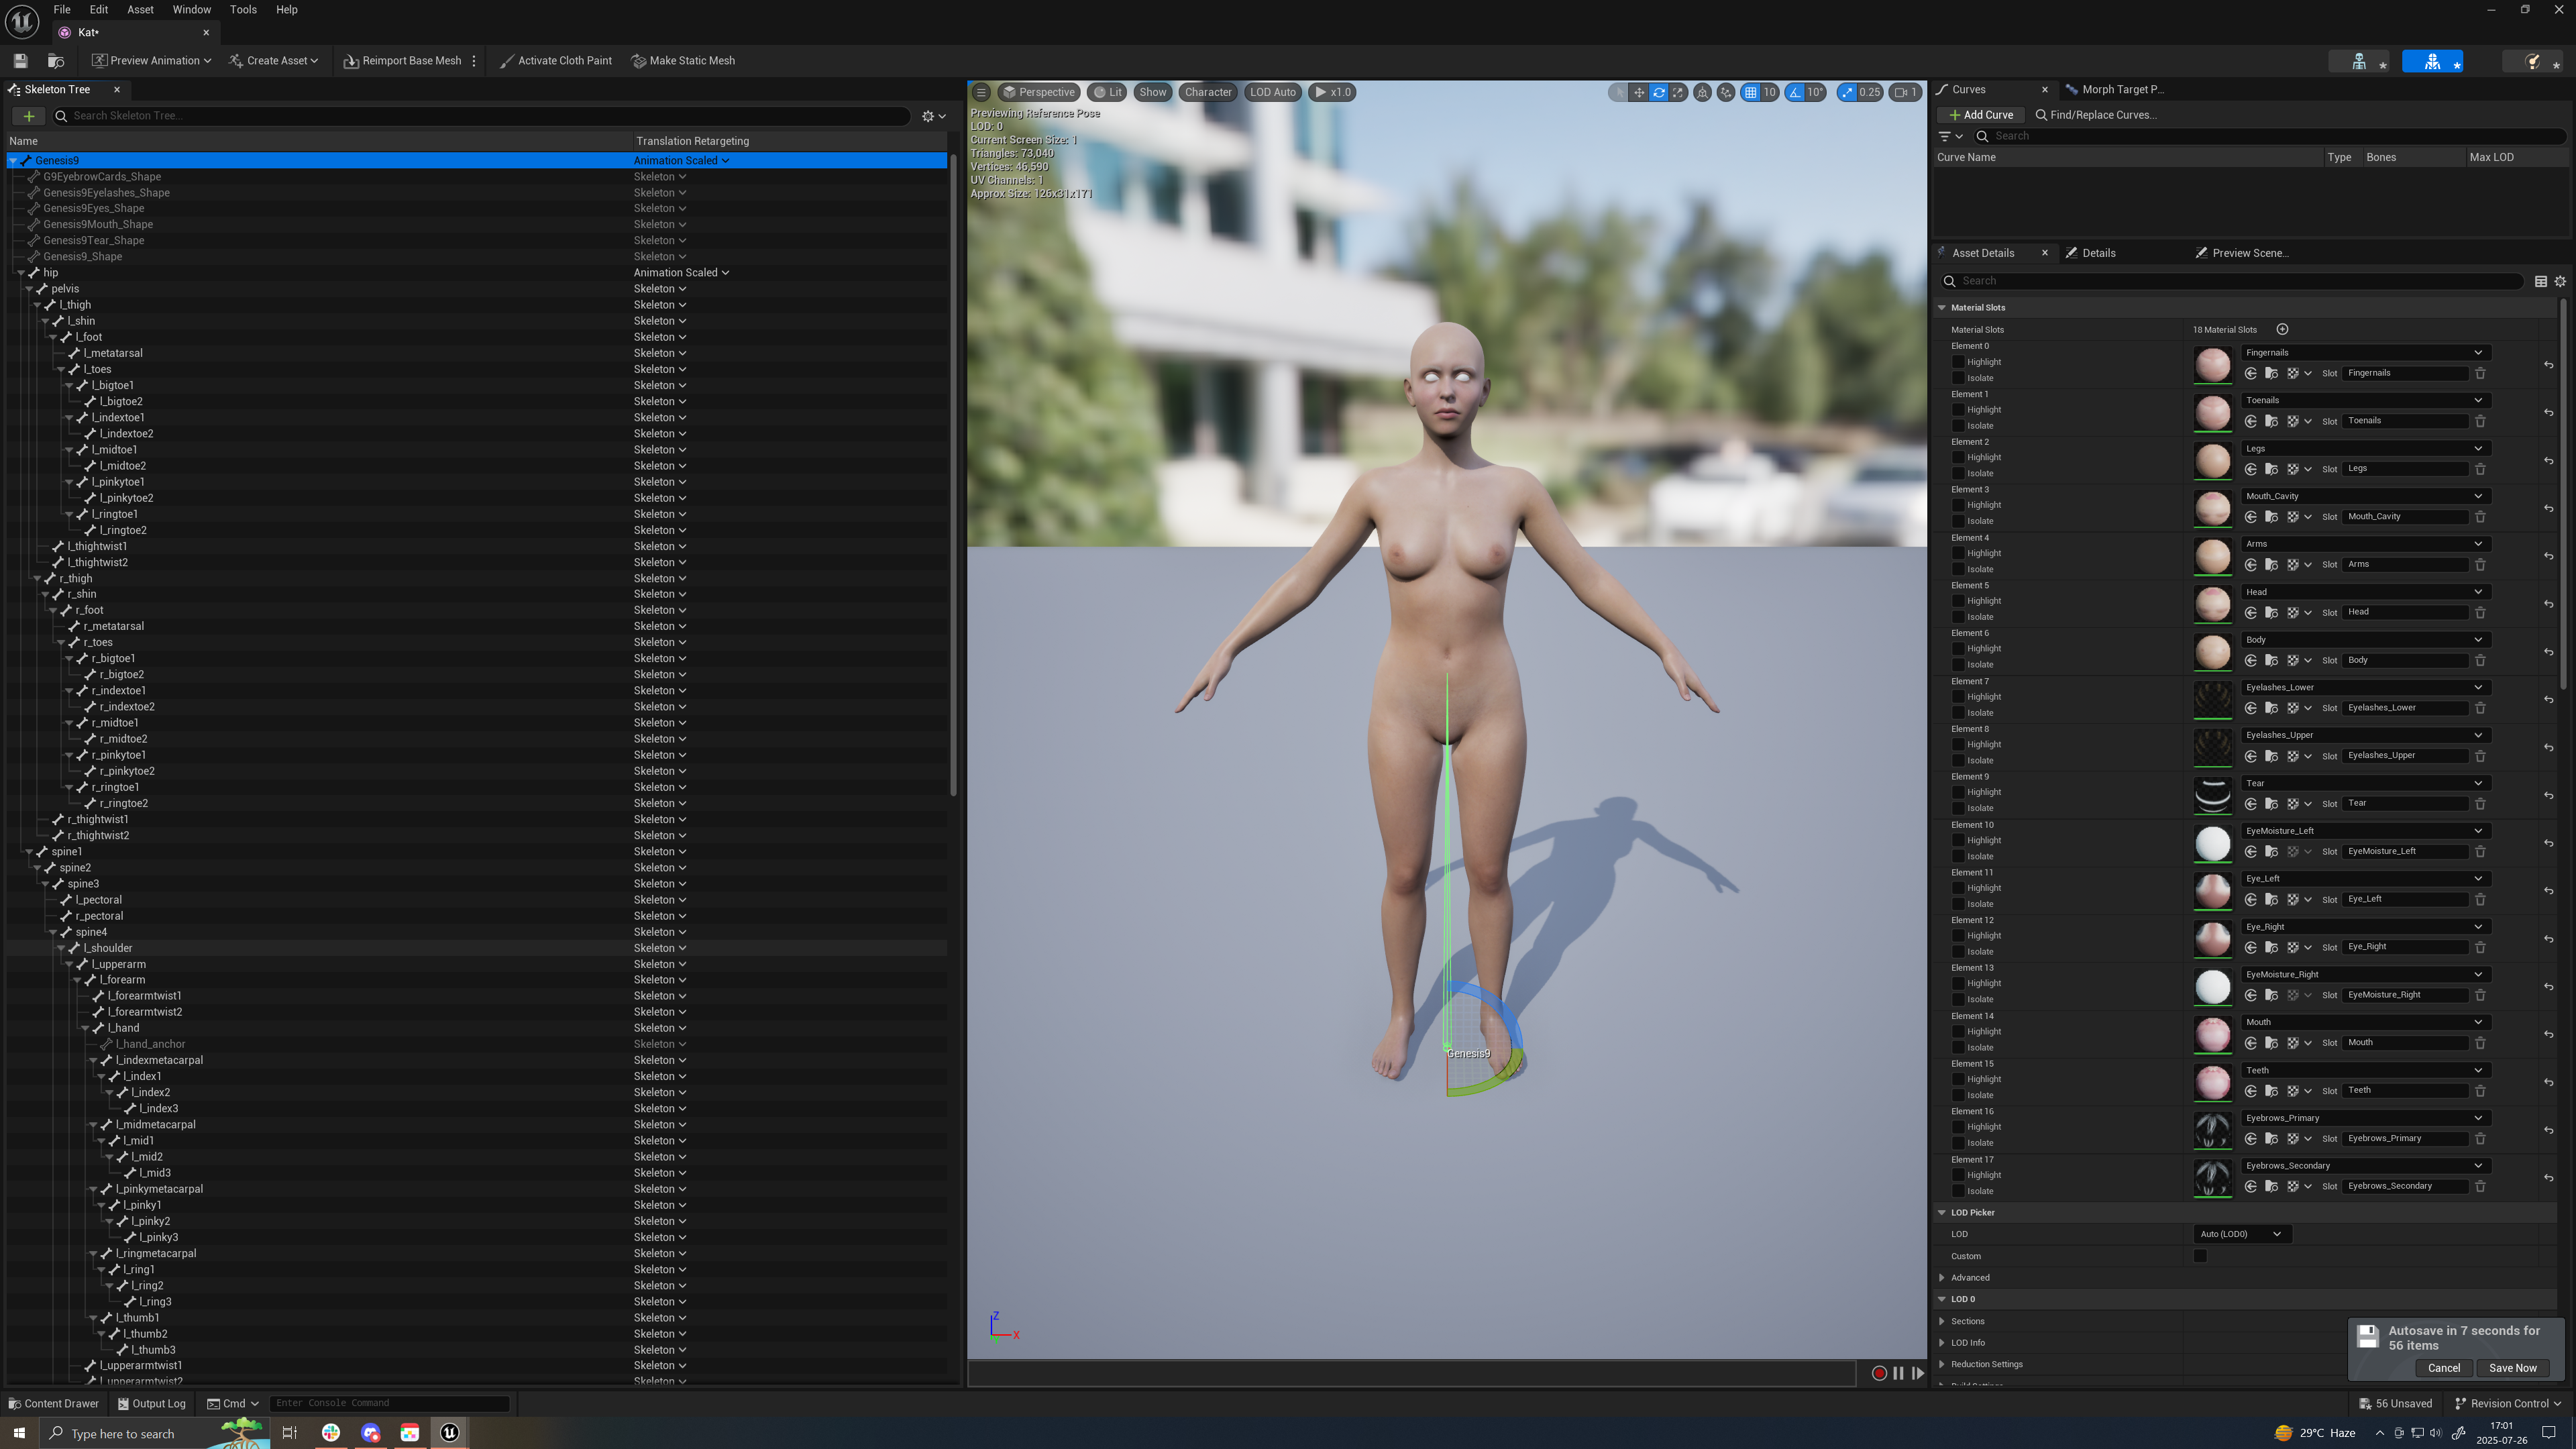
- On the left panel, click on the cog icon and choose “Show Retargeting Options”
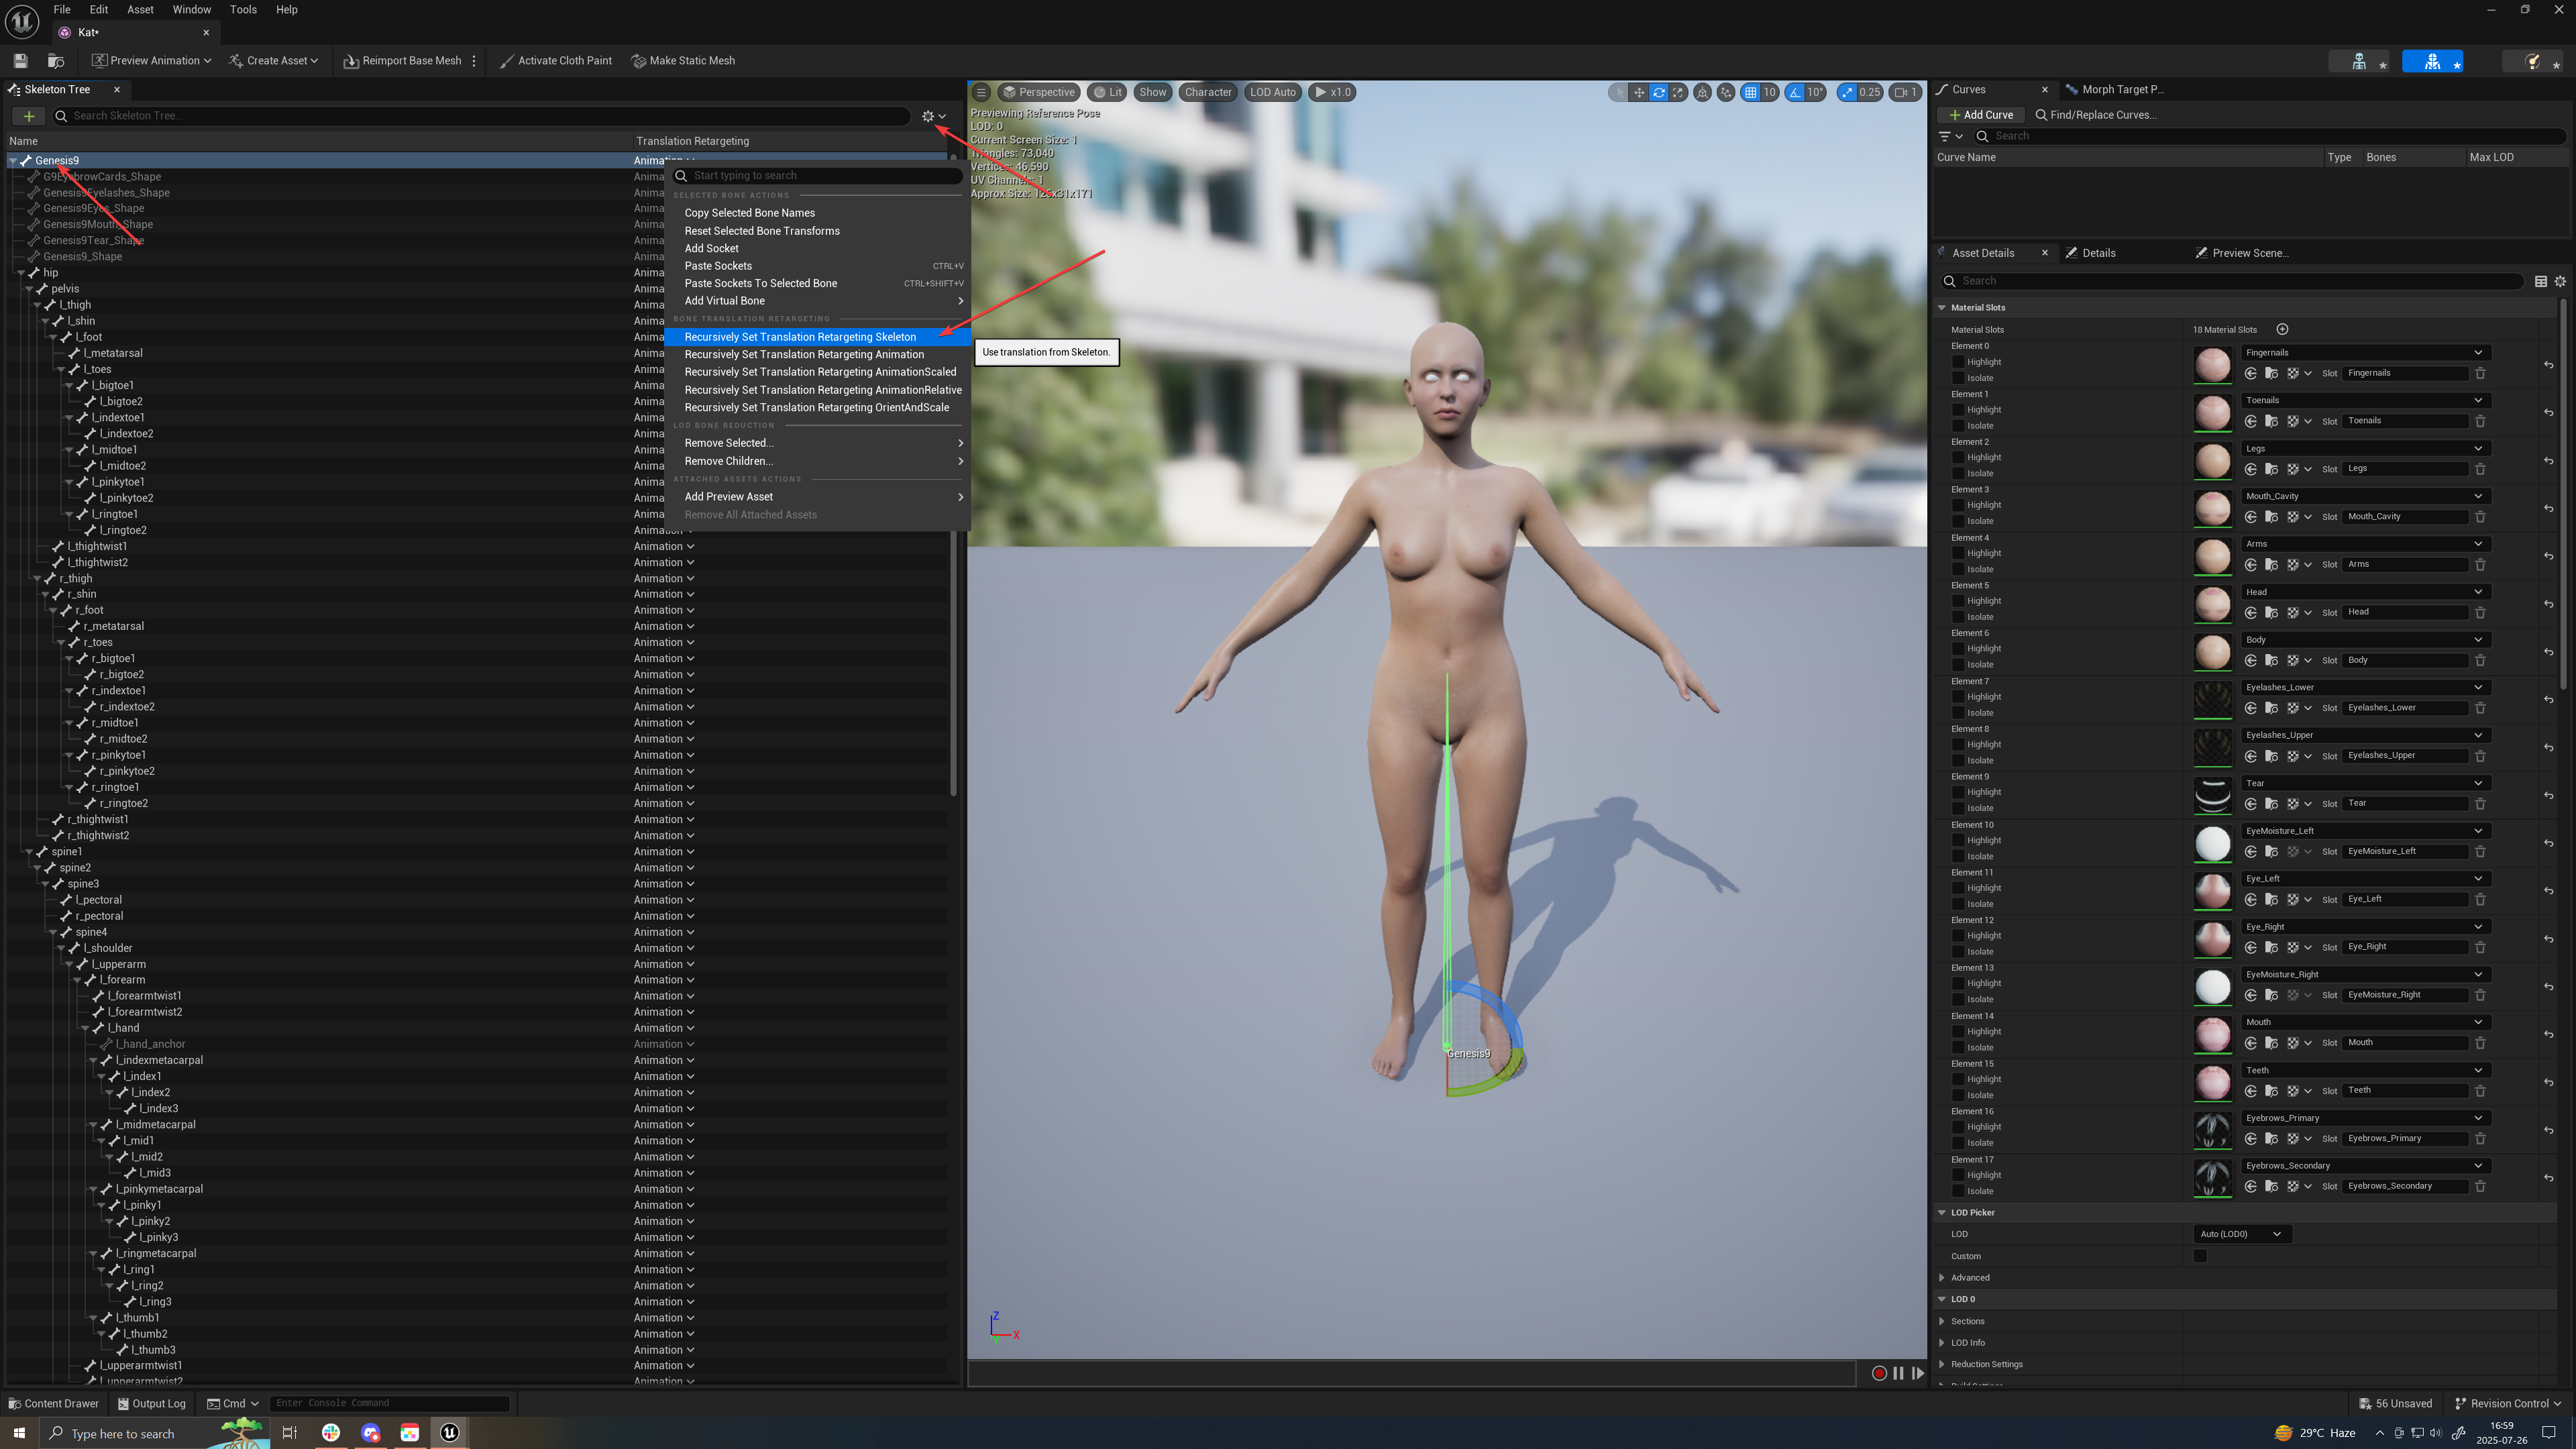
- Now we need to set each bone’s retargeting option. Essentially, since our Genesis 9 character is not only smaller than a UE Mannequin, but also does not have the same bones, nor the same bones mapping, nor the same bone count, some root skeletons need to be set to “Animation Scaled”, but the great majority of them should be set to “Skeleton”.
- So Select Genesis9 (the root) and choose “Recursively Set Translation Retargeting Skeleton”.
- However, for the root and the hip bone, choose Animation Scaled instead
- You can close this window.
- Why don’t you “File → Save all” as you’re at it…
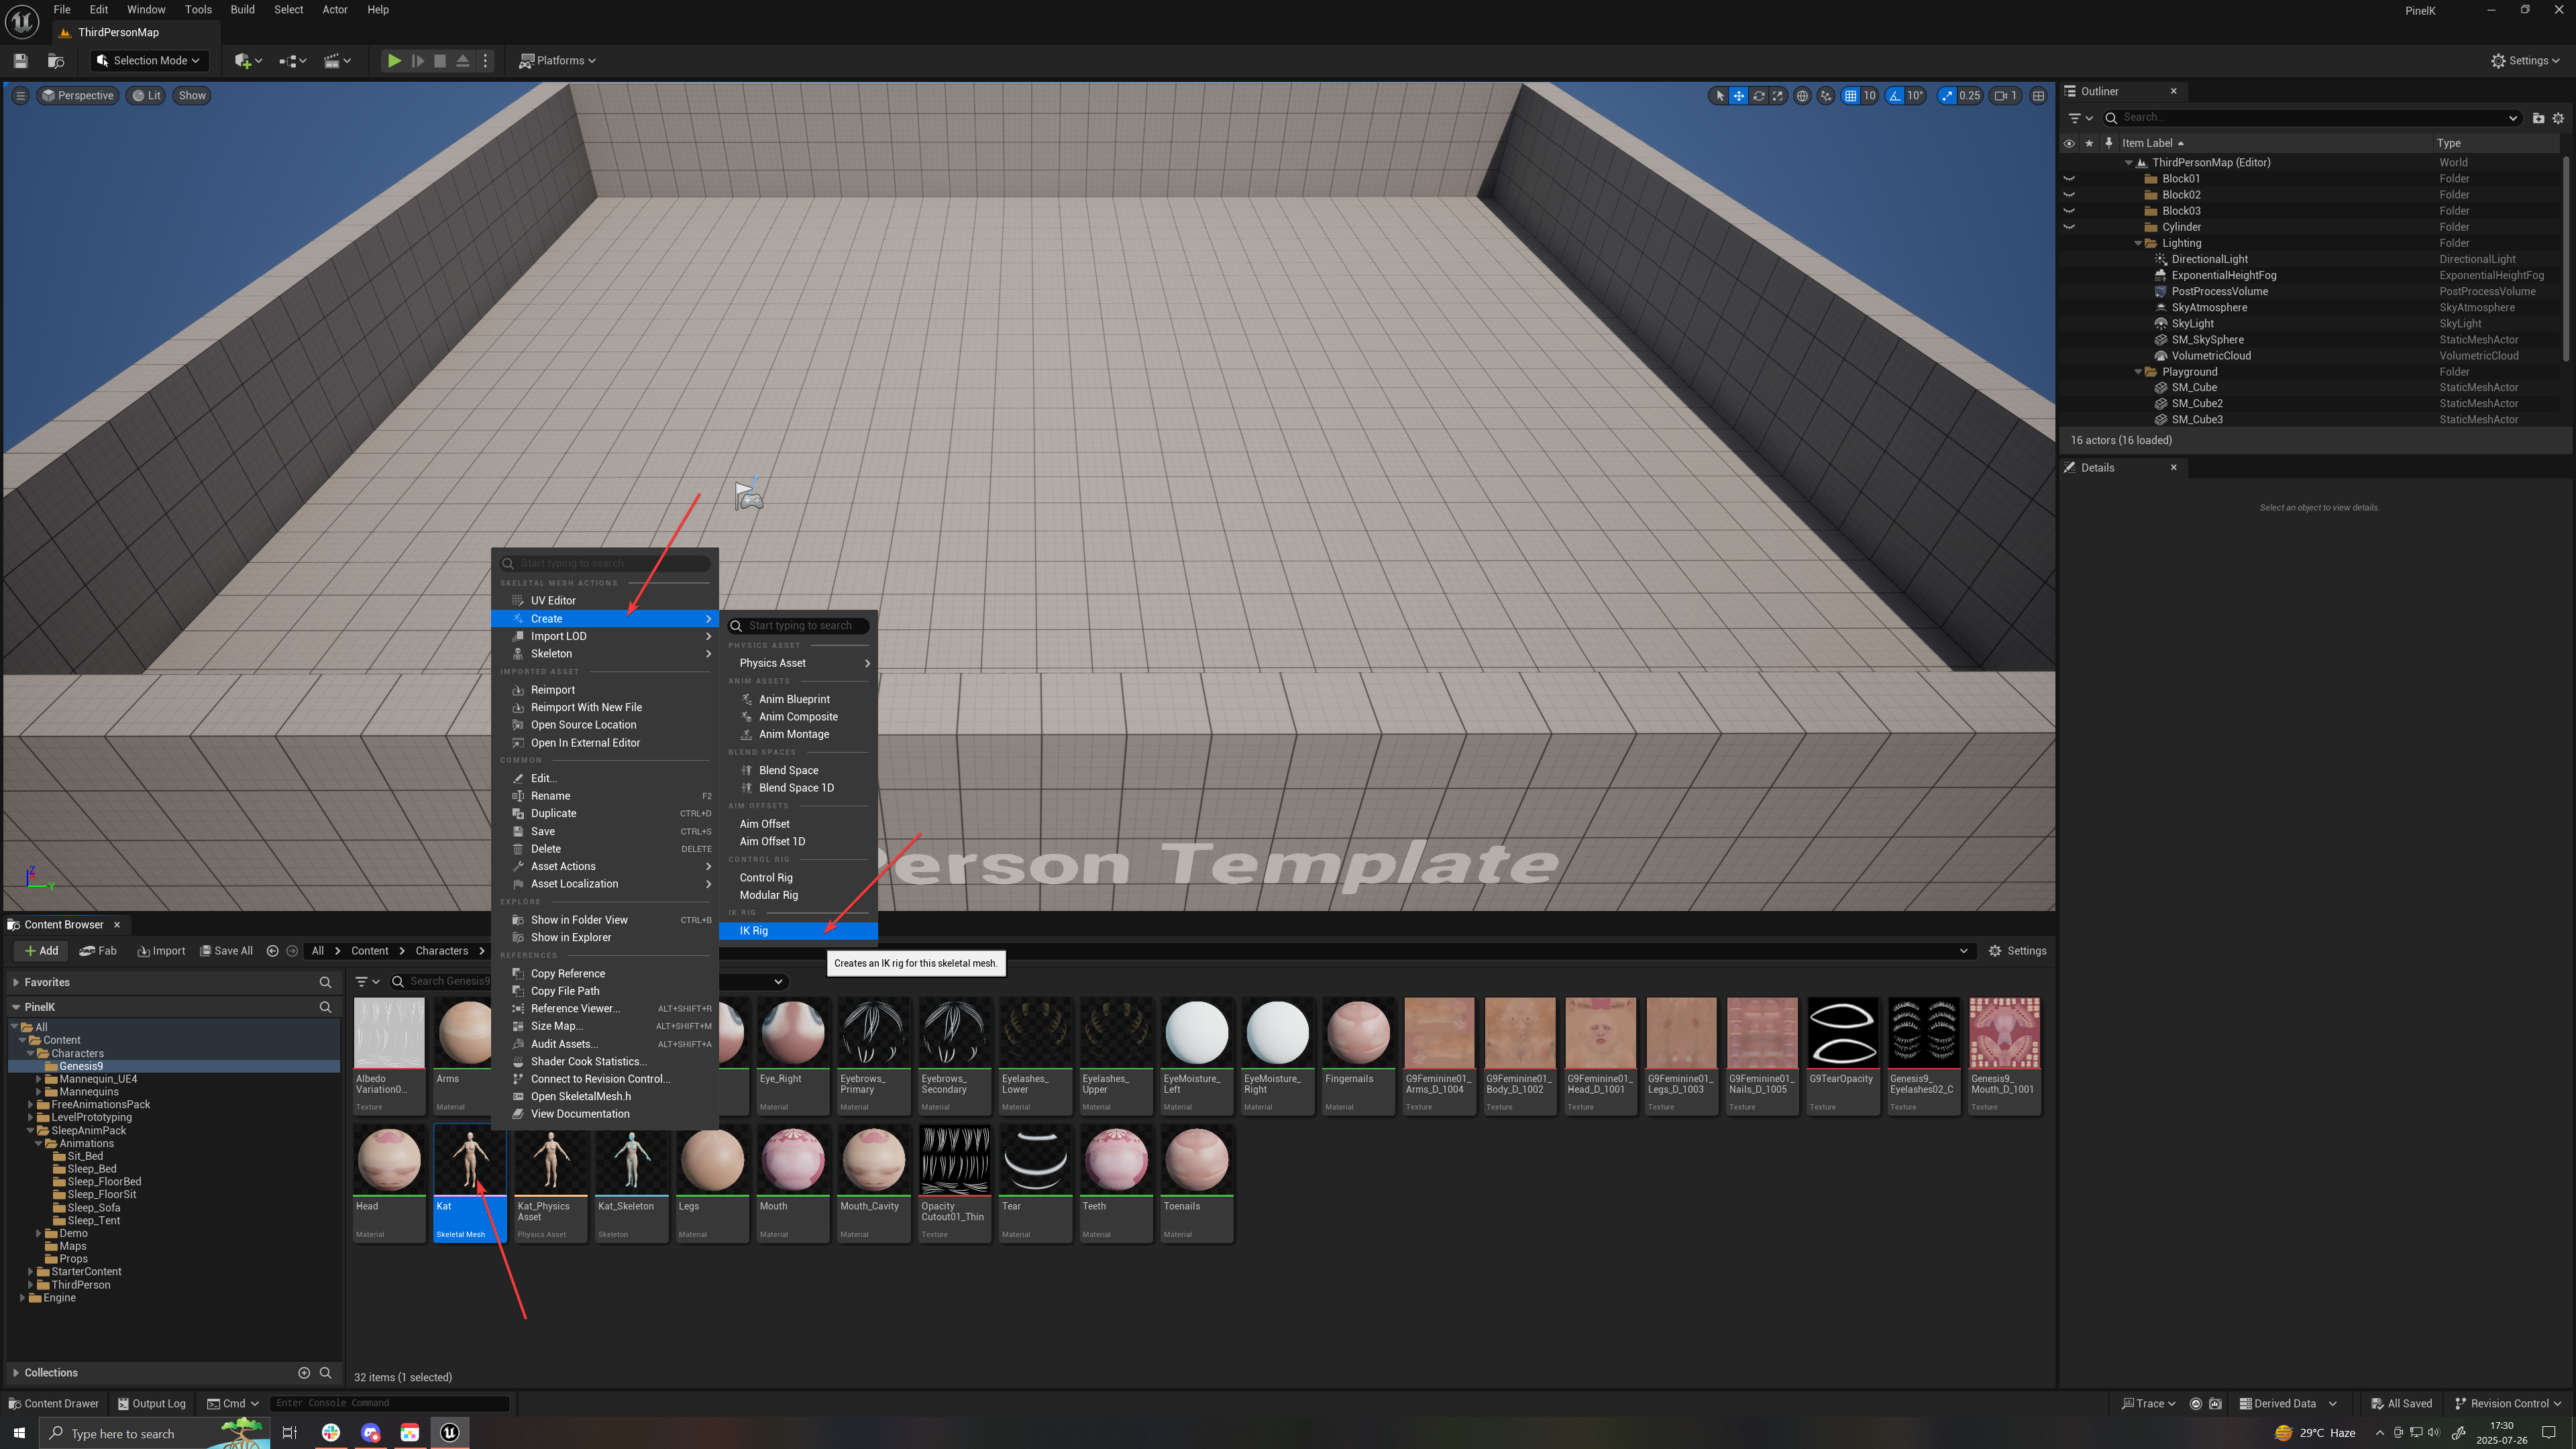
- Right click on your Genesis 9 Skeletal Mesh and choose “Create → IK Rig”
- Open your newly created IK Rig asset (it will have the name of your Skeletal Mesh, prefixed with “IK_”; in my case, it is called “IK_Kat”).
- Click on the button “Auto Create Retarget Chain”.
- Unreal will create a retarget chain based on Reallusion Character Creator 4, as it doesn’t know about Genesis 9 from DAZ 3D (it should mind you, maybe it does in UE 5.6, we’ll find out).
- It’s okay, we’ll get a 72% accurate retarget chain which we will fix later.
Close this window for now.
File → Save all.
Now go to the Animation asset that was done for UE Mannequin characters in the Content library.
In my case, I purchased the SleepAnimPack from fab.com (formerly known as UE MarketPlace).
☝🏼
Once purchased, you will see it in your Epic Library where you can add it to your project by clicking on the “Add to Project” button next to the library item.
- Under the SleepAnimPack → Demo → Mannequin → Character → Mesh, right-click on the the SK_Mannequin assset and choose Create → IK Rig.
- We do not need to create an IK rig per say, but we need the retarget chain. double click on the newly created IK_Mannequin asset to open it
- Click on the “Auto Create Retarget Chains” button.
- Since this asset is an Unreal Engine well known skeleton, the retarget chains are perfect from the get go.
- File → Save all.
- Ok, let’s look at our UE Mannequin armature and main differences with our Genesis 9 character.
- UE Mannequin:
- And our DAZ Genesis 9 character:
And the most useful thing one can do, is laying and comparing the bone structure hierarchically in a comparison sheet, with the target on the left (Genesis 9, i.e. the one receiving the animation) and the source on the right (UE Mannequin, i.e. the one providing the animation).
⚠️
The original Google Shseet can be viewed here: https://docs.google.com/spreadsheets/d/1PQKg0pQ4rNe6lN1A4FWFIcYEXPyx1Oy0fjtPKxs53DQ/edit?usp=sharing
Or you can get the PDF version here: https://drive.google.com/file/d/1Cq9Eq6HKaYSYSOZ7e3iNPtsi6NOYuCEh/view?usp=sharing
So now that we have the mapping between the two armatures, we can create and/or match the retarget chains, especially for the areas where Genesis 9 has more bones than UE Mannequin (spine, neck).
Open your UE Mannequin IK retarget asset. You should see, on the lower right corner, the IK Retarget chains:
☝🏼
The goals that you see (LeftFootIK, LeftHandIK, RightFootIK and RightHandIK) do not exist so you can set them tu None, but we can create IK controls and pivots with the following method:
Notice that the Retarget root is the pelvis, i.e. the first first “real” bone in the armature.
Notice also that the legs and hands have IK Goals.
We need to create similar chains on the Genesis 9 character, so let’s open the Genesis 9 IK asset.
You can see that it has more Chains then the UE Mannequin IK and that the retarget root is the hip, which is what’s needed because (refer to the armature mapping PDF above) the bone named “Hip” in Genesis 9 is matching the bone named “Pelvis” in the UE Mannequin armature.
So let’s make sure similar chain have exactly the same name and let’s make sure the span the correct amount of bones on the Genesis 9.
☝🏼
- For the neck and spine bones for example, you’ll notice that Genesis 9 has 4 spine bones instead of 3 compared to the UE Mannequin armature, and 2 neck bones instead of 1.
- We need to take that into account and tell the retarget to distribute the animation transformations for, say, the spine chain of a UE Mannequin (3 bones) across all the spine bones (4 bones) of the Genesis 9 armature.
- Ditto for the neck armature.
- Notice that Root, Neck and Spine chains are missing in the Genesis 9 IK.
- The LeftClavicle and RightClavicle chains are missing as well. The reason being that Genesis 9 calls them l_shoulder and r_shoulder (refer to the PDF bone mapping).
Close the UE Mannequin IK rig.
Open the Genesis 9 IK rig.
You can click on the + Add New Chain button to add a new chain.
Essentially, we not only need to create the chains that do not exist in Genesis 9 but are present in UE Mannequin, but also, for the existing chains, that the bones are the ones that match together (see bone mapping PDF above).
Here is what needs to be done on the Genesis 9 character:
| Action | Chain Name | Start bone | End bone | IK Goal |
| --- | --- | --- | --- | --- |
| Create | Root | Genesis 9 | Genesis 9 | None |
| Create | Spine | spine1 | spine4 | None |
| Create | Neck | neck1 | neck2 | None |
| Create | LeftClavicle | l_shoulder | l_shoulder | None |
| Create | RightClavicle | r_shoulder | r_shoulder | None |We’re done! Save the IK rig asset.
Right-click on an empty space in the asset browser where your Genesis 9 character is located (you could choose any folder really, just be consistent).
☝🏼
If you need to create more than one retargeter, you may want to consider creating a folder at the root (below “Content”) named “Retargeters” for example.
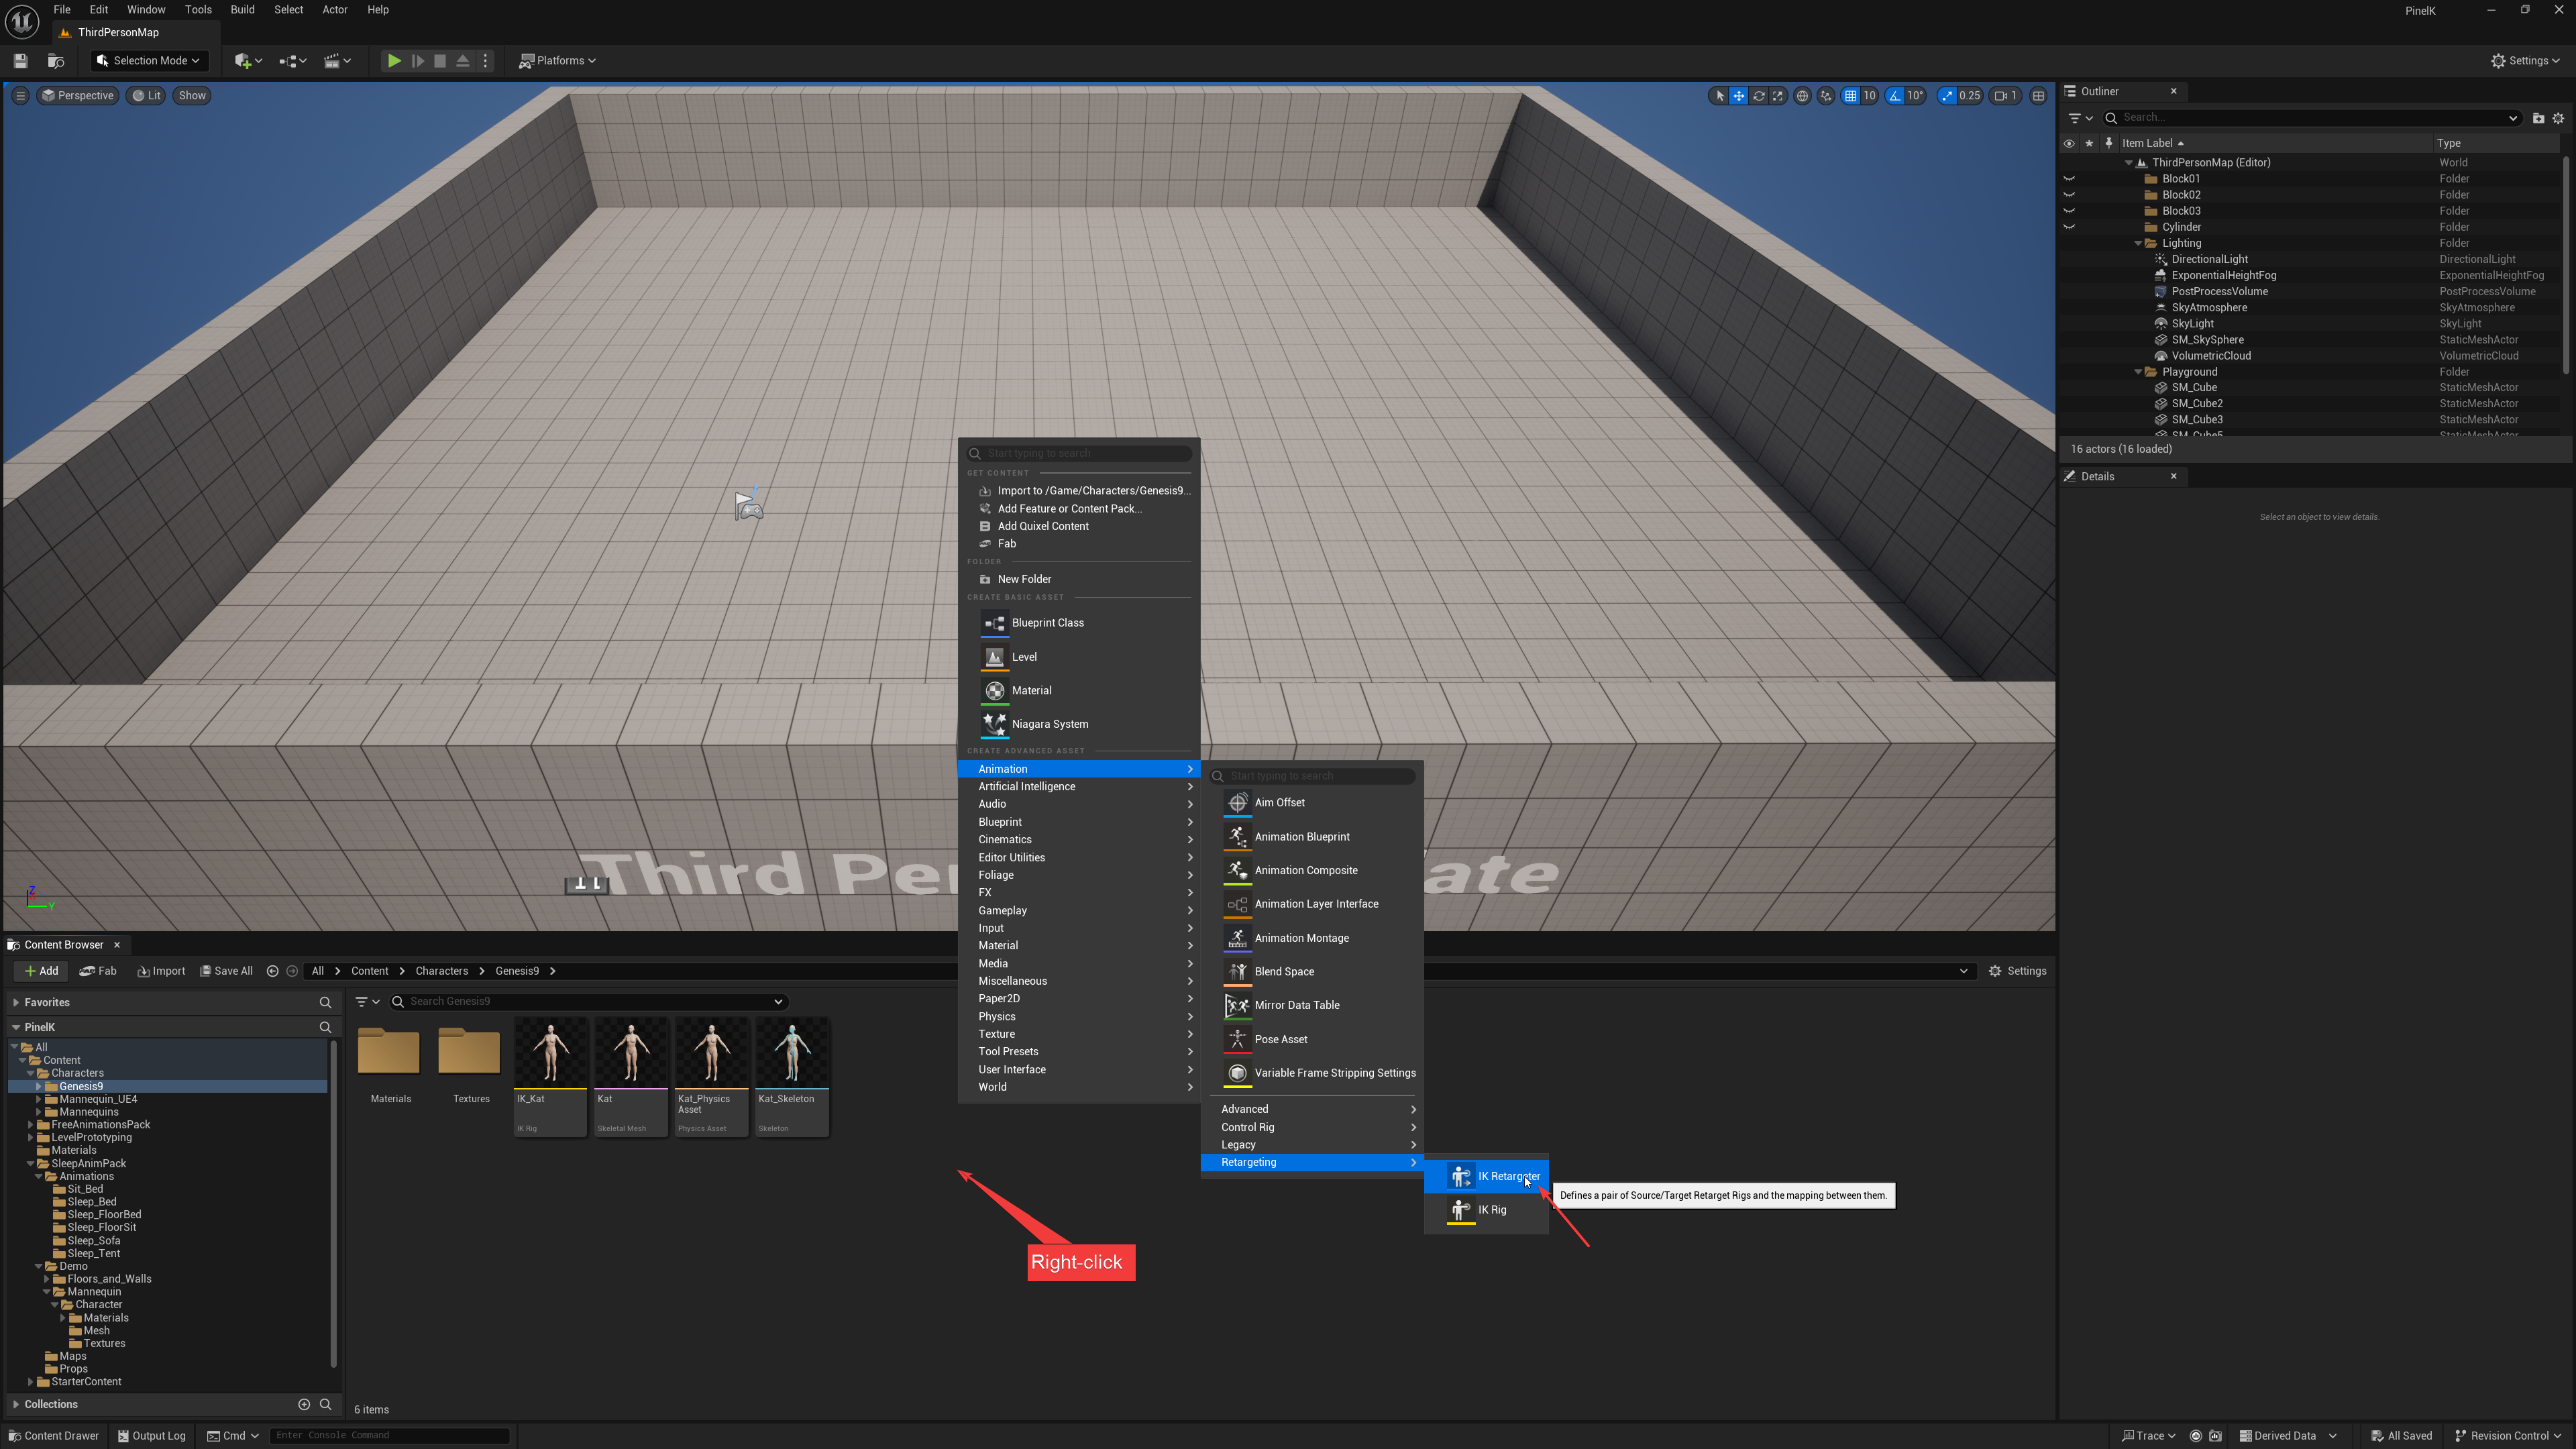
- Choose Animation → Retargeting → IK Retarget to create a new one.
Double click on it to open it.
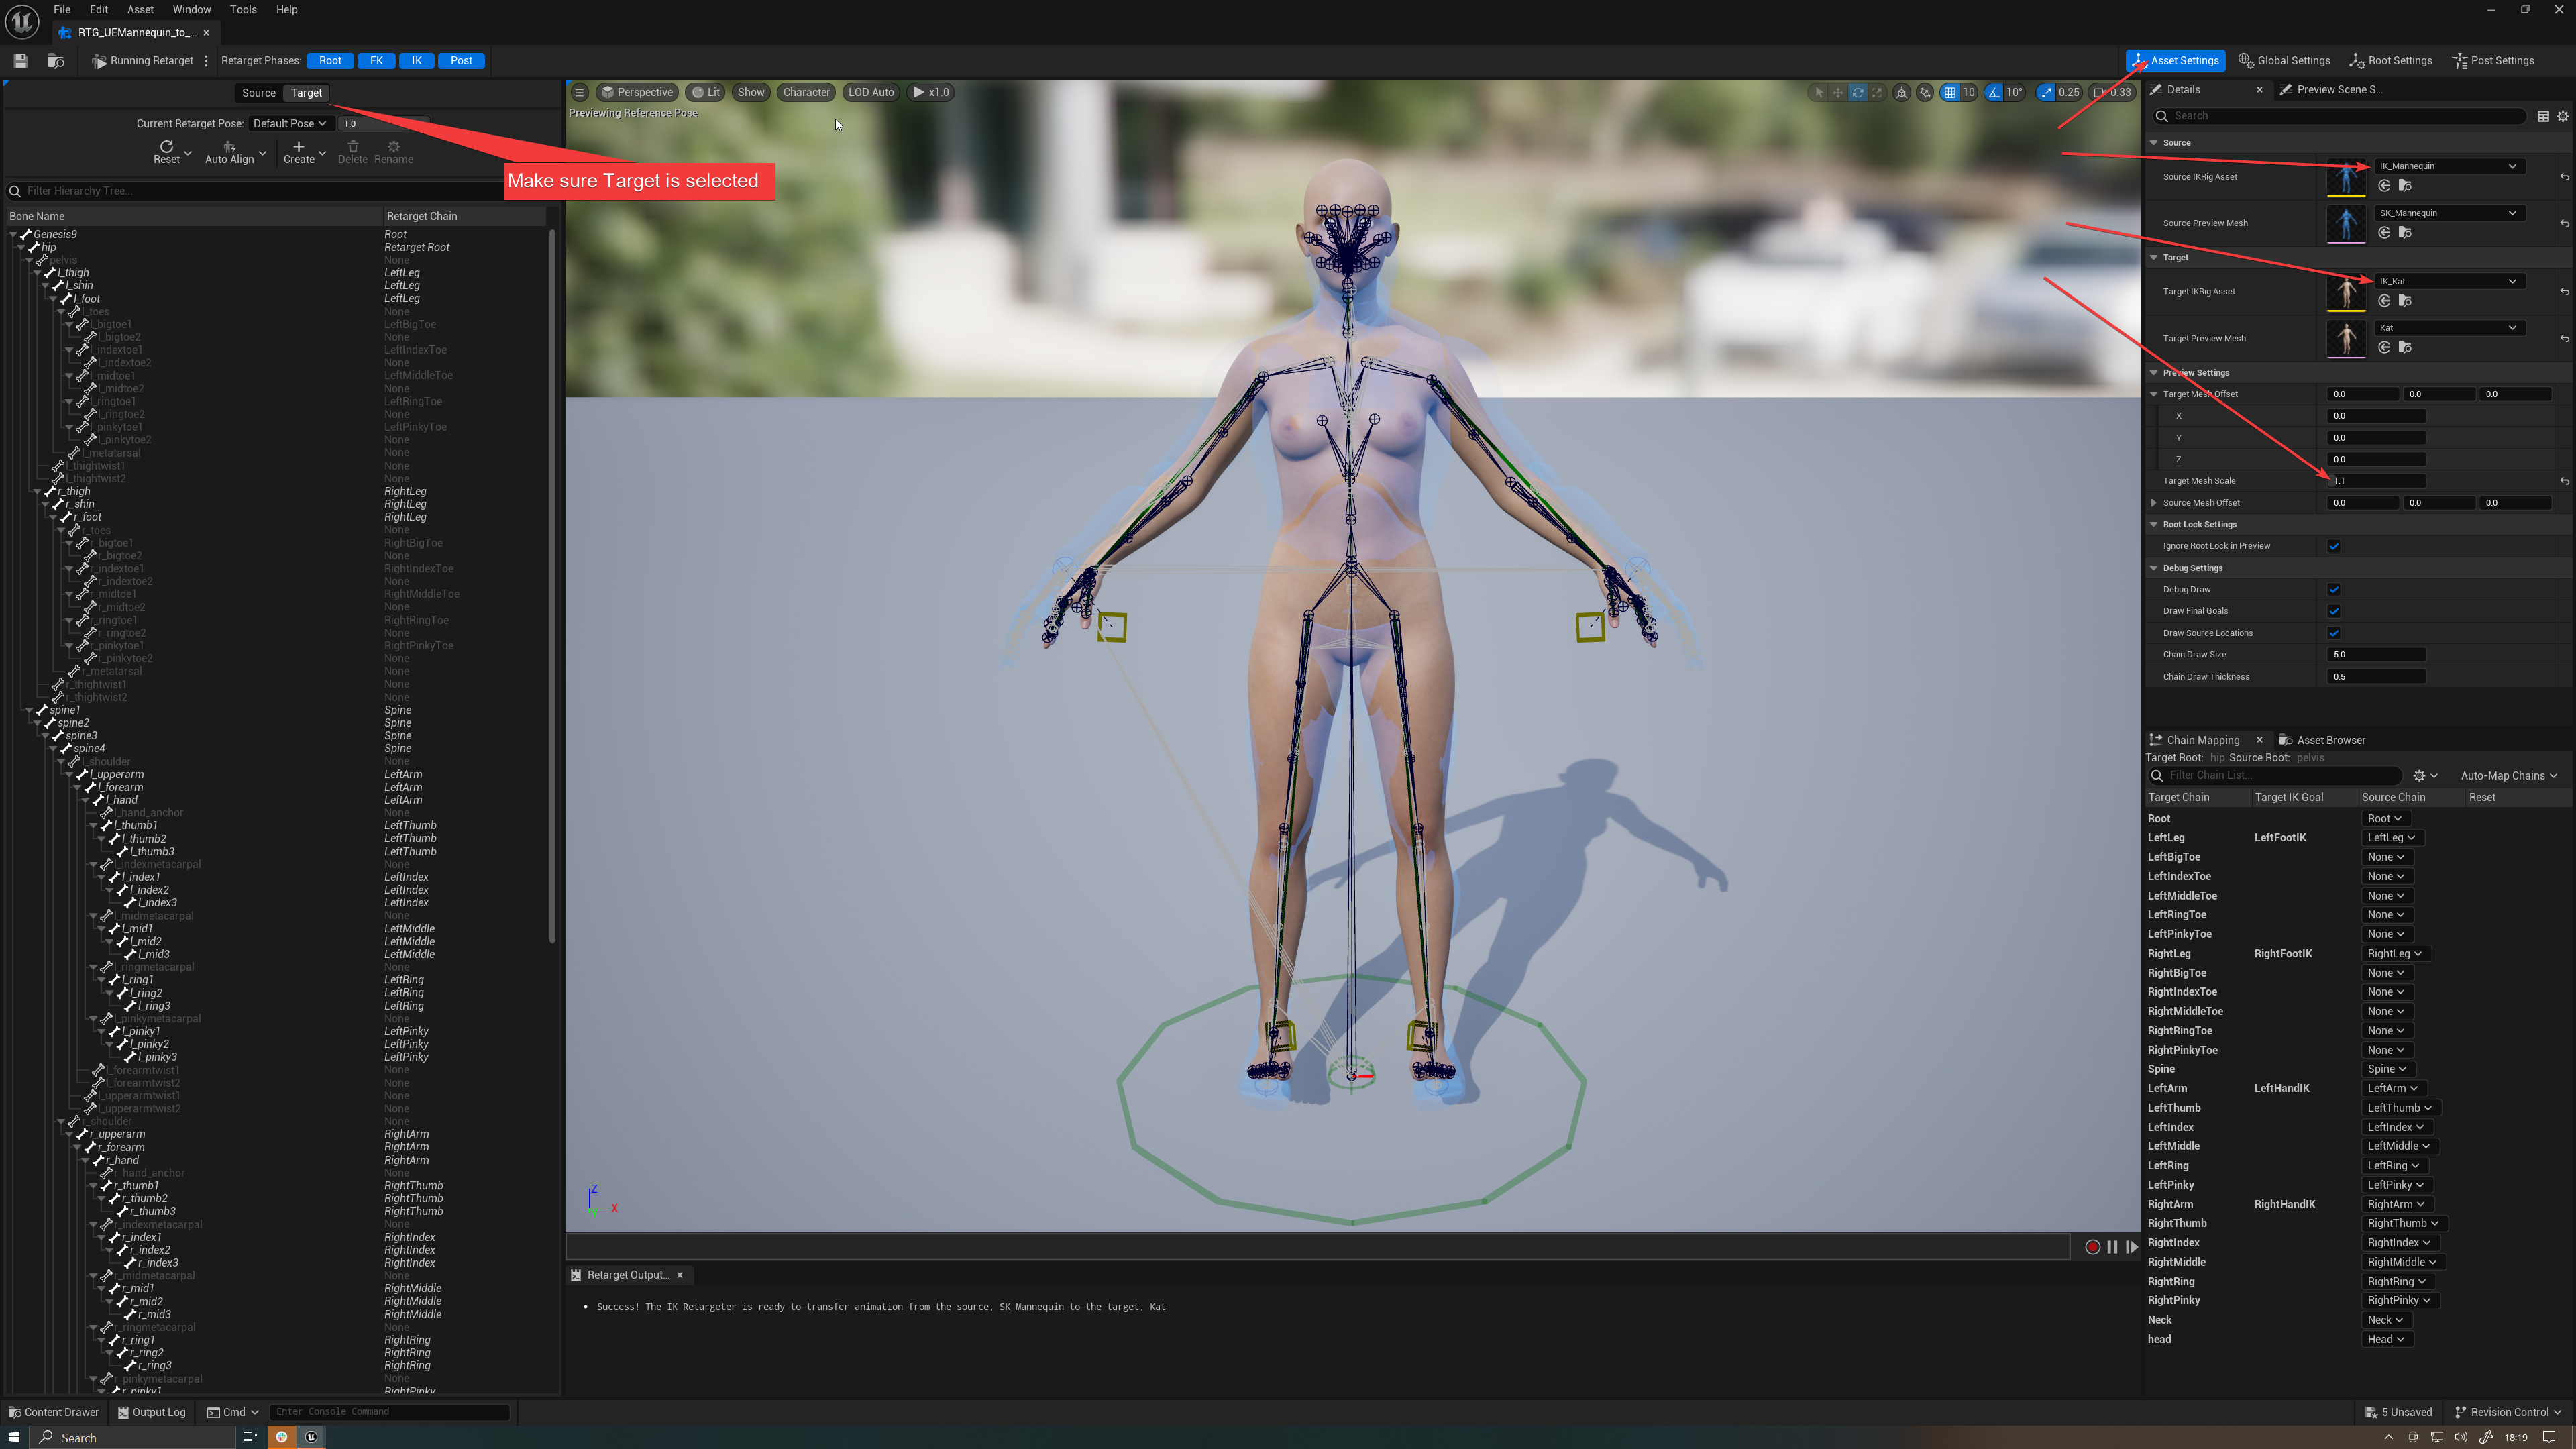
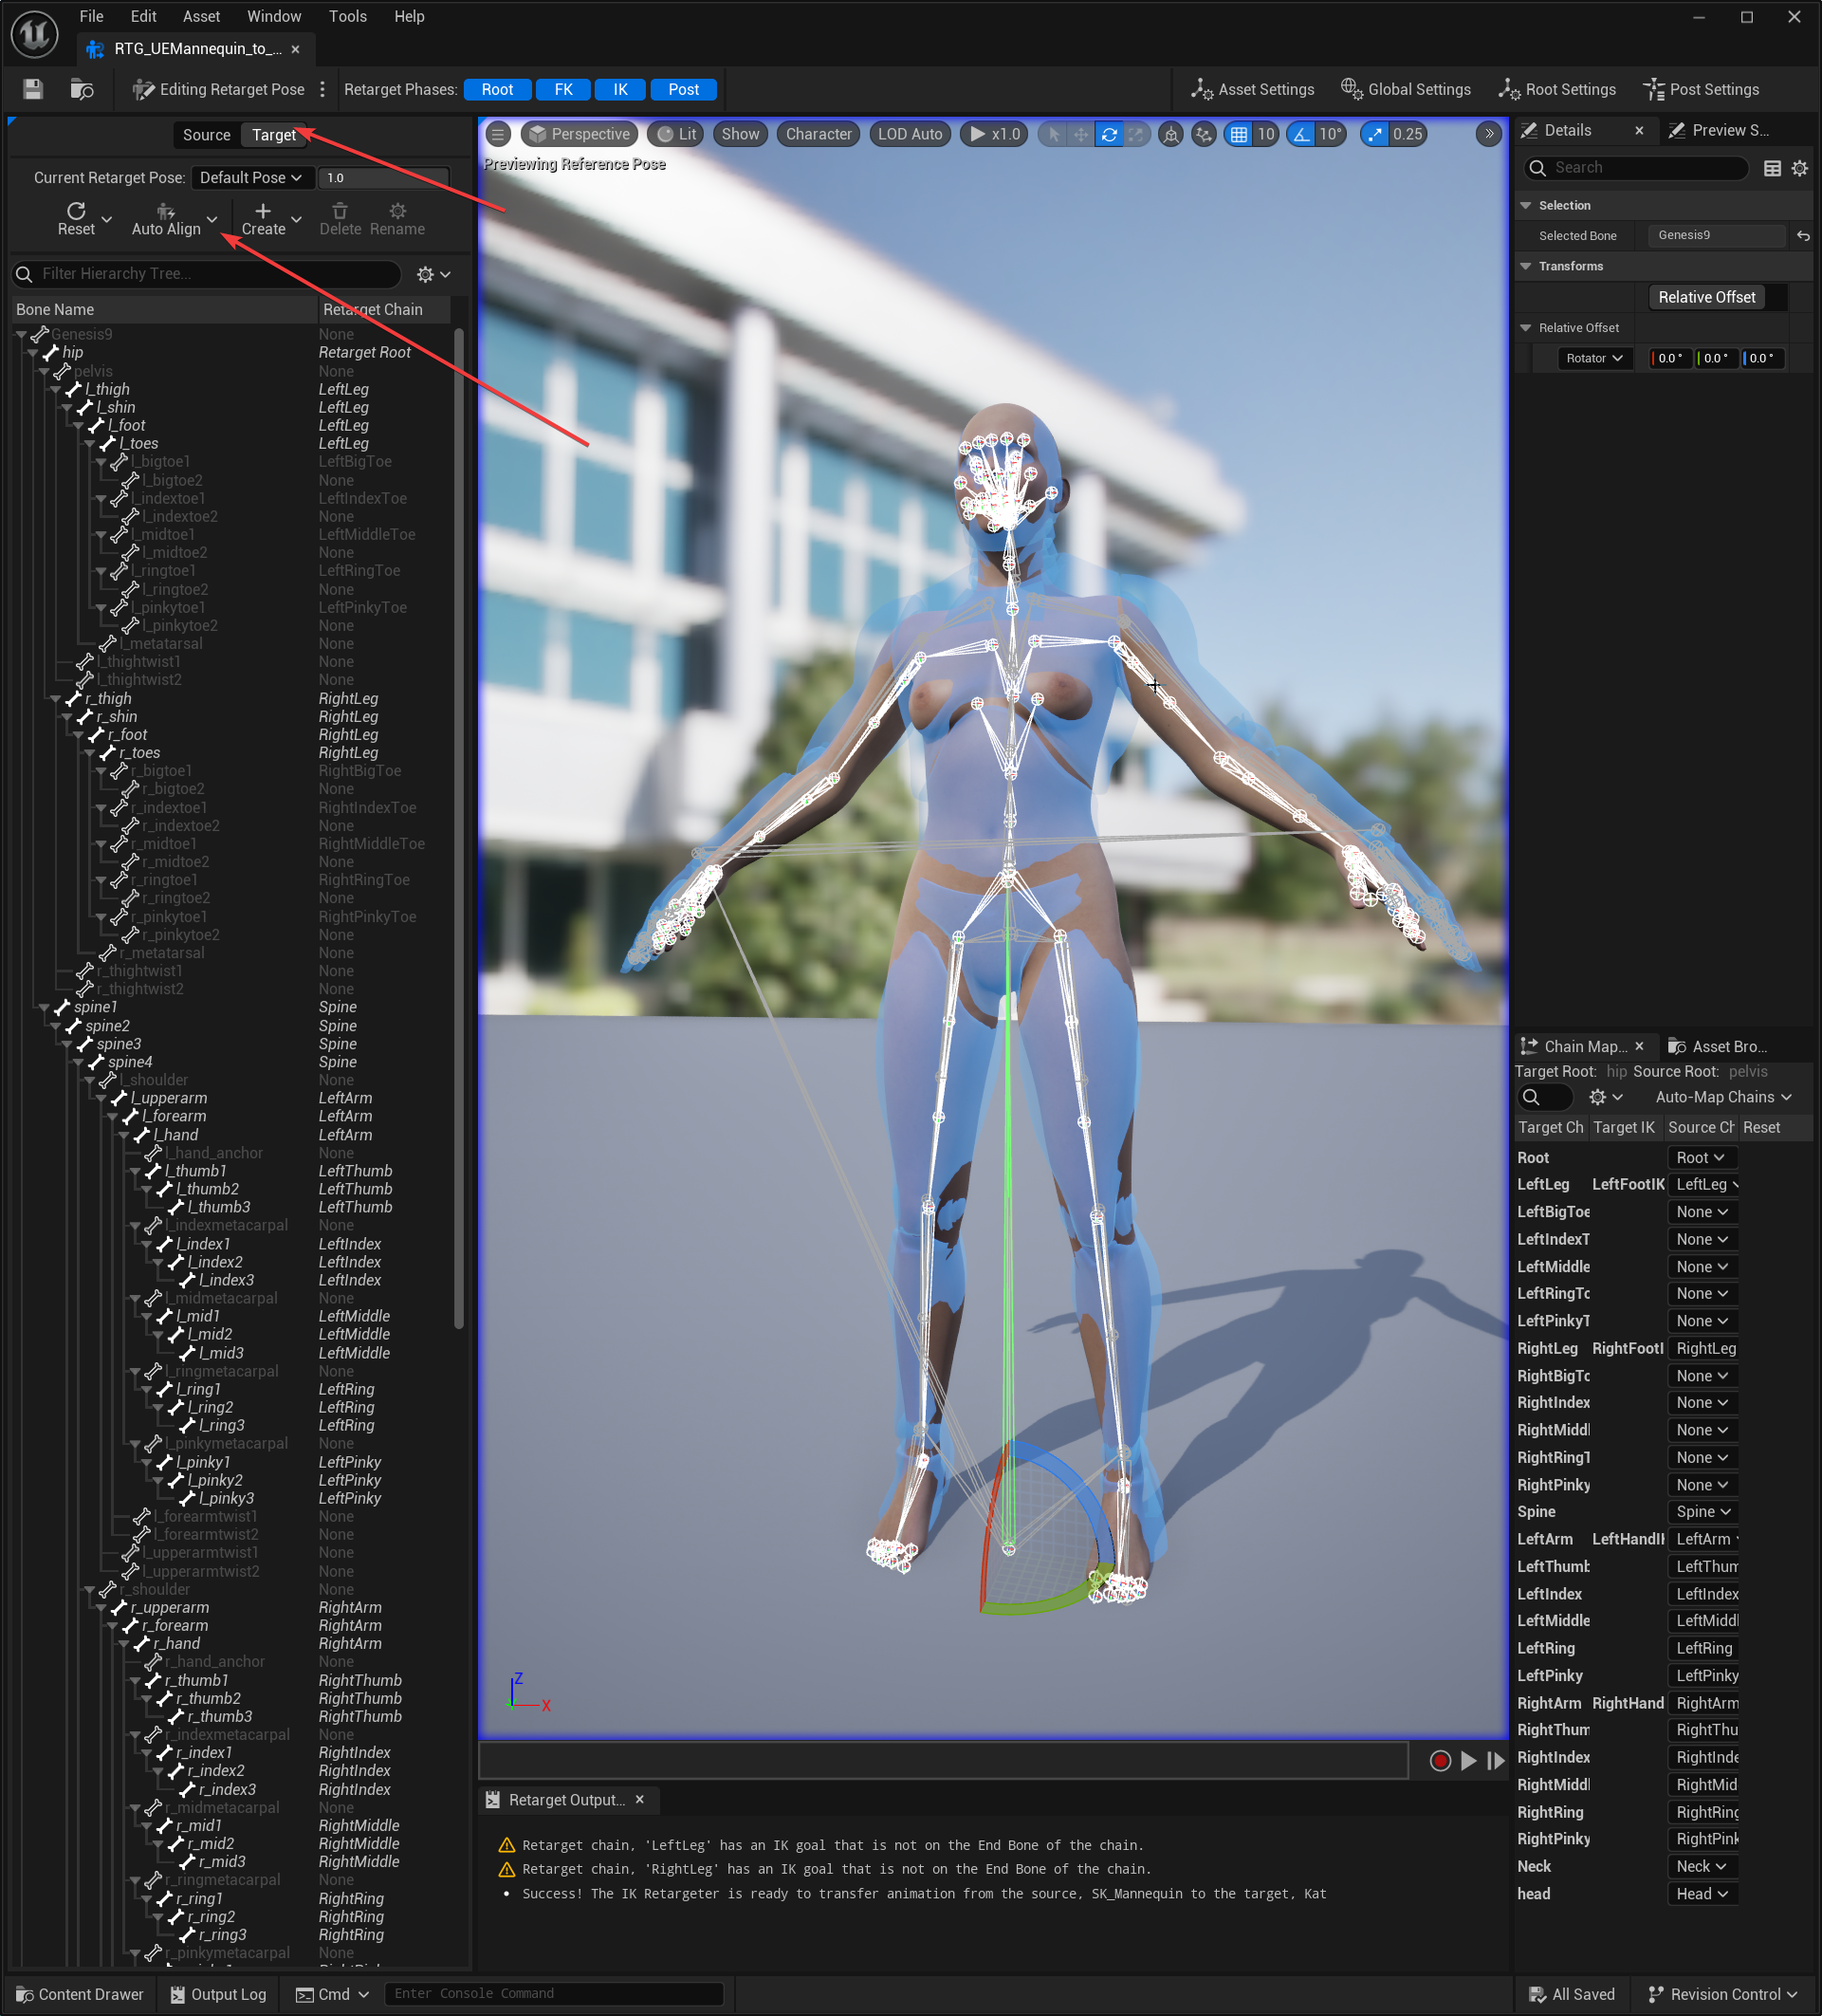
Make sure that, on the left, “Target” is selected, we want to work and modify/edit the target charcater, i.e. the Genesis 9 one.
Under Asset Settings, in the Details panel on the right, set source mesh to your UE Mannequin IK Rig (mine is called IK_Mannequin) and target to your Genesis 9 IK rig (mine is called IK_Kat).
Under the “Target Mesh Offset” drop down, set target mesh scale to 1.1 so that the size of the Genesis 9 is as close as possible to the one of the mannequin.
☝🏼
You may need to use a slightly different scale value, the idea is to try to match both sizes as closely as possible.
It does not affect the real size of the Genesis 9 character, do not worry.
- Save!
- Click on the “Running Retarget” button so that we switch to “Edit Retarget Pose” instead.
- On the left, where you see the target bone structure, make sure the “hip” bone is set to “Retarget root”. It should be by default. If not, we need to change it.
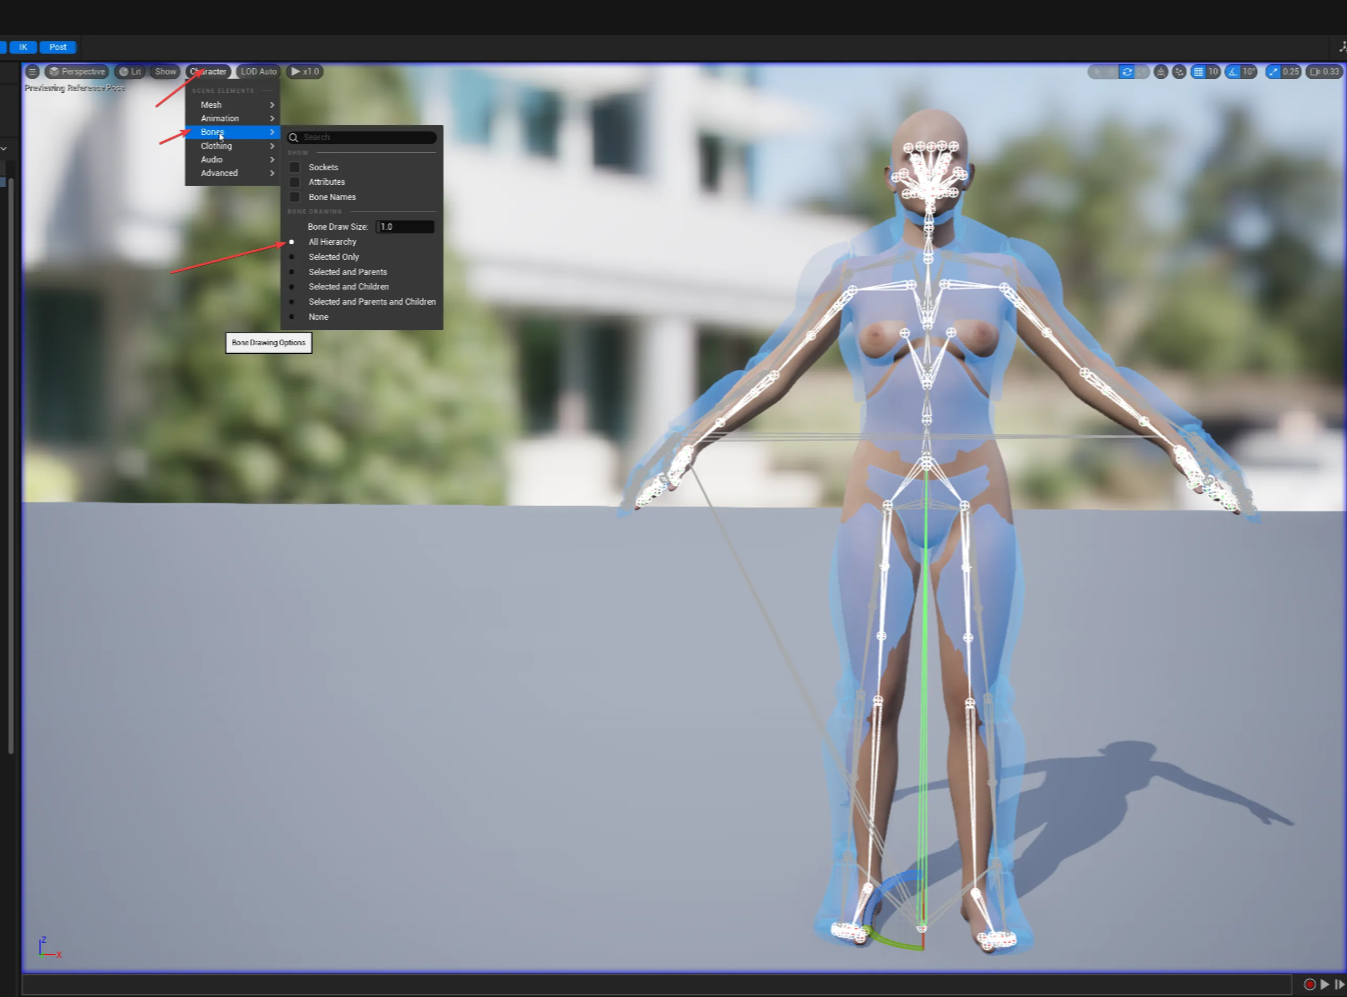
- In the viewport, click on Character and enable the display of the bones, it will help us with the pose alignment.
☝🏼
If you look at the chain mapping section on the lower right part, everything should be mapped, i.e. the target chain to the same chain name on the source, EXCEPT for the toes, as UE Mannequins do not have any.
Save but keep the retargeting window open.
Browse to your UE Mannequin animations.
Select a UE Mannequin animation that you have and want to retarget.
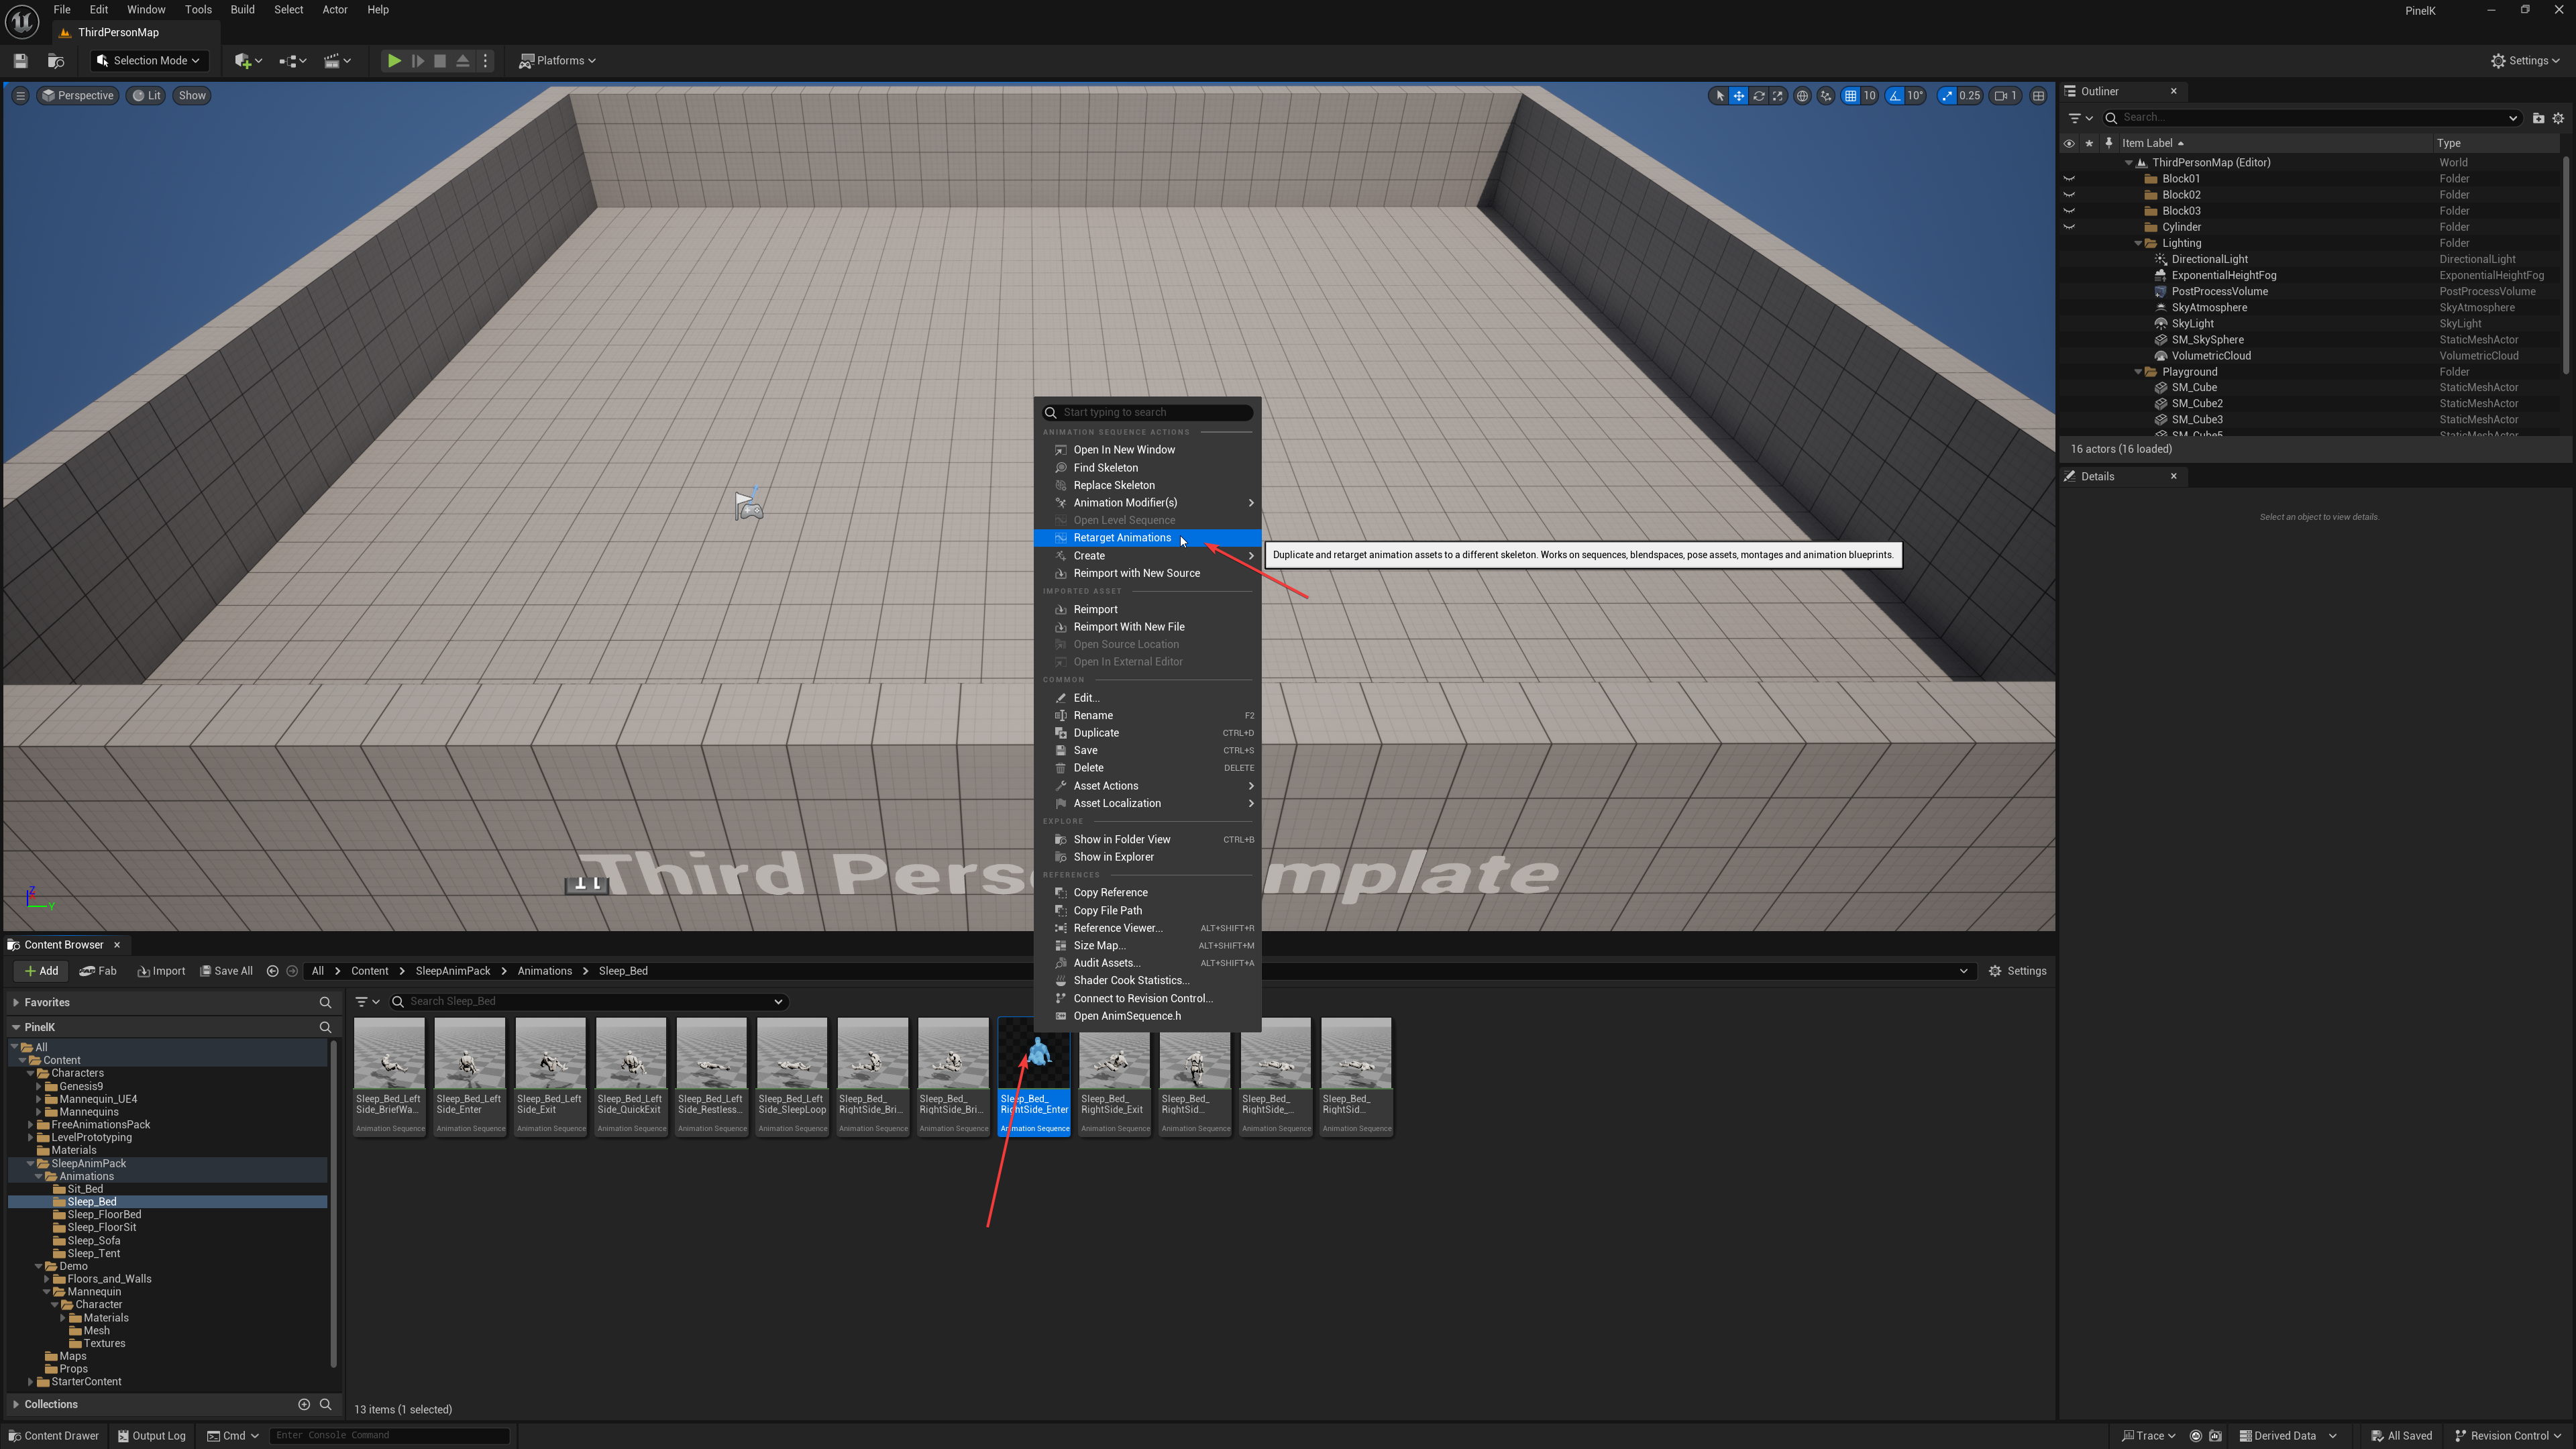
Right-click and choose Retarget Animation.
- In IK Retargeter window will appear.
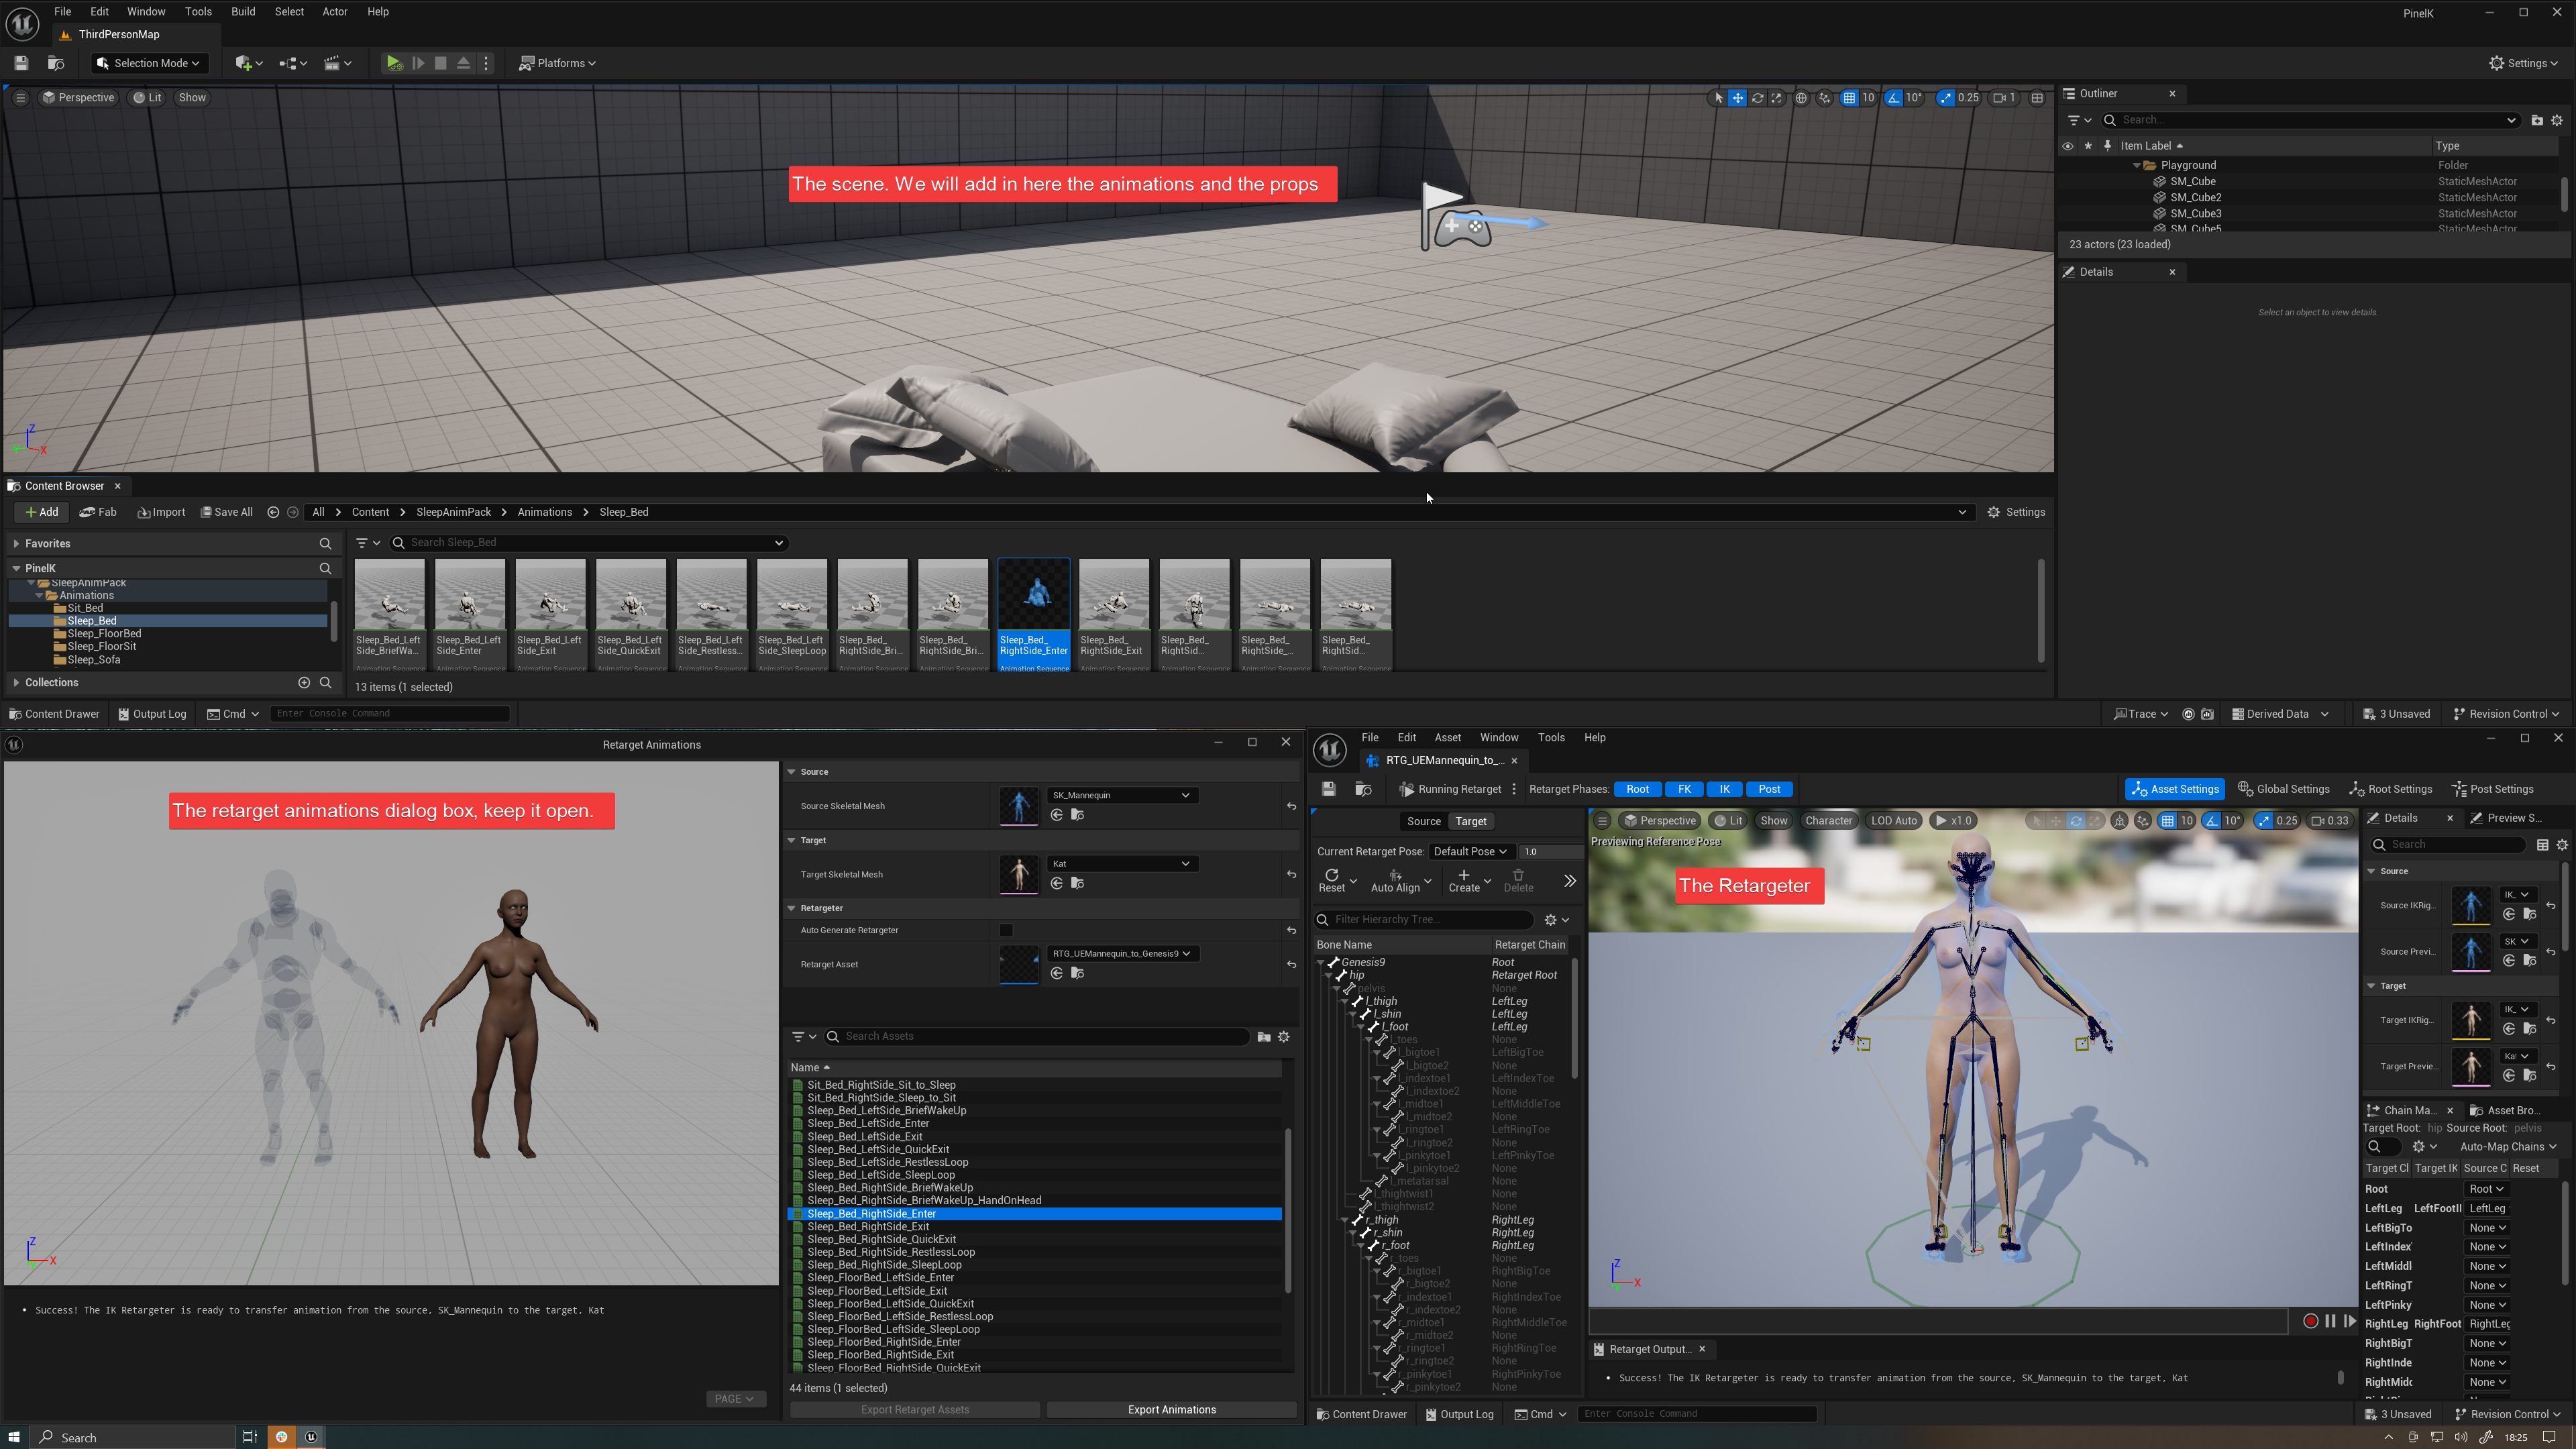
- Keep it open as we will iterate back and forth between the RTG window that defines the retargeting, and the dialog we just open that actually retargets an animation.
- Also, keep your main window handy, we will drag and drop both animated characters, at exactly the same place, to compare the original and retargeted animation.
- Ok, now the tedious work of aligning the bones and their orientation. Kat’s bones have to match the angles and directions of the UE Mannequin bones, so we need select each bone and rotate it accordingly.
- What I notice right away (but it may not require fixing, so, again, change a single thing, generate the animation, verify, iterate):
- UE Mannequin’s clavicle are tilted down a bit.
- Retargeted roots are misaligned: the target’s hip is higher than the source’s Pelvis.
- The forearms are rotated frontward on the Mannequin.
- The mannequin Legs are more angled laterally.
- But the feet are pointing forward.
- So first things first, let’s try an auto-realign, it might fix most issues.
- However, we don’t to perfectly align everything, it would never end and that’s why we have set the root bones (”Genesis 9” and “hip”) retarget to “Animation Scaled” instead of “skeleton”’ remember?
- On the retargeter window, click on the Target button , then click on the Auto-Align→Align All bones.
☝🏼
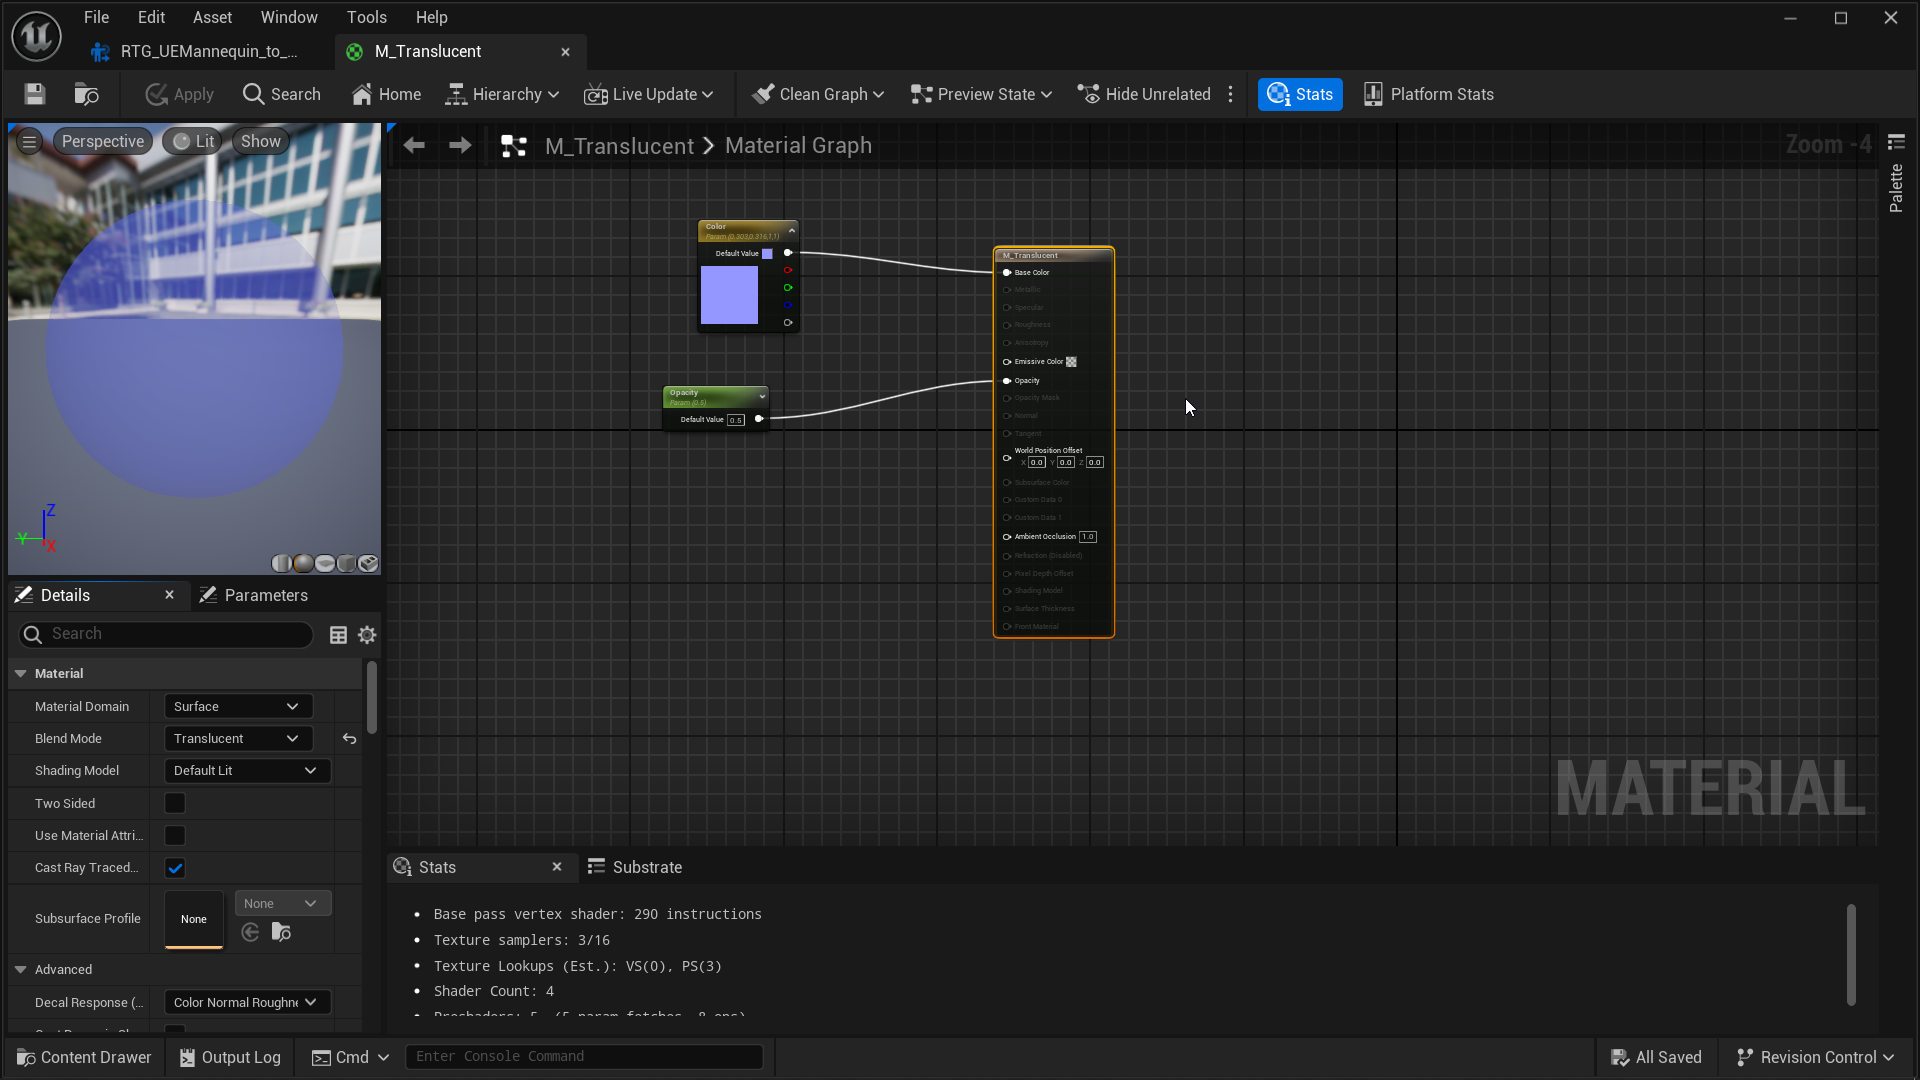
- Now you understand why I changed the material of the UE Mannequin to a simple translucent one :).
P.S.: I used a simple material with blend mode set to Translucent and an opacity value that I can change as a parameter:
- Let’s try.
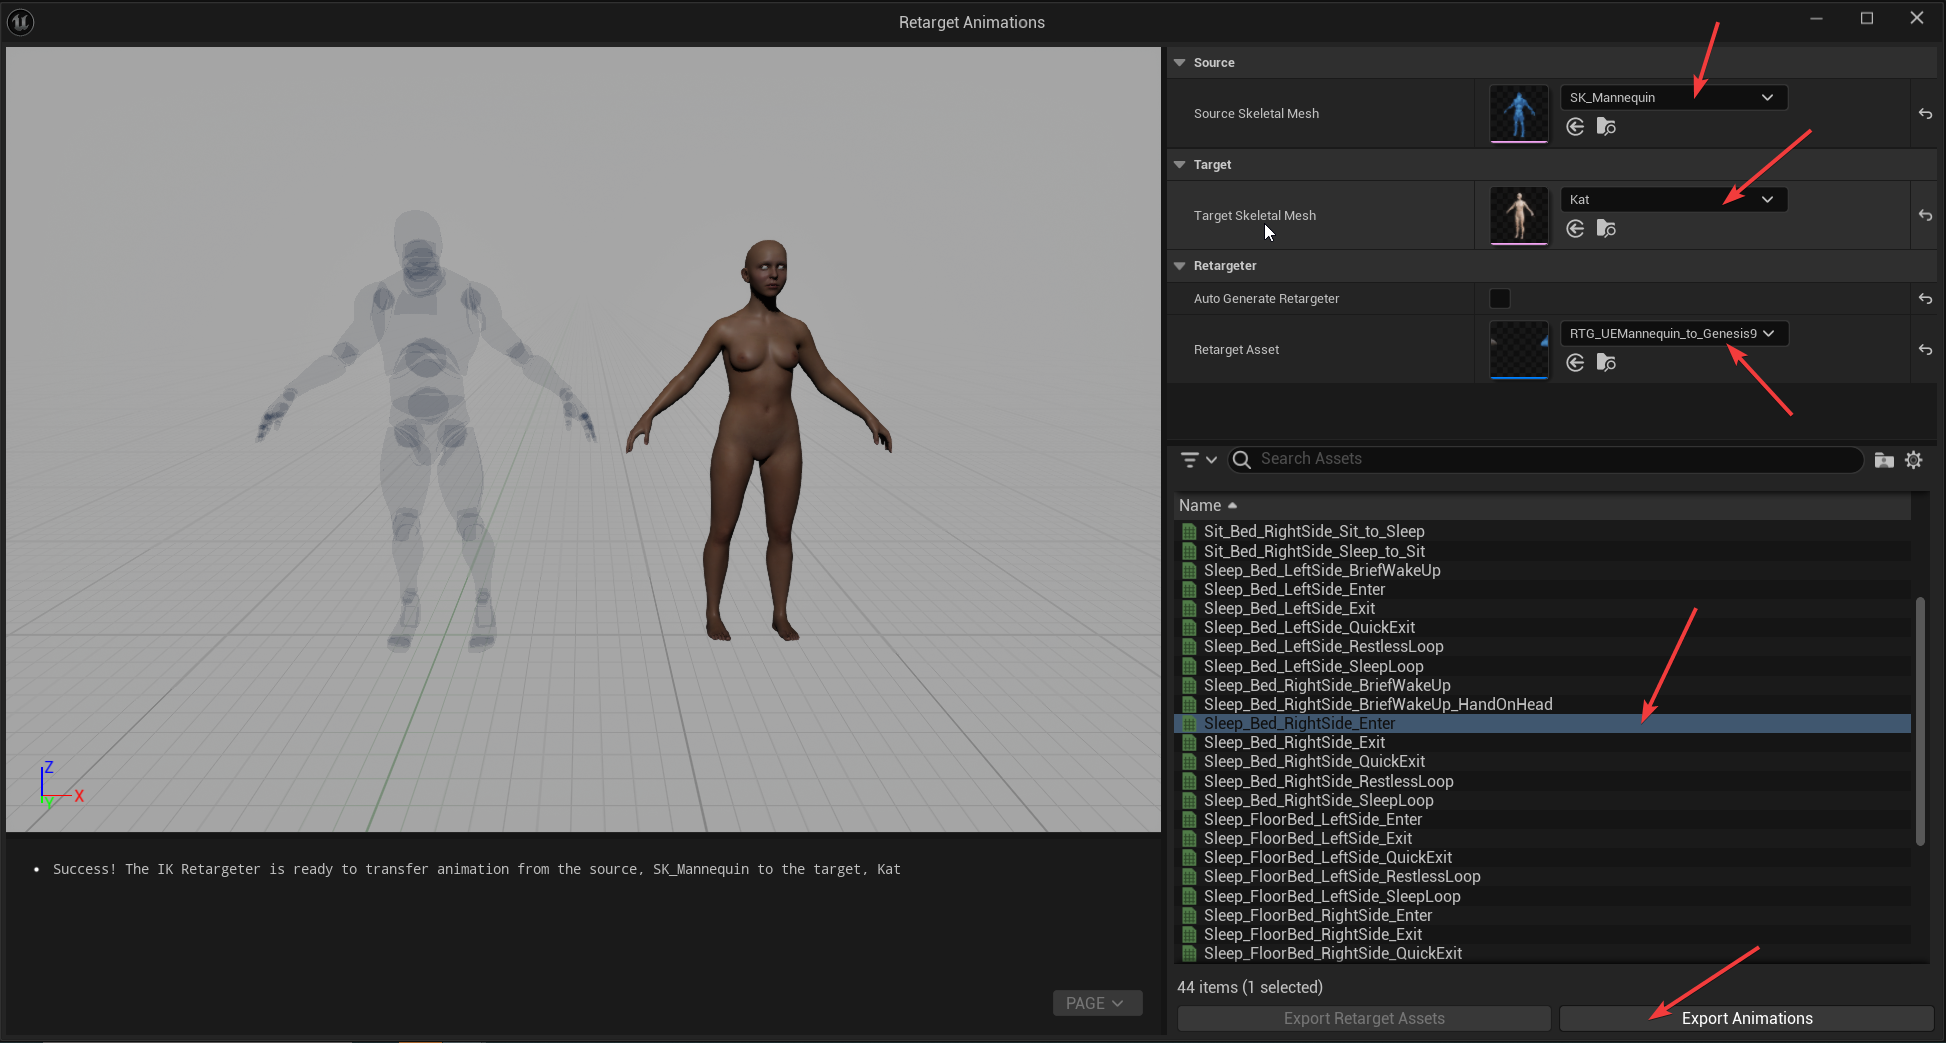
- So, in the Animation Retarget dialog box, uncheck “Auto Generate Retargeter” and choose “RTG_UEMannequin_to_Genesis9” instead.
- Choose also the animation you want to retarget. When everything will work perfectly, we will be able to select many animations at once.
☝🏼
If your Genesis character seems crooked, tense or dislocated, when you choose the retargeter, it means the latter needs more work.
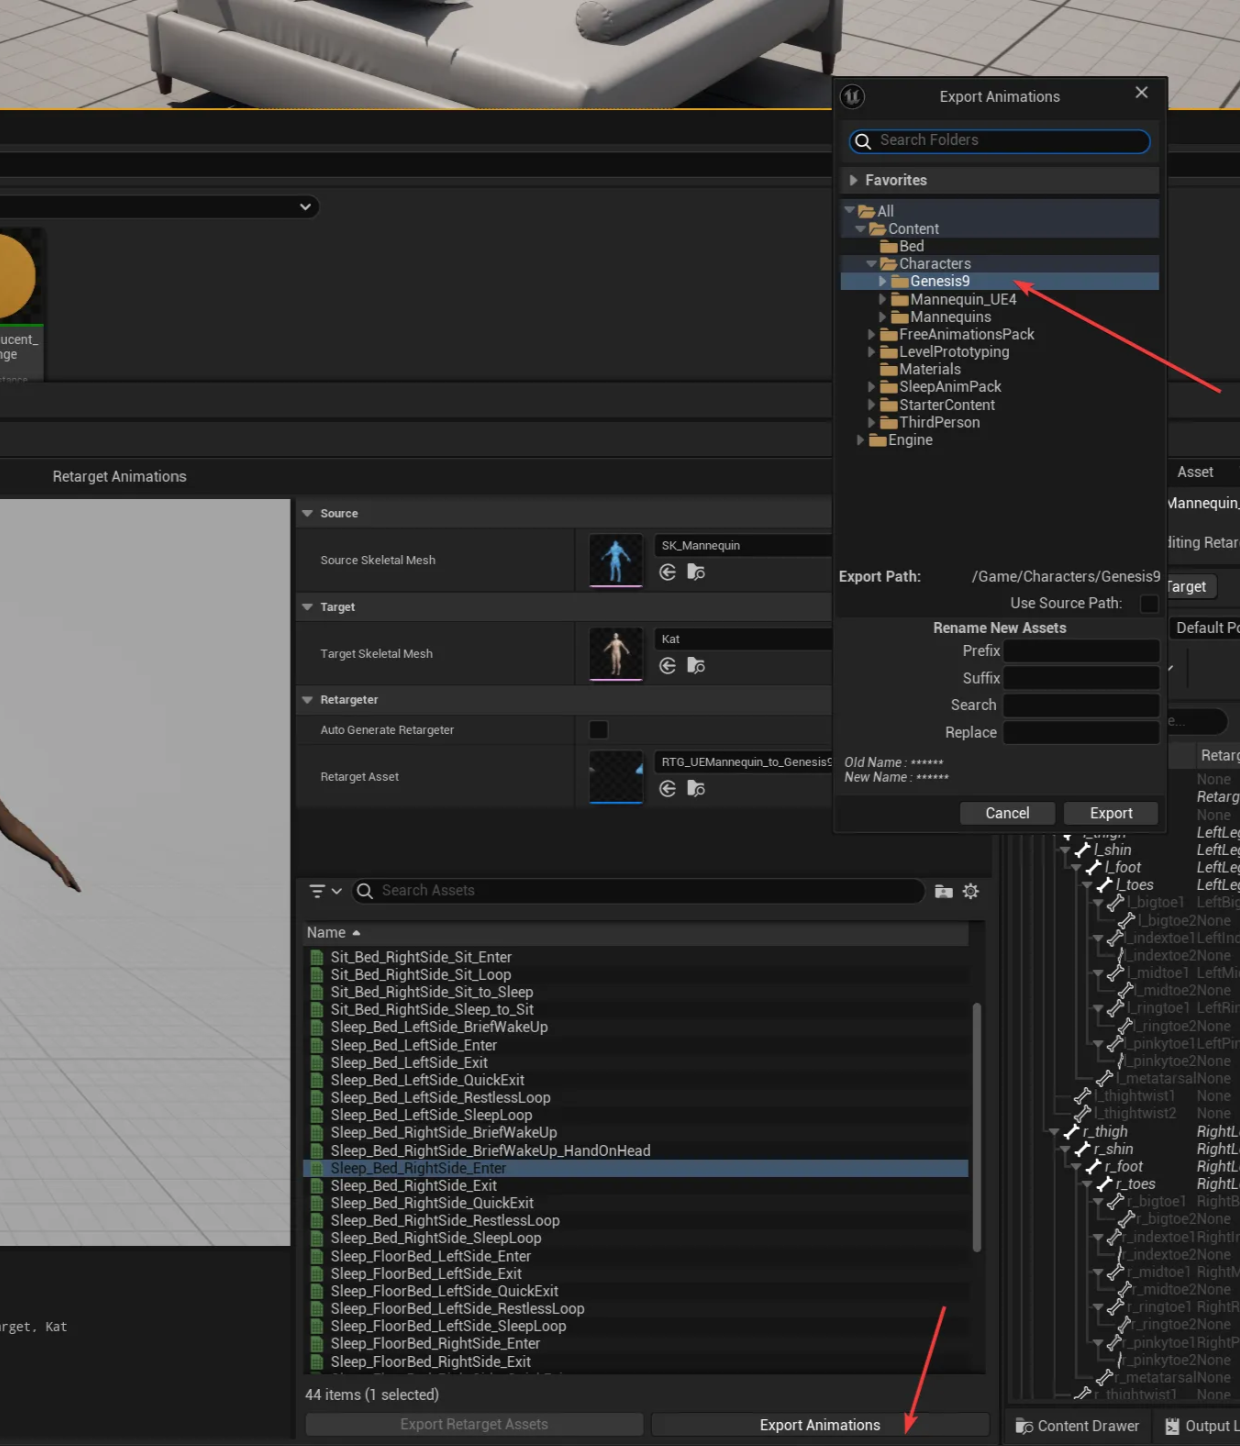
- Click on “Export Animations” and choose the destination (I chose the folder when my Genesis 9 characters are) and then click on the Export button.
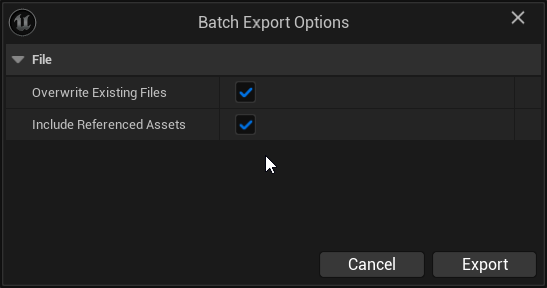
- A new dialog box will appear. Make sure you check “Overwrite Existing Files” as we will be doing this many times!
- In the content browser, UE should have switched to that target directory and you should see your animation.
- Double click on it and check if the animation seems okay.
☝🏼
If the retargeter is berzerk, so will be your Genesis 9 character! For example, here, the root chain was set to use the “hip” bone instead of the “Genesis 9” bone. See for yourself what it does to our poor character:
Let’s set up the scene with our props and drag and drop both the original animation (the UK_Mannequin character) and the retargeted one (on the Genesis 9 character).
Make sure you match and align the position (lead by the root bone) of both characters.
Play the scene and move around.
Pay specific attention to what feels like tensions or stiffness on the Genesis 9 character.
Not bad eh!
- I however do not like how the butt and back move up when Kat lays down, but the original animation seems to have the same behaviour, to a lesser extent because the UE Mannequin is bulkier.
- This, my friend, is fixed with fine-tuning and keyframing of the animation in an animation blueprint or, better, the Cinematics Level Sequence.
⚠️
Unfortunately, as of the writing of this document, the “Send to Unreal” plugin in DAZ Studio only supports UE 5.3 and will not work with UE 5.4 (won’t even compile) or above. So the workaround is to use Blender as the middle man because otherwise the Genesis 9 Bones’ local X axis won’t be aligned with the downward direction of the bones and it will cause issues with IK rigging.
HOWEVER: David Vodhanel maintains, on GitHub, a DAZ to Unreal plugin fork for all >5.3 versions of UE, including 5.4, 5.5 and 5.6! Here’s the link:
https://github.com/David-Vodhanel/DazToUnreal/releases/
Follow this tutorial to install the DAZ to Unreal pluging both in DAZ Studio and UE 5.x
- The tutorial will show you how to import a DAZ Genesis 9 character into Unreal
- The character will have, in UE, a full body IK rig as well as FCMW rigs (TBD, whathever they are)
- TBD: check the retarget portion to see how it can be used for Mixamo.
- TBD: Mixamo characters have 16cm shorter limbs, it has an impact!
- Now, need to figure out how to do the following:
You don’t lose your FK / IK controls at all—Unreal just gives you two different ways to bring them back into the game after a Mixamo-to-DAZ retarget.
Workflow What happens When to use it How to do it Layered Control Rig (UE 5.4+) Your Mixamo clip plays on the bones while the Control Rig sits on a Layered track. A built-in Backwards Solve step makes the incoming bone animation drive the rig’s controls in realtime, so you can key extra poses or tweak FK/IK effectors on top. Nothing is baked, so you can keep swapping animations. Quick cleanup, additive offsets (fix foot-slides, adjust head turn, etc.). Non-destructive. In Sequencer: + Track ▶ Control Rig ▸ Layered, pick your DAZ rig. Tweak weight/order as needed. ✔ Requires a Backwards Solve node in the rig graph. Bake to Control Rig The retargeted bone keys are converted to keys on your rig controls. After that the animation is driven entirely by the Control Rig, just like if you had keyed it by hand. Deep editing, spline graph cleanup, or when you need to export the final result as an FBX with clean control keys. In Sequencer: Right-click Skeletal Mesh track → Bake to Control Rig…, choose your DAZ rig, set options (world-space, reduce keys, etc.). Works because Backwards Solve pushes the bone motion onto the controls. What this means in practice
- Retarget first – IK Rig/Retargeter turns the Mixamo clip into a regular Animation Sequence on the Genesis 9 skeleton.
- Add your Control Rig – Either as a Layered track (non-destructive) or by baking. When you scrub the timeline you’ll see the DAZ FK/IK gizmos moving with the clip.
- Refine – Move an FK shoulder, pull an IK wrist with Full-Body IK, or drop an additive curve on just the fingers—exactly the same controls you had before.
- (Optional) Bake out – If you started layered and want to ship a single clip, just run Bake to Control Rig later, or bake the final pose to a fresh Anim Sequence.
Tips & gotchas
- Backwards Solve is mandatory. Without that event in your rig graph, Unreal can’t “reverse-engineer” the bone keys back onto the controls.
- Full-Body IK still works. Because the Control Rig is live, any FBIK units inside it will solve after the retargeted pose, letting you ground feet or keep a hand on a prop.
- Performance: A layered Control Rig adds only the rig’s solve time (typically < 0.3 ms per character) on top of the retarget; baking removes that cost entirely.
- Exporting: If you need an FBX for another tool, bake to Control Rig then “Bake Animation Sequence” to get a clean bone-keyed clip.
TL;DR – Retargeting a Mixamo clip onto a DAZ skeleton does not strip away your FK/IK controls. Add the Control Rig back in as a Layered track to tweak non-destructively, or Bake to Control Rig when you’re ready to do heavy editing or export.
When you import a DAZ Genesis 9 character into Unreal Engine 5.4 (keeping native bones and full body rigged) and then retarget a Mixamo animation to it, you do not inherently lose the FK and IK rigging control on the DAZ character.
Here’s why and how it generally works:
- DAZ Character Import: When you bring your Genesis 9 character into UE5, especially using the DazToUnreal Bridge, it typically comes with its own skeletal mesh and an associated Skeleton asset. This Skeleton asset defines the character’s bone hierarchy and initial pose. Crucially, the DazToUnreal Bridge also often generates a Control Rig for your DAZ character. This Control Rig is what provides you with the FK (Forward Kinematics) and IK (Inverse Kinematics) controls within Unreal Engine.
- Mixamo Animation Retargeting: Unreal Engine 5.4 has a significantly improved retargeting system (IK Retargeter). The process involves:
- Setting up an IK Rig for your DAZ character’s skeleton.
- Setting up an IK Rig for the Mixamo animation’s skeleton (often the UE5 Mannequin, or a custom one if you’ve imported a specific Mixamo character).
- Creating an IK Retargeter asset that maps the bone chains between the source (Mixamo) and target (DAZ) IK Rigs.
- Applying the Mixamo animation through this IK Retargeter to your DAZ character.
- Preservation of Control Rigs: The retargeting process essentially transfers the animation data from one skeleton to another, accounting for differing proportions and bone structures. It doesn’t overwrite or disable your character’s underlying Control Rig.
- Refining and Fine-Tuning with Control Rigs: This is where the power comes in. After retargeting, you can:
- Create an Animation Blueprint: Your DAZ character will have an Animation Blueprint (ABP). Within the AnimGraph of this ABP, you can add an “IK Retargeter” node to play the retargeted Mixamo animation.
- Add a Control Rig Node: Crucially, you can then add a “Control Rig” node after the IK Retargeter node in your AnimGraph. This allows you to layer additional animation on top of the retargeted motion.
- Blend Poses: Inside the Control Rig node, you can access the FK/IK controls generated for your DAZ character. You can then pose individual bones, adjust IK goals, and generally refine the animation. You can blend this Control Rig animation with the retargeted animation using various blend modes (e.g., additive blending) to correct any minor issues, add subtle secondary motion, or create custom poses on top of the base animation. For example, if a retargeted hand isn’t quite hitting a prop correctly, you can use the IK controls in the Control Rig to precisely position it.
In summary, the workflow typically allows you to:- Get a base animation from Mixamo quickly via retargeting.
- Utilize the DAZ character’s native bone structure and the automatically generated Control Rig (via DazToUnreal) to make precise adjustments and additions to that retargeted animation.
This flexibility is a major advantage of Unreal Engine’s animation system, allowing for efficient initial animation application followed by detailed artistic control.
- If you try to import a Genesis 9 character straight from a DAZ FBX export in Unreal, will will get the following bone local axis:
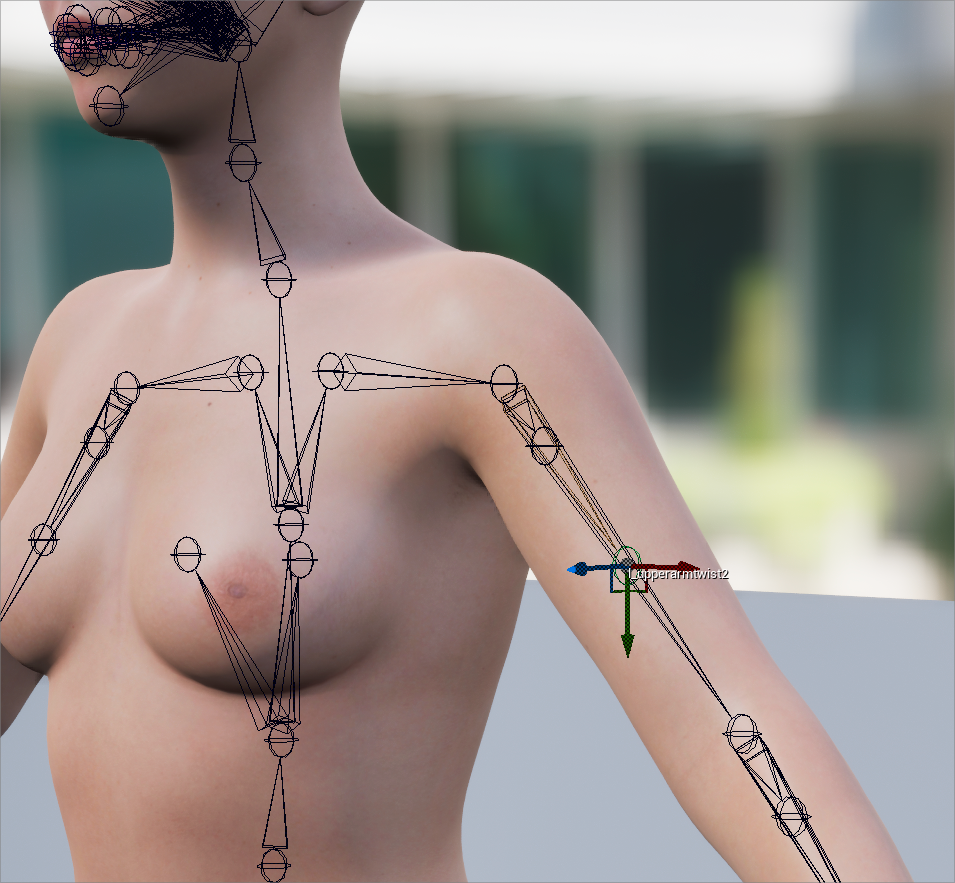
Notice how they somehow remained parallel to the world coordinates instead of having the X axis aligned with the bone’s downward direction (from head to fingers, and from head to toes)?
This will cause issues with IK control rigs and it’s not easy to fix directly in Unreal.
So, we will use Blender as a middle man since blender’s FBX export parameters are quite powerful.
In DAZ, choose your character
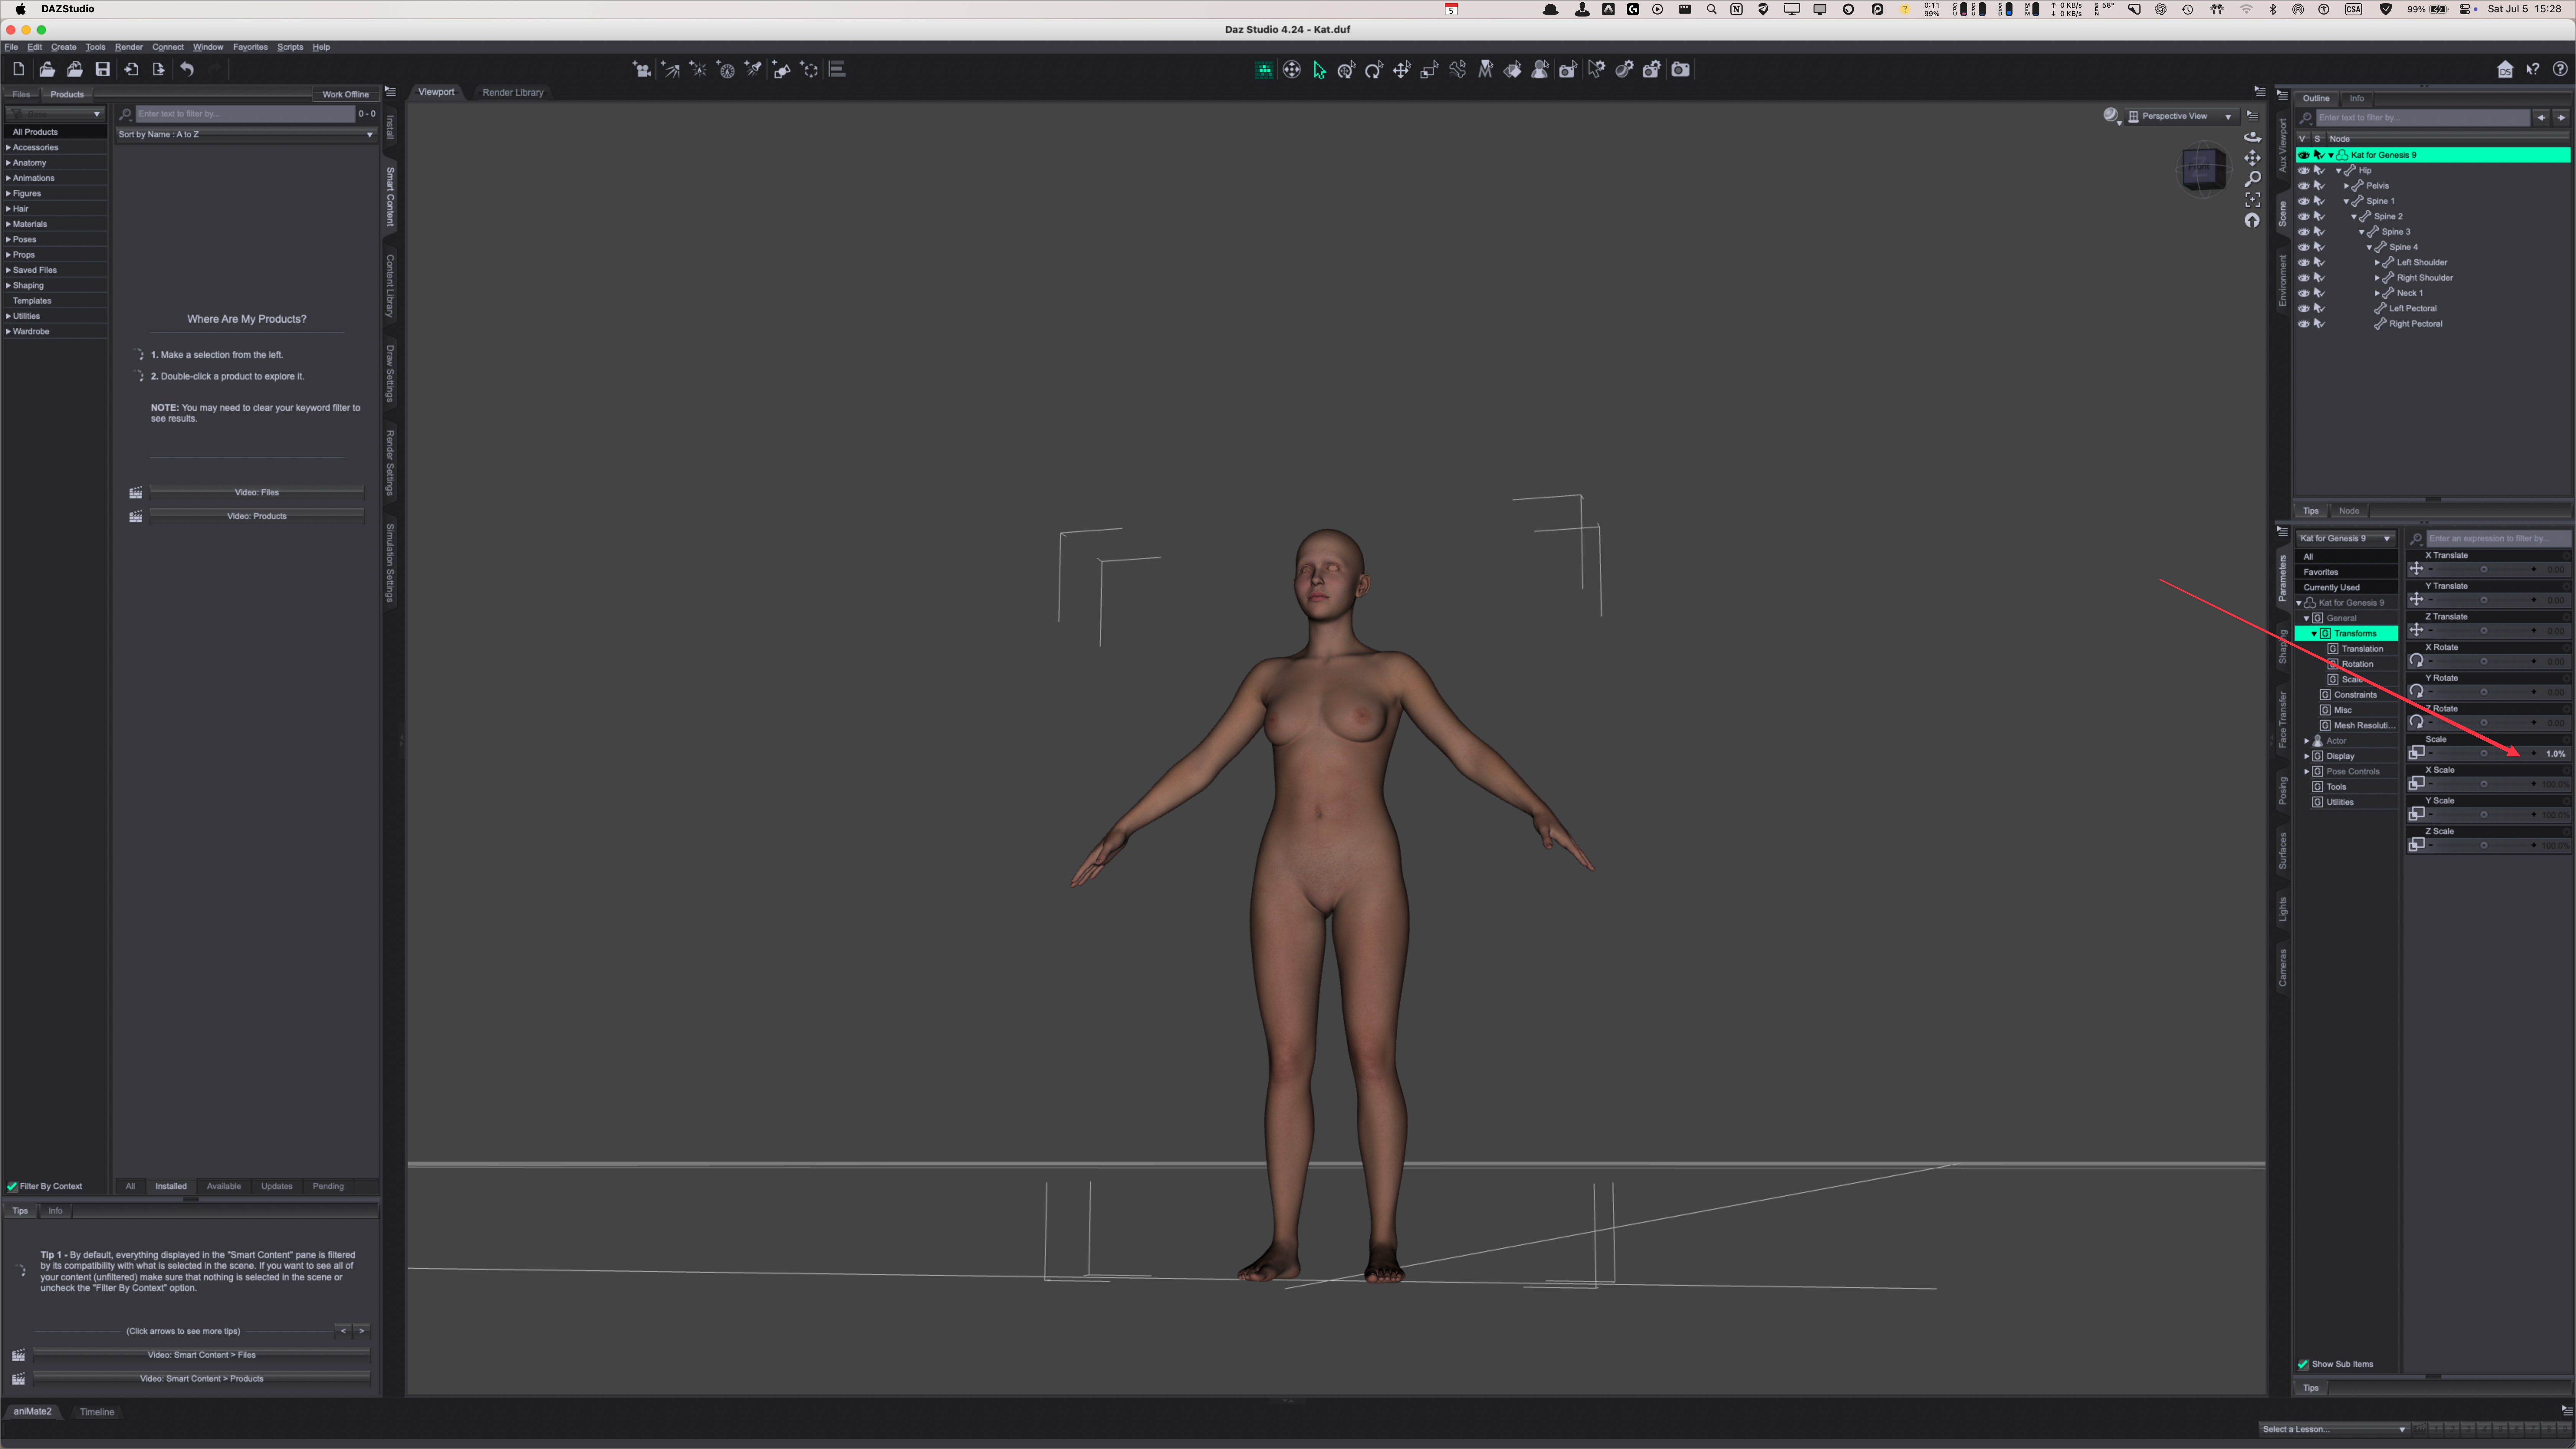
Make sure the scale is 1%, it’s very important, otherwise the scaling won’t match.
- and use File → Send to → Blender using the DAZ to Blender Plugin.
- In Blender, via the DAZ to Blender plugin, click on the “Import New Genesis Figure” button. It should know where the DAZ Studio exported it.
- Apply transforms:
- Select your character mesh and Armature, then Ctrl+A → “Loc/Rot/Scale”.
- Scene units must be set to “Metric”, Unit Scale = 1.0.
- Pose mode:
- Armature should be in its rest (A-Pose or T-pose) position.
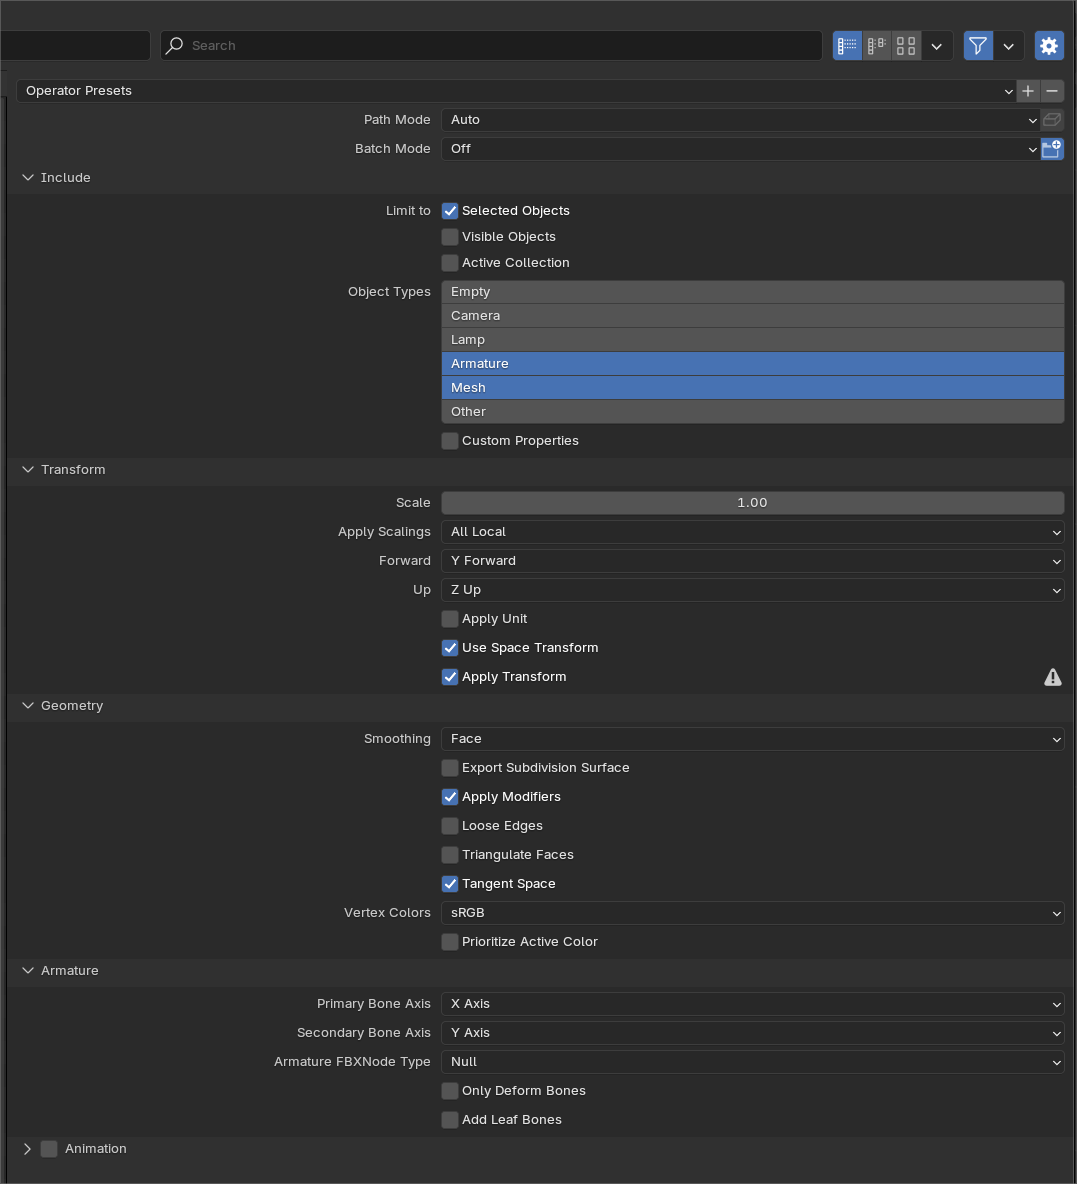
- Now Export to FBX using the following parameters:
FBX Export Panel Settings
Section Parameter Value Include Limit to Selected Objects ON Object Types Mesh, Armature Path Mode Copy (☑ little icon for embedding textures) Transform Scale 1.0 Forward Y Forward Up Z Up Apply Scalings All Local Apply Unit ON Apply Transform ON (checked) Geometry Smoothing Face OR Edge (either works for UE) Apply Modifiers ON Tangent Space ON Armature Primary Bone Axis X Axis Secondary Bone Axis Y Axis Armature FBXNode Type Null Only Deform Bones OFF (unless you want ONLY the skeleton for mesh skinning; leave OFF for control bones) Add Leaf Bones OFF In other words:
Import the FBX into Unreal. Make sure the Skeleton is set to None, should be the default.
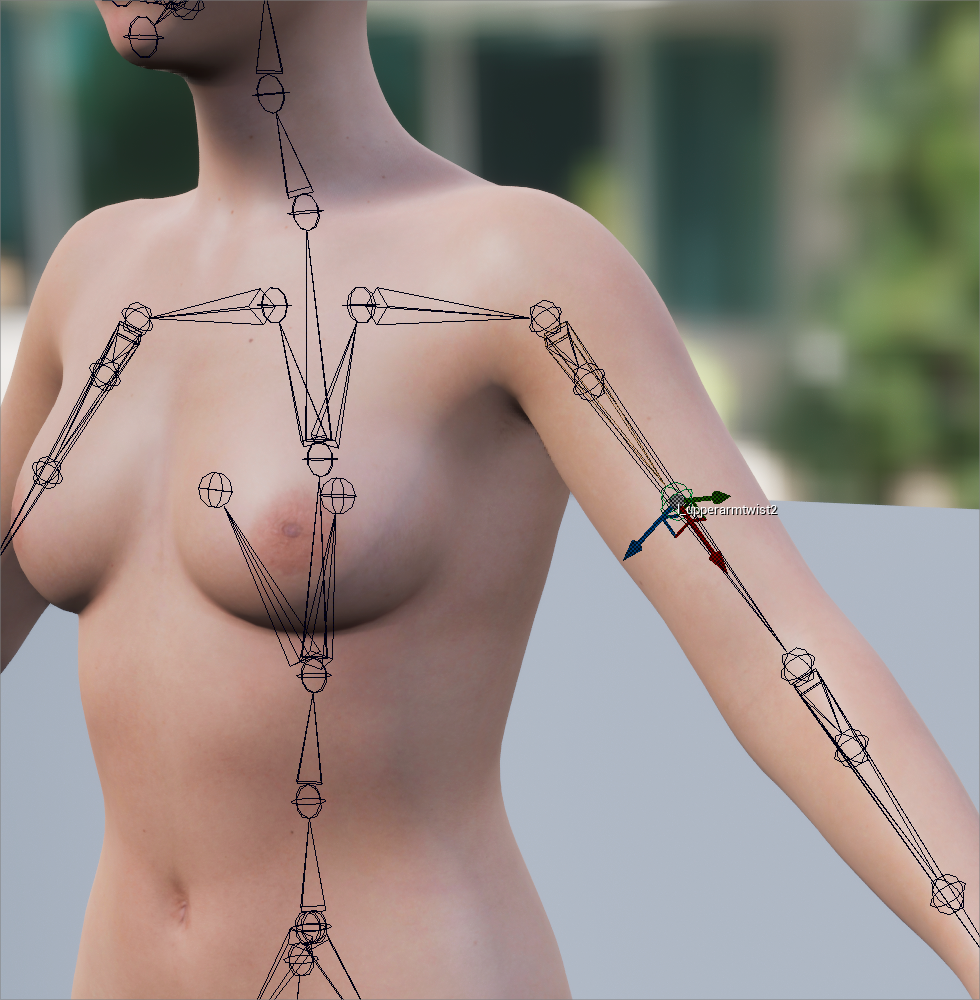
Notice now that the bone’s local axis are correctly orientated:
You will notice that the textures are not imported. For that, you can save your DAZ character in FBX from DAZ Studio. Unreal will create the materials which you can then apply to your Blender imported character
Follow this amazing tutorial to create the control rigs:f
⚠️
The scale of your control rig shapes will be off by a scale of 100%. So instead of going with, say, a scale of 5 as instructed in the following video, go with 0.05 instead.
# Motion Builder 2026
# Essential Keyboard shortcuts
Section Shortcut Action 3D Viewport ^W Node Editor View toggle ^1, ^2, ^3, ^4 Number of 3D viewports ^R Right and Left View ^F Front and Back view ^T Top and Bottom view ^E Perspective View ^A Show layers F Zoom to Selection ^Space Play/Stop Animation T Translate Selection R Rotate Selection S Scale Selection U Undo Timeline K Insert keyframe ^Space Play/Stop ^← Move one frame to the left ^→ Move one frame to the right ^ Up Arrow Play Forward ^ Down Arrow Play backward ^ Home Go to first Frame ^ End Go to last Frame J-LMB drag Proportional play forward or backward depending on left/1right mouse drag direction and speed HIK Q (hold) Ignore Rotation/translation pinning E Pin/Unpin Rotation W Pin/Unpin Position Alt-Up/Alt-Down Select the parent/child bone/control rig in the hierarchy Shortcuts from the official doc https://help.autodesk.com/view/MOBPRO/2024/ENU/?guid=GUID-A968732C-4AF7-4679-B176-E4ED3A1470CB
# Overall workflow (from MoCap to Export ready)
- Take a raw mocap FBX and:
- Apply it to a custom character rig
- Clean up and tweak the motion using Control Rig (IK/FK)
- Use animation layers to make non-destructive edits
- Plot everything to the skeleton for export
OVERVIEW OF THE WORKFLOW
- Import mocap data
- Characterize the mocap skeleton
- Import and characterize your custom character
- Retarget mocap to your character
- Create and animate with Control Rig
- Use animation layers for cleanup/tweaks
- Use IK/FK blending as needed
- Plot animation to Control Rig
- Plot animation to Skeleton
- Export final FBX
STEP-BY-STEP WORKFLOW
1. Import Mocap FBX
- Go to File > Import and bring in your mocap file (often a raw skeleton with baked animation)
- Don’t worry if the character looks robotic at this point
2. Characterize the Mocap Skeleton
- Create a new Character asset (right-click in the Navigator)
- In the Character Definition tab, drag bones into the corresponding slots (Hips, Spine, Legs, etc.)
- Once all required bones are mapped, click Characterize > Biped
- Verify that the mocap skeleton is now a MotionBuilder “character”
3. Import and Characterize Your Custom Character
- Import your rigged character FBX.
- Repeat the characterization process for this skeleton as well.
- You now have two Characters in the scene.
4. Retarget Mocap to Custom Character
In Character Controls, select your custom character
Set the Input Source to the mocap character
Enable Character Input (checkbox)
⚠️
The mocap motion should now drive your custom character in real time.
5. Create a Control Rig for Editing
- With the custom character selected:
- Click Create Control Rig
- Choose IK/FK Full Body
- This gives you editable effectors and FK/IK blending sliders.
- Now:
- Your Control Rig is driven by the mocap (indirectly).
- You can still keyframe on top of it for corrections.
6. Add Animation Layers for Non-Destructive Edits
- In the Key Controls window (or Character Controls), click + to add a new Animation Layer (e.g., “Cleanup”)
- Keep Layer 0 as the mocap base
- Use new layers to:
Fix sliding feet
Add hand offsets
Polish head turns
Adjust hips or shoulders
⚠️
You can toggle layer visibility and key only the parts you need.
7. Use IK/FK Blending per Limb
- In the Character Controls, for each limb:
- Use IK Blend T and IK Blend R sliders (0–100) to:
- Fix contact (e.g., pin foot to floor = IK)
- Animate arcs (e.g., swinging arm = FK)
- You can keyframe these values for smooth transitions between IK and FK.
8. Use Effector Pinning (Optional but Powerful)
- For moments where hands or feet must stay fixed in world space (e.g., grabbing a table, stepping), do this:
- Select the hand or foot effector
- In the Properties pane, enable:
- Pin Translation = True
- Pin Rotation = (optional, if hand should not twist)
- Animate other body parts, and the pinned effector will stay in place.
9. Plot to Control Rig (if needed)
- If you’ve been working with retargeting from mocap to Control Rig but haven’t baked it yet:
- Select your character
- Go to Character Controls > Character menu
- Choose Plot > Control Rig
- This bakes the motion from the source to keyframes on the Control Rig.
- You can now turn off Character Input and continue animating freely.
10. Plot to Skeleton
- Once your animation is polished:
- Select your character
- Go to Character Controls > Character menu
- Choose Plot > Skeleton
- This bakes all keyframe data onto the actual skeleton joints — removing dependencies on Control Rig, retargeting, or mocap rigs.
11. Export Final FBX
- Select your character
- File > Export Selection > FBX
- Choose Animation Only or full rig depending on your needs
- In Export Settings:
- Uncheck Include Control Rig
- Bake animation on Skeleton
You now have a clean FBX with baked keyframe animation on the skeleton — ready for use in Blender, Unreal, Unity, etc.
12. Using Story Mode (for Multiple Takes)
If you need to combine, blend, or edit multiple animation clips:
- Switch to Story Mode
- Add your character to a Character Track
- Drag in clips or actions (like walk > turn > sit)
- Blend and trim clips visually
- Then plot the final result to the Control Rig or Skeleton
# Plotting in MotionBuilder
Plotting in MotionBuilder means baking the animation — converting procedural or constraint-based animation (like IK, control rig, mocap data, etc.) into raw keyframes on a specific part of the character: either the Control Rig or the Skeleton.
Plot to Skeleton
What it does:
Bakes animation onto the skeleton joints (i.e., the actual FBX skeleton hierarchy).
Strips away Control Rig, IK constraints, and effectors.
After this, only FK rotation keys remain on joints.
⚠️
It’s typically used for exporting to other software or game engines like Unreal, Unity, or Blender.
Use cases:
When ready to export the character to another software or pipeline.
When ready to to strip out MotionBuilder dependencies (no rig, constraints, etc.).
When done with animation cleanup and just need clean baked keyframes.
⚠️
You lose Control Rig and IK/FK blending unless you re-create them; so use it at the final stage, once you’re sure you’re done editing and save as a new file!
Plot to Control Rig
What it does:
- Bakes the animation onto the Control Rig, i.e., the effectors and FK/IK controls.
- Useful when animation was done via mocap, constraints, or skeleton-level manipulation, and you now want to edit it using the rig.
Use cases:
- When you imported mocap or retargeted animation to the skeleton and want to edit it comfortably using FK/IK.
- When you want to use the Control Rig tools for cleanup, offsetting limbs, tweaking poses.
- When you’re preparing for animation polishing inside MotionBuilder.
Use Case Plot to Control Rig Plot to Skeleton Target of baked keyframes Control Rig (effectors, FK/IK controls) Skeleton joints Allows FK/IK blending/editing Yes No Use for final export No (Control Rig is MotionBuilder-only) Yes Use after retargeting Yes Yes (if you’re exporting directly) Clean up mocap in MotionBuilder Yes No Editing-friendly after plotting Yes No (rotation keys only) Typical Workflow Example
- Import mocap FBX (skeleton + animation)
- Characterize the skeleton and retarget to your custom character rig
- Plot to Control Rig → to bake the animation onto the rig and allow FK/IK editing
- Do your animation cleanup and fine-tuning using the rig
- Plot to Skeleton → bake the cleaned animation back to the joints for export
- Export FBX to your target DCC or engine (Blender, Unity, etc.)
# FK and IK animation
FK (Forward Kinematics)
- In FK, you animate a chain of joints from the top down, like rotating the upper arm, then the forearm, then the hand.
- Say you want to animate an arm waving. With FK, you rotate:
- The shoulder
- Then the elbow
- Then the wrist
- Key Traits:
- Natural for arcs and fluid motions (like swinging arms or a spine)
- Great for detailed keyframe animation
- Easier to create smooth overlapping motion
- In MotionBuilder:
- You’ll see and animate using rotation curves for each joint
- It’s often used for areas that don’t interact directly with the environment
IK (Inverse Kinematics)
- In IK, you animate the end effector (e.g. the hand or foot), and the software calculates how to rotate the rest of the chain to reach that position.
- Say you want a character’s hand to stay fixed on a table as they lean forward. With IK:
- You position the hand where you want it
- And the shoulder/elbow rotate automatically to accommodate
- Key Traits:
- Ideal for grounded contacts: hands on walls, feet on floor, grabbing objects
- Often combined with constraints in MotionBuilder
- Can result in less natural arcs unless carefully blended
- In MotionBuilder:
- You manipulate IK effectors, usually represented as boxes at the hands or feet
- The effectors control the chain up to the root of the limb
FK/IK Blending in MotionBuilder
- Use IK to position the hand on a table
- Then blend to FK to lift the hand in a natural arc
- The “IK Blend T” (translation) and “IK Blend R” (rotation) parameters control how much influence IK has over the joint
Use Cases in MotionBuilder
Scenario Best Method Arm swinging freely FK Hand pressing a button or holding a gun IK Character walking/running IK for legs, FK or IK/FK blend for arms Carrying a heavy object IK Use Case
Feature FK IK Control Rotate joints manually Move end effector (e.g., hand) Natural arcs Yes Not automatically Fixed contact No Yes (e.g., foot on ground) Ease of posing Slower Faster Precision High Can overshoot or twist unexpectedly # Switching and Blending between IK and FK in MotionBuilder
A. Switching Between FK and IK in MotionBuilder
1. Open the Character Controls Panel
- Go to Character Controls (Window > Character Controls or shortcut Ctrl + 1)
- Make sure your character is selected and has a Control Rig
2. Switch to IK or FK for Arms/Legs
- In Character Controls, select the Body Part Selector (click the arm, leg, etc.)
- In the Properties pane, you’ll see options for:
IK Blend T → for position
IK Blend R → for rotation
⚠️
Values range from 0 (full FK) to 100 (full IK). (or is it 0 to 1 again? TBV)
3. Set IK or FK Per Body Part
For the right arm, set:
- RightArm.IK Blend T = 100 (full IK position)
- RightArm.IK Blend R = 100 (full IK rotation)
Set to 0 for FK, or blend between for hybrid control.
⚠️
Blends between IK and FK can be keyframed!
B. Pinning Effectors (to keep hands/feet in place)
⚠️
Helps keeping a hand on a surface or foot on the ground during movement.
1. Select an Effector
- Select the hand or foot IK effector in the viewport or Character Controls
- Example: Right Wrist Effector
2. Pin Translation / Rotation
- In the Properties pane, look for:
- Pin Translation
- Pin Rotation
- Set them to True (or 1) to lock the effector’s position or rotation in world space.
3. Animate with Pins
- Once pinned, the limb will try to keep that effector in place while you animate the body.
- Keyframe your character’s hips, spine, or torso while the hand remains pinned.
C. Using Constraints for IK
1. Constrain a Hand to a Prop
- Select the effector (e.g., Right Wrist Effector)
- Then Ctrl+select the prop (e.g., a cup)
- Go to Asset Browser > Constraints and drag out a Parent / Position / Orientation Constraint.
2. Set Constraint Active Time
- In the Navigator, go to Constraints > [your constraint]
- Keyframe Active on/off at frames where you want the constraint to engage or disengage
D. For a Smooth IK/FK Workflow:
Task Tip Hand on wall or object Use IK + Pin Translation Transition from contact to arc Animate IK Blend values Keep foot planted Use Foot Effector + Pin Translation Pick up a cup Use Parent Constraint on hand to cup # Some useful tips and tricks
- It is a good habit to “Reset All Properties” in the Character Settings window in the Navigator when importing a new FBX
- Create a new layer
- Keyframe the beginning and end of the original movement you want to refine or fine-tune
- Now work within those two keyframes (they are like In and Out of a clip)
- Drag and drop your Mocap or Mixamo FBX Animation and choose Merge and select the proper take
- Go to the FCurve
- Go to keyframe -1
- In the Navigator, select the hips of the animation you imported under the Scene root
- Right click on that Hips selection, and choose “Select Branches”
- Verify with ^W then F that all branches are selected
- ^W again to go back into Perspective View
- Now right-mouse click againt on the Hips selection, and choose “Zero rotation”.
- You should have a solid T-Pose now.
- Now in the asset browser, select your character definition, drag and drop it on the root skeleton.
- Release and select “Characterize” and choose “Bipedal”.
- Rename the Motion Capture:
- HIK big blue Icon → Edit → Definition → Rename (say MCap)
- Now you need to do the same for the original character:
- In the HIK section, make sure Character and Source are set to “None”
- Select the hips of the skeleton of the original character
- Drag and drop the character definition on the hips, release, and choose bipedal again.
- Choose Character to be your Character and the Source the Motion Capture one (Mcap)
- Now if you go to Frame one, your character should be animated according to your Mcap.
- Hit ^Space to view the animation
- Bake the animation:
- HIK Blue button
- Bake (Plot) → Bake to Skeleton
- Now we can delete the MoCap Animation
- In the Navigator
- Select the Hips of the Mocap Animation
- Select all related stuff (Mesh, etc.)
- Right Click → Select Brahcnes
- Right Click → Delete → Confirm → Yes to All
- File→Save!
- Go to keyframe one
- Set source the HIK source to the basic one (should be stance or something similar)
- Place the Prop’s position and zero the X, Y and Z values (use Front, Top and Side views).
- Add a constraint
- In the asset Browser, look for elements under Templates.
- Choose Skeleton Root and drag and drop it on the scene
- Move it to where the root of the prop should be (typically the prop’s geometric origin).
- Parent the root skeleton to the prop:
- In the Navigator, select the skeleton root
- Drag and drop it to the prop’s name in the navigator
⚠️
To know which is which, select anything in the Navigator, and you should see it highlighted in the viewport
    - [ ] Now the skeleton root, if you move it, will move the prop as well.
- [ ] Now parent the prop to the character
    - [ ] In the Asset Browser, go to Constraints
    - [ ] Drag and drop ParentChild to the Prop and, upon Release, choose “Constraint”
    - [ ] A Constraint Settings window will appear to the right of the Navigator
    - [ ] Select the bone/IK on your character that should control the prop (say the wrist that controls a Prop that is a gun)
    - [ ] Go to Hips (the root skeleton) that is selected in the Navigator and Expand so we can see the wrist that we have selected (or hit ^W then F and find the wrist in the hierarchy, say “Right Hand”)
    - [ ] Drag and drop the Right Hand in the Navigator to the Source (Parent) 1 in the Constraint Settings panel that appeared.
    - [ ] So you should have RightHand, that is the Source (Parent) in the ParentChild constraint that is a property of the Gun.
    - [ ] Hit the Snap Button
- [ ] Now if you go to the HIK panel, and choose None as the source for your character, the gun should be snapped correctly.
- [ ] Bake the Plot to the Control Rig and choose FK/IK.
- [ ] Hit ^A and select the IK controller you want to adjust and you can add to it a ParentChild constraint so that it follows the root skeleton of the prop (don’t forget to hit “Snap”).
- [ ] When your are happy, Bake to Skeleton!
- Drag and drop a null from the asset browser and set it to [0, 0, 0]
- Go to node hierarchy view
- Select the root bone
- Alt-left-click and drag onto the origin bone node null object
- Release and choose « Parent »
- Go back to 3D view in the viewport
- With the null bone selected, goto the HIK section, unlock and select the origin bone (between the legs)
- Right-click and choose assign
- Lock the HIK again
- keyframe MPX by https://zurbrigg.com
- There’s also a Pro version
A. In Mixamo
- choose your Character
- Hit Download, use FBX (the regular one, not the one for Unity) and Choose T-Pose
- Now find the animations you want in Mixamo and click on them
- They will play on your character
- Adjust and tweak the animation sliders as needed
- Hit download.
- Under Skin, choose “Without Skin”.
- Choose your FPS
- Download
- Repeat for other animations
B. In Motion Builder:
Drag and drop your character without animation
In the Character controls:
- Define a Skeleton under Define, hit the “Skeleton” button
- Click on the Hip in the new chbaracter definition
Click on the Hip on the actual rig that you downloaded from Mixamo to also select it
Click on the Load Skeleton Definition button on the Character Controls section
- CHoose HIK (Human IK) and click OK
Some bones will look yellow and you should see an exclamation point on the HIK bones as things are usually a little off. We need to fix it.
On the 3D viewport, select, say, the upper arm bone (Humerus) if it shows as yellow on the HIK window.
In global rotate mode, bring it to a T-pose, i.e. more horizontal, until the bones become green on the skeleton window.
⚠️
- It kind of zeroes out the stuff.
- Do the same for the other upper arm skeleton bone as the Humerus is typically a culprit
- Now lock that definition (the lock icon) and choose biped
- Rename (Big HIK blue button → Edit → Definition → Rename)
- Now in the Source, choose Control Rig and choose FK/IK.
- There it is, the character is defined, characterized and rigged.
- File → Save as blahblah-rigged.fbx
C. Loading one of the animations and making it ready to be used later
- File → New Scene
- Drag one of your animation and choose All Takes
- Now you need to define it.
- First we need to zero out all the animations to go back to T-Pose.
- Select all the joints
- Go to Frame 0.
- Under Ressources, Properties: Set Rotation to 0 for all 3 axis.
- If there are funkiness, select the funky joints and rotate them by hand until they feel straight.
- Select all the joints
- Go to Frame 1
- Key all of them on the very first frame (S)
- Define the Skeleton by clicking on the Define button on the HIK area
- Do the same process as before:
- Select the hip in the skeleton definition
- Same thing with the hip joint on the 3D viewport
- In the Template mode, choose HIK
- You may want to fix the arms again or other join parts that are not in a good T-Pose if you see yellow bones on the HIK area.
- Lock the character down (the lock icon), it is very important and choose Biped
- Edit → Definition → Rename and rename your HIK
- Now if you hit Play, you got your animation!
- Select all the joints, go to frame 0, click on the keyframe at frame 0 and hit the delete key.
- The T-pose is gone.
D. Making it work in story mode:
To make things work in story mode with several control rigs, well, we need to establish a control rig.
⚠️
Story mode needs a control rig that we can save in the file
In source, choose “Control Rig” and chose FK/IK.
⚠️
You’ll see that the animation does not play anymore and the T-Pose is back. It’s normal.
- If you want to see the animation, you need to choose “None” as the source.
- In the Scene Navigator, you should see our joints and the control rig reference.
- So now it’s all calibrated, rigged an characterized.
Story mode:
New Scene
Drag your character rigged that you defined from the asset browser.
⚠️
It’s the one we have created in step B. You may want to refresh the folder.
- Drag it and choose “No animation”.
- Go in story mode in the timeline.
- Drag the animation that you have created in step C from the asset browser somewhere onto the bottom (second from the top) part of the Story track.
⚠️
Not sure why it has to be the second timeline track yet…
- Badabeen badaboon! It should pick up the rig and assign the animation to it.
- You may want to right click on the story mode’s timeline and select “Frame start/end” to get the whole clip.
- Now you can add a new animation (same process as in section C: Define, characterize and put a control rig on).
- Drag the new animation clip and make it overlap with the first animation clip.
- The animation should blend!
Matching stuff perfectly:
- In the track animation, turn on the Eye dropper tool (it’s an eye in the series of icons on the left of the track).
- Try to match the position of the origins of the two animation clips:
- Select one of the origins, and move it with the move tool.
- Another way, is to use the match tool:
- In the story mode, move the playhead smack in the middle of the two clip transitions
- Select the second clip.
- Now right of the Match label on the top of the first timeline, you should see a two clips icon that look a puzzle piece that wants to match 🙂
- Match Clip → To previous clip.
- Math time → At current time ( you may want to try other options)
- Match Position : Normally you should enable Translation and Rotation. Use Gravity.
- Hit ok.
- HIK big blue button → Bake (Plot) → To Skeleton
- Now the animation has been transferred over onto the skeleton
- To verify, go into the story timeline track and mute it (the interdiction sign).
- hit play to make sure the animation still plays as it is now baked to the skeleton.
- You can now delete the story mode track.
- Bake (Plot) to the control rig if you need to do finer custom or counter animations.
From the Asset browser, add a marker
in the navigator, create a Parent/Child constraint
- The Marker should be the Child (Constrained Object)
- The end of the chain controller of the limb that is rotating should be the Parent (so the wrist controller or the ankle controller)
Click on the Zero Button and Uncheck “Lock” so that the marker follows the parent controller
Select the Marker again
Now, on the Base Animation Layer, click on the Animation button and select “Plot Selected (All properties)”
Now the movements of the marker are keyed onto the base layer
Go back to the Parent/child constraint you have created.
Uncheck the Active checkbox.
Bring to Zero the IK T and IK R on the controller that is the parent of the marker
Right click on the controller on the HIK section and create an AUX Effector
We want to constraint the entire limb hierarchy to the new AUX Effector
So in the Parent/Child constraint, move the Marker as now the Parent
Then Select in HIK window the AUX Effector
Find in the Navigator the AUX Effector and drag it on the constraint’s Parent section
Click on the Snap button
Click on the big HIK button, and plot to Skeleton.
Select all the bones of the limb you want to fix, i.e. the one that has the AUX Effector at the end of the bones hierarchy
Bring up the FCurve Editor, look at the Translation and Translation curves, and delete all except the first frame of the sequence you are correcting.
💡
Why keep the first frame? Well, the first frame is right before the twisting happened, that’s the one we want).
- Now plot it back to Rig
- Wala
- Now you can delete the controller.