Activer Developper Extras et Python Tooltips dans Blender
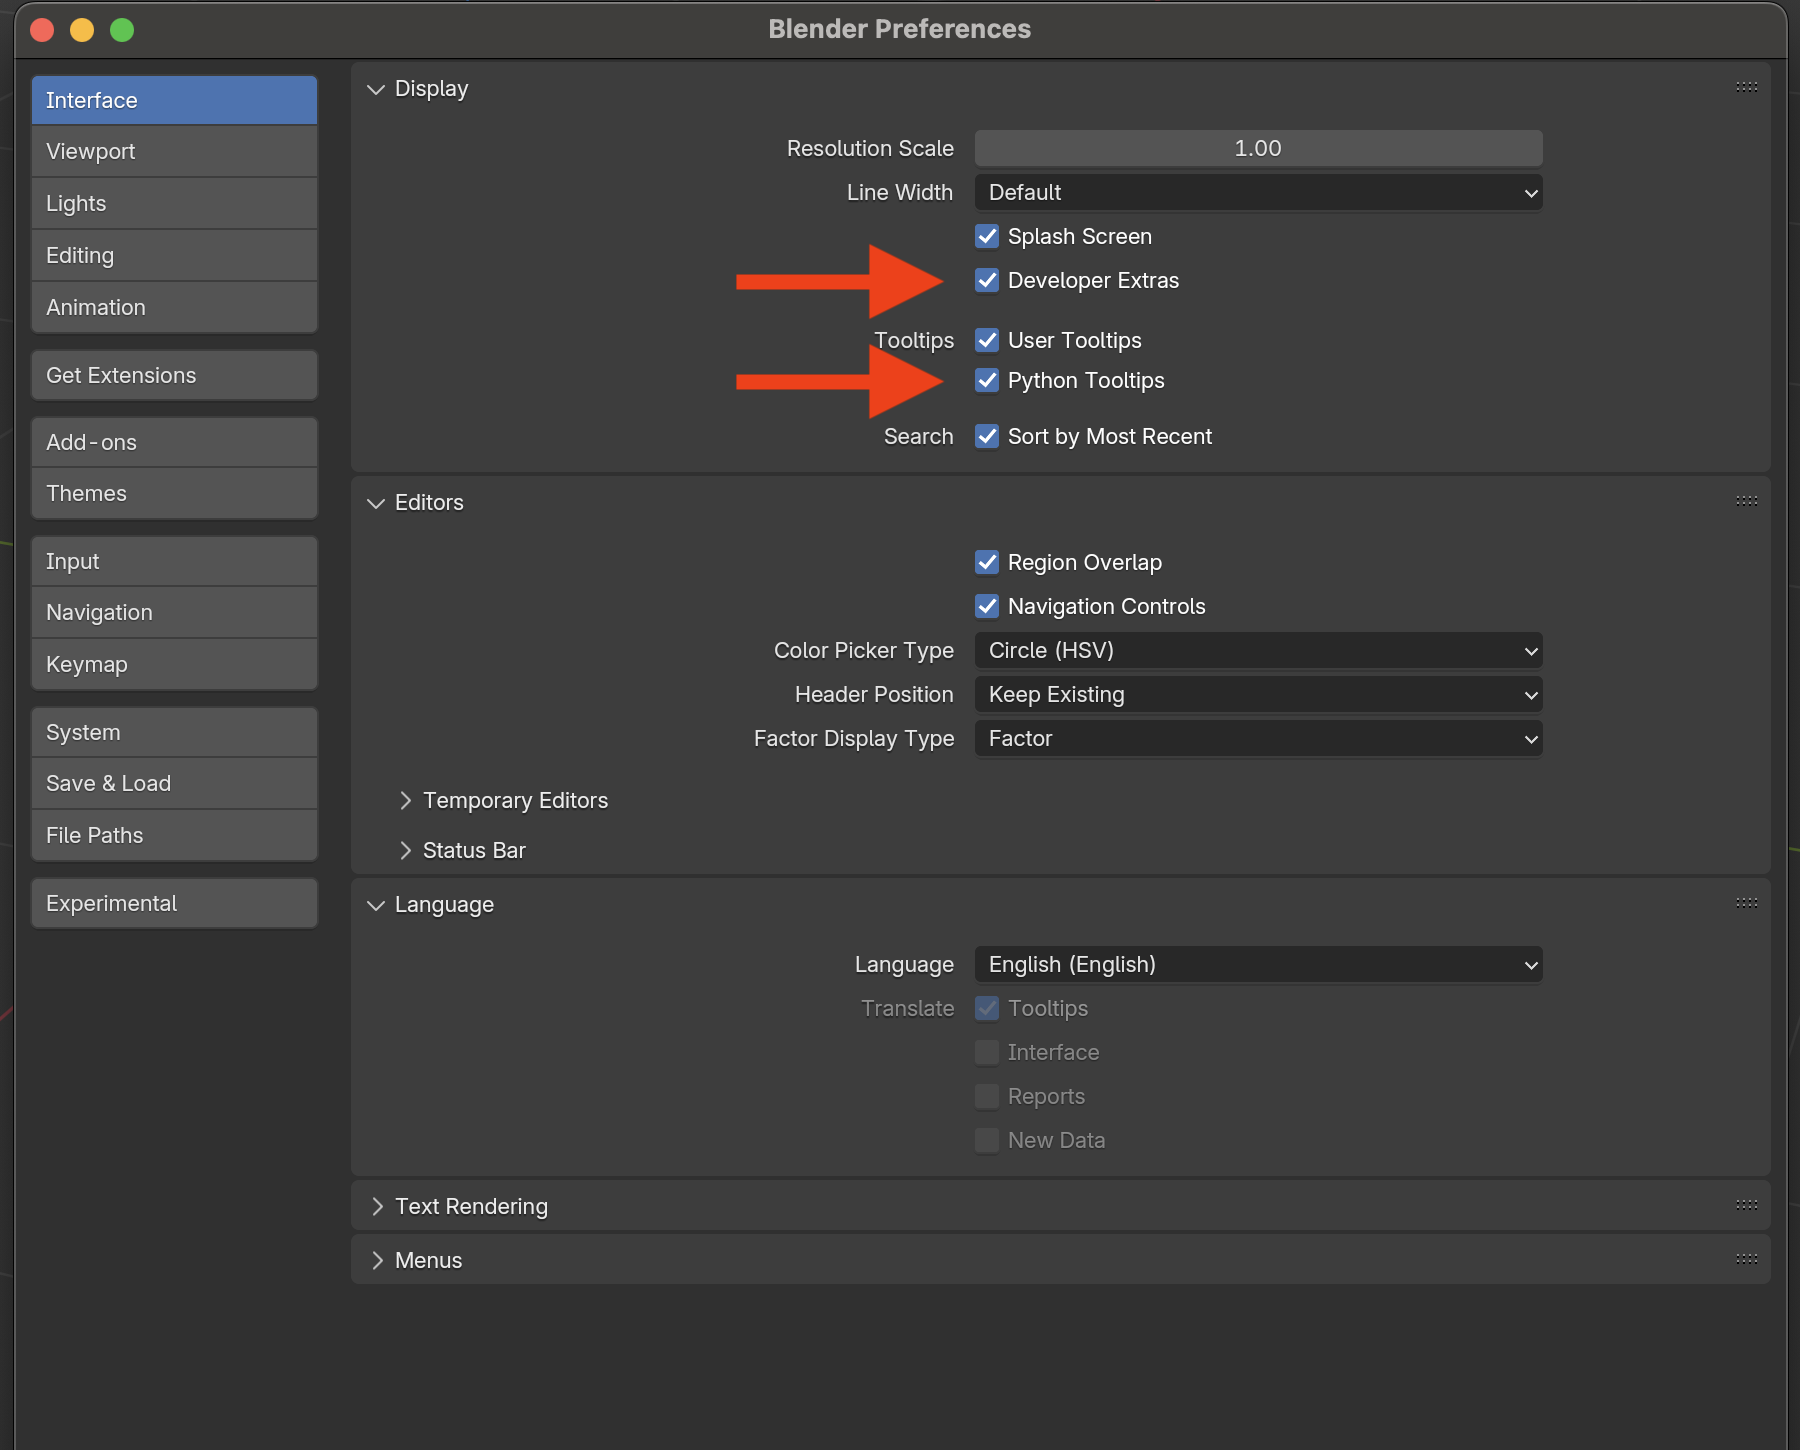
Dans Blender, choisir Edit→Preferences et dans interface, activer “Developper Extras” et “Python Tooltips”
Blender Workspace pour Python
Créer un nouveau fichier .blend
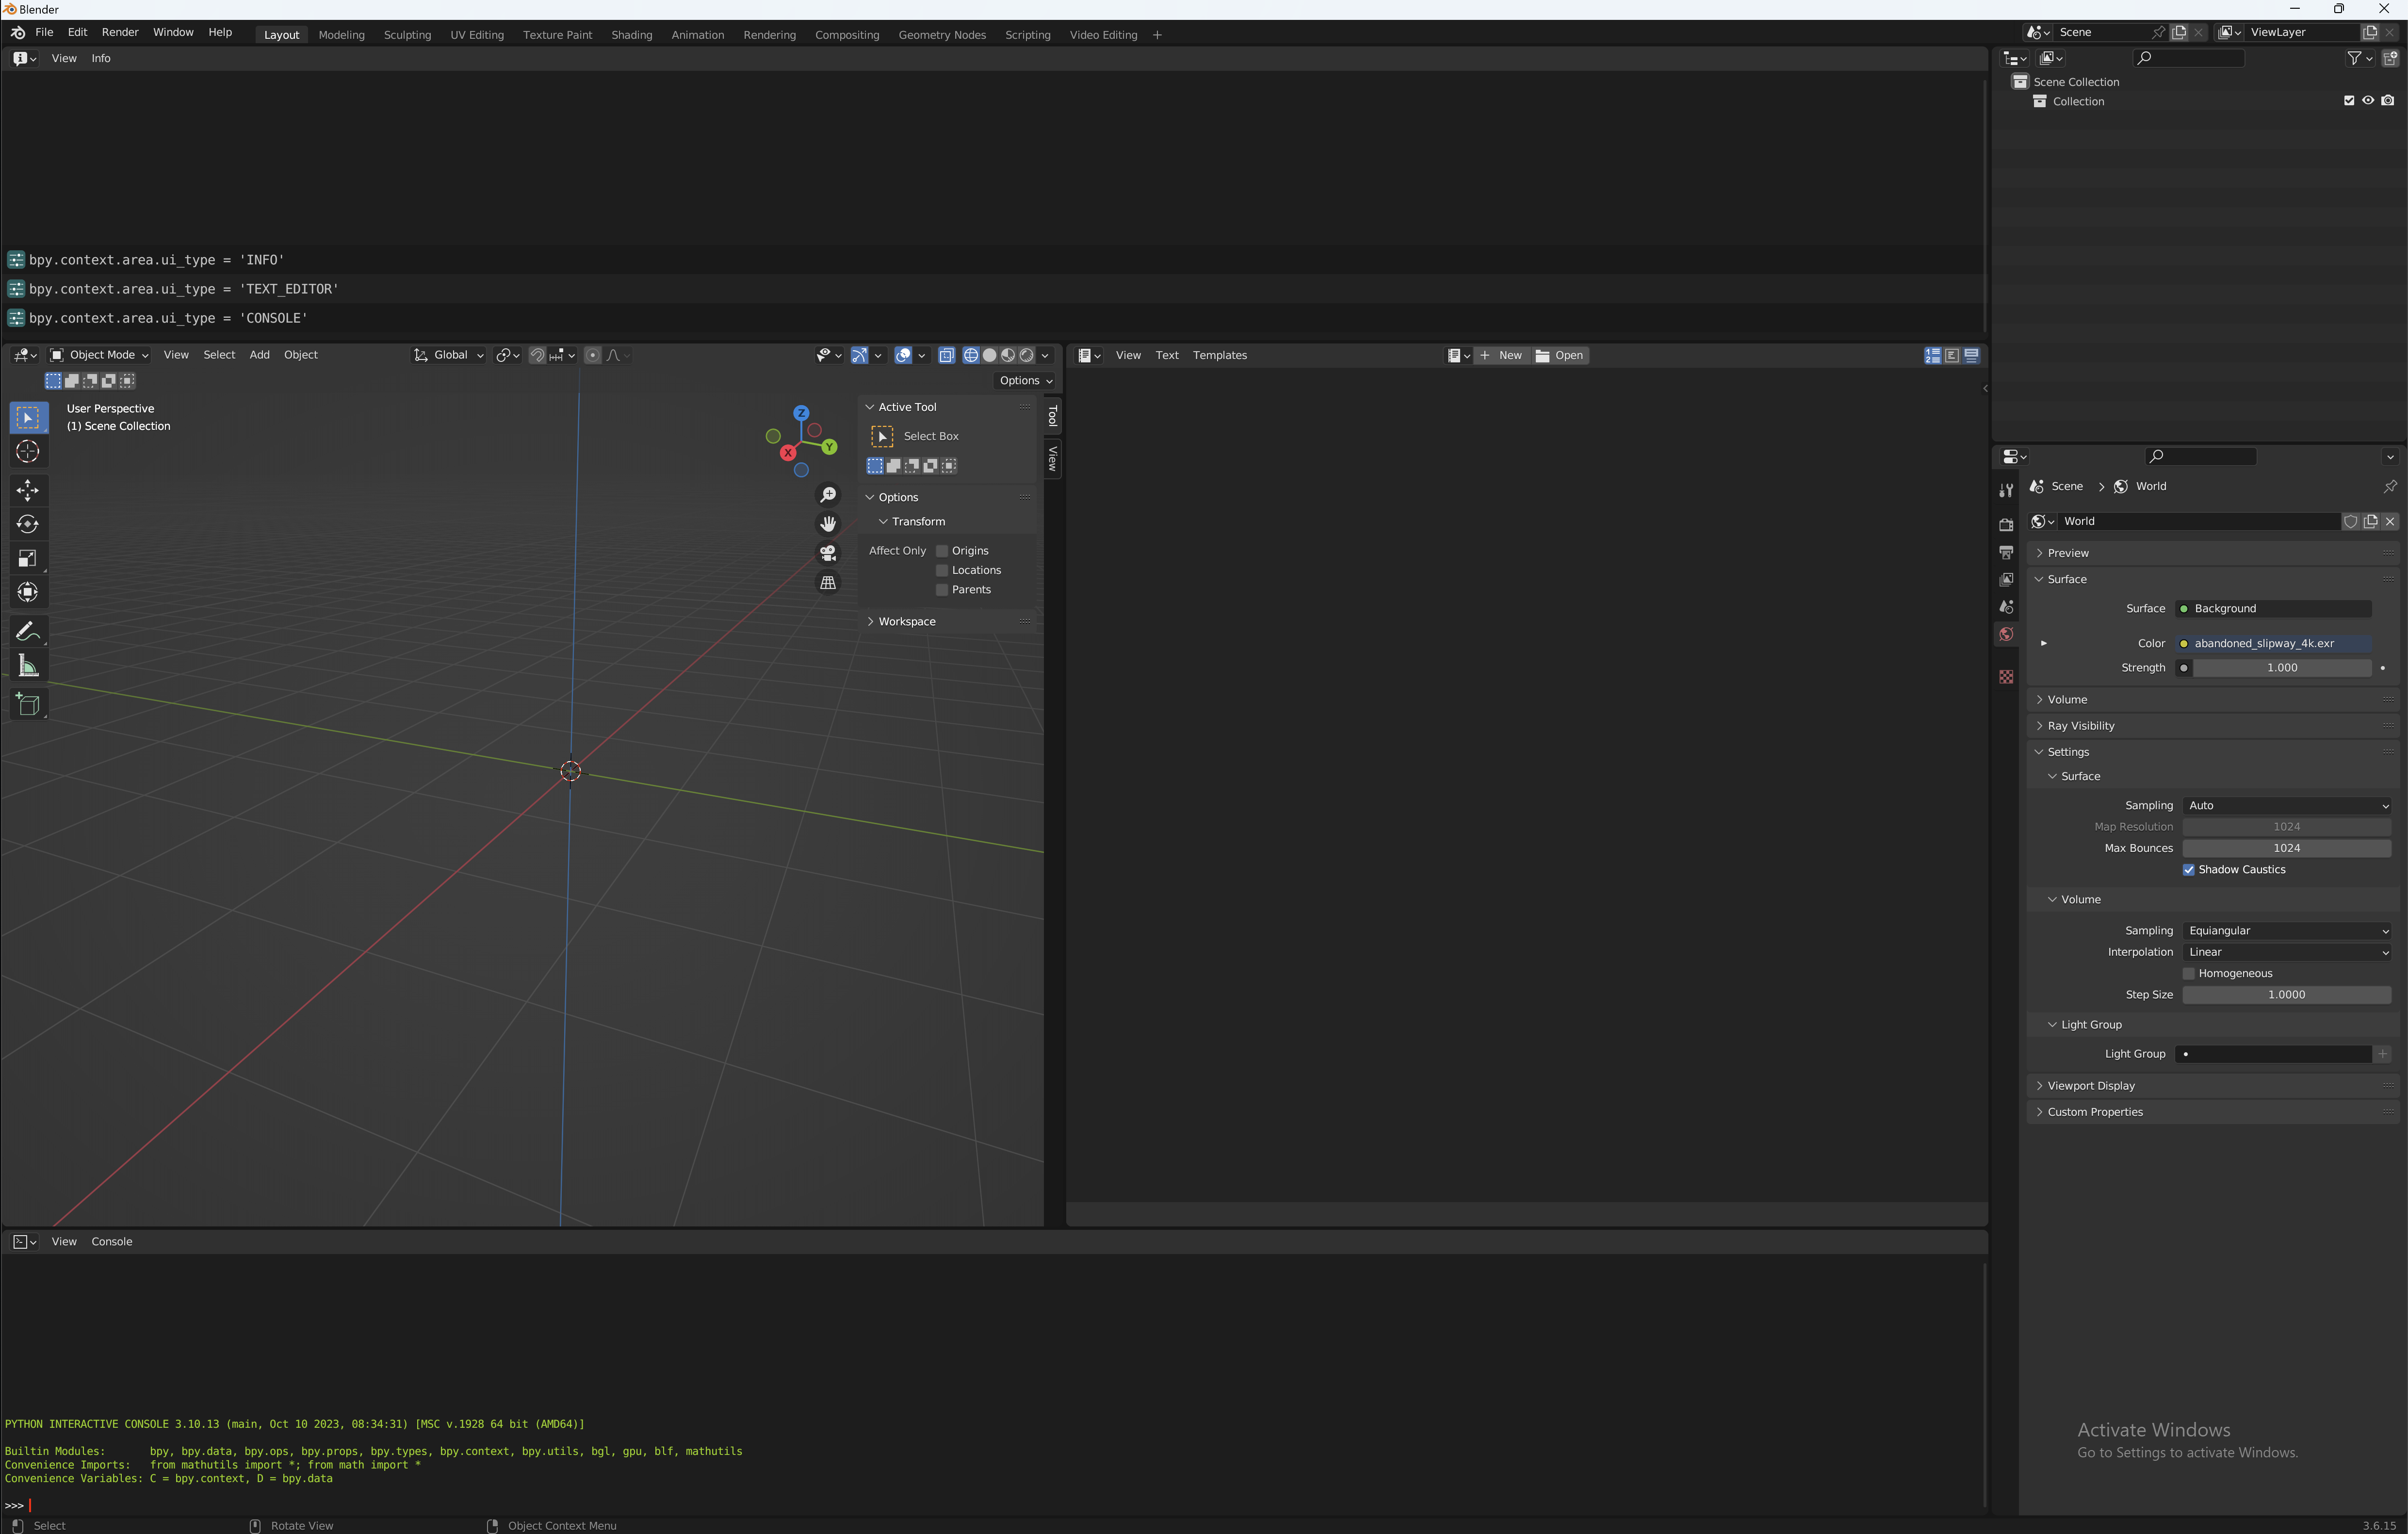
Ajouter un espace de travail horizontal en haut de type “Scripting → Info”
Ajouter un espace de travail vertical à droite de type “Scripting → Text Editor”
Changer le timeline pour l’espace de travail “Scripting → Python Console”
Pour le reste du cours on va jouer à créer des primitives
Dans le viewport, faites ⇧ A et créez par exemple un cube
Qule code Python apparaît dans l’espace “Info”?
Effacer le cube, copiez et coller le code de création dans la console Python, changez un peu les paramètres de Localtion et Scale et faites ↩
Essayez d’autres actions et jouer avec la console
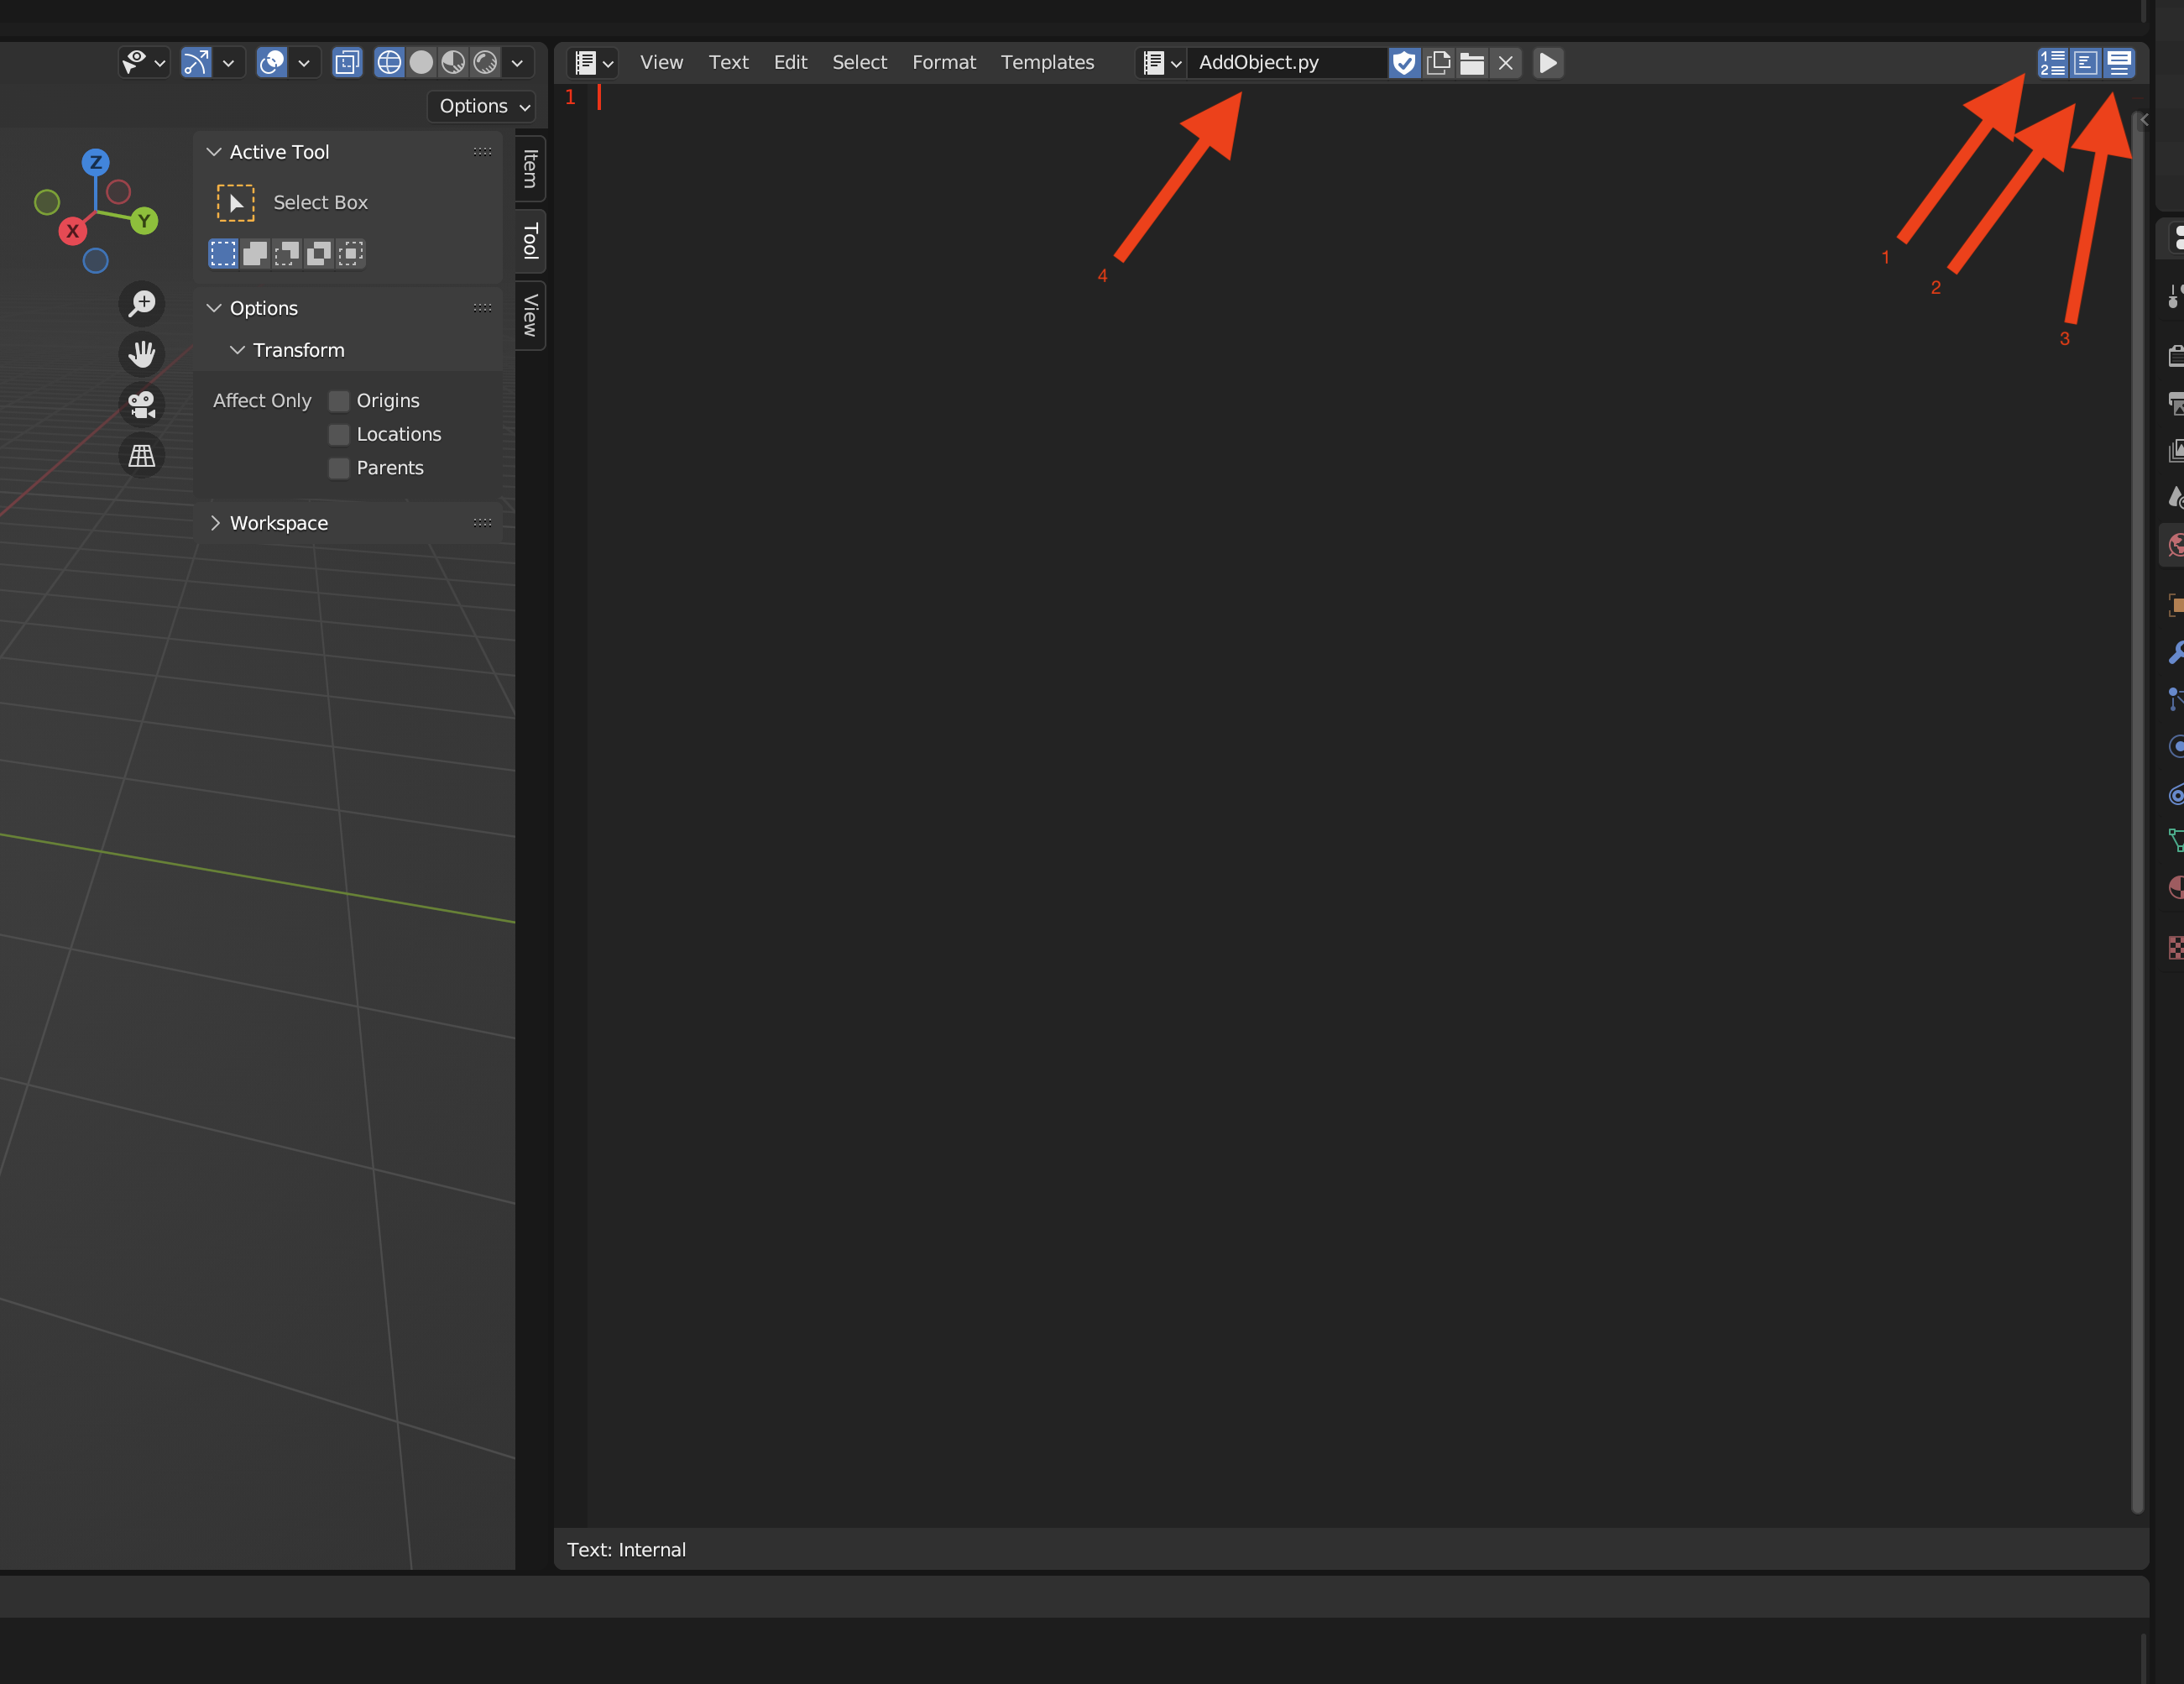
Dans l’espace text Editor, assurez-vous d’activer Line numbers, Word Wrap et Syntax Highlighting. Cliquez également sur New et tapez le nom du fichier python “AddObject.py”
Choisir le menu Text, puis Save-As et sauvegarder le code dans le dossier cours1
Sauvegarder également le fichier Blender sous le nom AddObject.blend dans le même dossier cours1
💡
Note: le code dans le script editor est sauvegardé avec le fichier .blend, mais il est bon d’en avoir une copie externe dans un fichier .py, donc faire régulièrement, dans l’espace de travail Text Editor: Text → Save
Tapez les instructions suivantes dans le text editor:
import bpyfor i in range (1,10): bpy.ops.mesh.primitive_cube_add(size=2, enter_editmode=False, align='WORLD', location=(i, i/2, i), scale=(0.2, i/5, 1))
Amusez-vous à essayer toute sortes de trucs et machins
À la fin du cours, n’oubliez pas de faire Text → Save du fichier .py dans l’espace de travail Text Editor et File → Save du fichier .blend
import bpy# Select all objects in the scenebpy.ops.object.select_all(action='SELECT')# Delete all selected objectsbpy.ops.object.delete()## Create Cubes#for i in range (1,10): bpy.ops.mesh.primitive_cube_add(size=2, enter_editmode=False, align='WORLD', location=(i, i/2, i), scale=(0.2, i/5, 1))
## Random Objects#import bpyimport random# Clear the current scene by selecting and deleting all objectsbpy.ops.object.select_all(action='SELECT')bpy.ops.object.delete()# Define the number of primitives to create along X and Y axesgrid_size_x = 5grid_size_y = 5spacing = 3# Create primitives in a gridfor i in range(grid_size_x): for j in range(grid_size_y): # Randomly select a primitive type to add primitive_type = random.choice(['CUBE', 'SPHERE', 'CONE', 'TORUS']) # Calculate the position for the primitive x = i * spacing y = j * spacing z = random.uniform(0, 5) # Random height # Add the chosen primitive type if primitive_type == 'CUBE': bpy.ops.mesh.primitive_cube_add(size=1, location=(x, y, z)) elif primitive_type == 'SPHERE': bpy.ops.mesh.primitive_uv_sphere_add(radius=1, location=(x, y, z)) elif primitive_type == 'CONE': bpy.ops.mesh.primitive_cone_add(radius1=1, depth=2, location=(x, y, z)) elif primitive_type == 'TORUS': bpy.ops.mesh.primitive_torus_add(location=(x, y, z)) # Randomize the rotation of the object obj = bpy.context.object obj.rotation_euler = (random.uniform(0, 3.14), random.uniform(0, 3.14), random.uniform(0, 3.14)) # Add a random scale factor to make each object unique scale_factor = random.uniform(0.5, 2) obj.scale = (scale_factor, scale_factor, scale_factor)# Adjust camerabpy.ops.object.camera_add(location=(10, -15, 10))camera = bpy.context.objectcamera.rotation_euler = (1.1, 0, 0.8)# Adjust lightingbpy.ops.object.light_add(type='POINT', radius=1, location=(10, 10, 10))light = bpy.context.objectlight.data.energy = 1000
## Sinusoïdale#import bpyimport math# Clear the current scene by selecting and deleting all objectsbpy.ops.object.select_all(action='SELECT')bpy.ops.object.delete()# Animation settingsframe_start = 1frame_end = 250bpy.context.scene.frame_start = frame_startbpy.context.scene.frame_end = frame_end# Define the grid size and spacinggrid_size_x = 10grid_size_y = 10spacing = 2# Create a list to store the spheresspheres = []# Create spheres in a grid patternfor i in range(grid_size_x): for j in range(grid_size_y): # Add a UV sphere bpy.ops.mesh.primitive_uv_sphere_add(radius=0.5, location=(i * spacing, j * spacing, 0)) sphere = bpy.context.object spheres.append(sphere)# Animate the spheres with a wave effectfor frame in range(frame_start, frame_end + 1): bpy.context.scene.frame_set(frame) # Loop through each sphere and set its location based on a sine wave for index, sphere in enumerate(spheres): i = index // grid_size_x j = index % grid_size_x # Calculate the wave height based on sine function (wave-like motion) wave_height = math.sin((frame / 10) + (i + j) / 2) new_location = (i * spacing, j * spacing, wave_height * 2) # Update sphere location sphere.location = new_location # Insert a keyframe for the location sphere.keyframe_insert(data_path="location", index=-1)# Adjust camera to have a good view of the animationbpy.ops.object.camera_add(location=(12, -20, 15))camera = bpy.context.objectcamera.rotation_euler = (1.1, 0, 0.8)# Set active camerabpy.context.scene.camera = camera# Add lighting to the scenebpy.ops.object.light_add(type='SUN', location=(15, -10, 20))light = bpy.context.objectlight.data.energy = 5
## Petit robot avec Material#import bpy# Clear the current scene by selecting and deleting all objectsbpy.ops.object.select_all(action='SELECT')bpy.ops.object.delete()# Function to create a material with a given colordef create_material(name, color): mat = bpy.data.materials.new(name=name) mat.diffuse_color = color # RGBA values return mat# Create materials for different parts of the robotbody_material = create_material("BodyMaterial", (0.1, 0.5, 0.8, 1)) # Blueishhead_material = create_material("HeadMaterial", (0.8, 0.8, 0.8, 1)) # Light Greyeye_material = create_material("EyeMaterial", (0, 0, 0, 1)) # Blackarm_leg_material = create_material("ArmLegMaterial", (0.3, 0.3, 0.3, 1)) # Dark Greyantenna_material = create_material("AntennaMaterial", (1, 0, 0, 1)) # Red# Create the robot bodybpy.ops.mesh.primitive_cube_add(size=2, location=(0, 0, 1))body = bpy.context.objectbody.scale = (1, 0.6, 1.5) # Reshape the cube to form the bodybody.data.materials.append(body_material) # Apply material# Create the robot headbpy.ops.mesh.primitive_uv_sphere_add(radius=0.75, location=(0, 0, 3.25))head = bpy.context.objecthead.data.materials.append(head_material) # Apply material# Create the robot eyesfor eye_location in [(-0.3, 0.4, 3.5), (0.3, 0.4, 3.5)]: bpy.ops.mesh.primitive_uv_sphere_add(radius=0.1, location=eye_location) eye = bpy.context.object eye.data.materials.append(eye_material) # Apply material# Create the robot armsfor arm_location in [(-1.5, 0, 1.5), (1.5, 0, 1.5)]: bpy.ops.mesh.primitive_cylinder_add(radius=0.2, depth=2, location=arm_location) arm = bpy.context.object arm.rotation_euler = (0, 1.57, 0) # Rotate to align properly arm.data.materials.append(arm_leg_material) # Apply material# Create the robot legsfor leg_location in [(-0.5, 0, 0), (0.5, 0, 0)]: bpy.ops.mesh.primitive_cube_add(size=0.5, location=leg_location) leg = bpy.context.object leg.scale = (0.3, 0.3, 1) # Reshape to form legs leg.data.materials.append(arm_leg_material) # Apply material# Create the robot antennabpy.ops.mesh.primitive_cylinder_add(radius=0.05, depth=1.5, location=(0, 0, 4.5))antenna = bpy.context.objectantenna.data.materials.append(antenna_material) # Apply material# Create the antenna top spherebpy.ops.mesh.primitive_uv_sphere_add(radius=0.1, location=(0, 0, 5.25))antenna_top = bpy.context.objectantenna_top.data.materials.append(antenna_material) # Apply material# Set up lightingbpy.ops.object.light_add(type='AREA', radius=5, location=(5, -5, 6))light = bpy.context.objectlight.data.energy = 1000 # Increase light intensity# Set up camerabpy.ops.object.camera_add(location=(7, -7, 5))camera = bpy.context.objectcamera.rotation_euler = (1.1, 0, 0.8)# Set the camera as the active camerabpy.context.scene.camera = camera
## Fibonnaci#import bpyimport math# Clear the current scene by selecting and deleting all objectsbpy.ops.object.select_all(action='SELECT')bpy.ops.object.delete()spheres = []def generateSunflowerSpiral(numPoints=1000, spacing=0.4, zHeight=0): points = [] goldenAngle = 137.5 * (math.pi / 180.0); for i in range(numPoints): angle = i * goldenAngle; radius = spacing * math.sqrt(i); x = radius * math.cos(angle); y = radius * math.sin(angle); points.append((x, y, zHeight)); return points;points = generateSunflowerSpiral()for x,y,z in points: # Add a UV sphere bpy.ops.mesh.primitive_uv_sphere_add(radius=0.2, location=(x,y,z)) sphere = bpy.context.object spheres.append(sphere)